The best grow medium for autoflowers is a light, well-aerated soil mix or coco coir blend, with a good-quality pre-amended soil being the easiest default for beginners and coco being the top upgrade for faster, more controlled growth. Autoflowers have a fixed life cycle of roughly 70 to 90 days from seed, which means they have zero tolerance for slow starts caused by compacted, waterlogged, or nutrient-hostile media. Getting the medium right from day one is one of the highest-leverage decisions you'll make for the entire grow.
Best Grow Medium for Autoflowers: Top Choices and Setup

Marcus Holloway
5 Apr 2026
How to choose a grow medium for autoflowers (what matters most)
Autoflowers are not forgiving of slow root development. Because they flower on a timer set by genetics rather than photoperiod, any week lost to root problems, overwatering, or nutrient lockout is a week you cannot recover. That narrows the criteria for a good medium down to three things: oxygen at the root zone, consistent moisture without saturation, and a predictable pH and nutrient environment.
Oxygen is the one most growers underestimate. Iowa State University Extension research shows that overwatered plants tend to push roots toward the surface where oxygen is available, rather than developing throughout the root zone. That shallow root system limits the plant's ability to take up water and nutrients efficiently. Oklahoma State University Extension puts it plainly: roots need air, and compacting your potting media cuts off that oxygen supply. Oregon State University Extension notes that air within the soil matrix provides oxygen for root and microbial respiration, making soil aeration a key factor in plant performance. This is why airy, porous media with good drainage is non-negotiable for autoflowers.
Beyond oxygen, you need to think about how much the medium will buffer pH and nutrients on its own. Soil with compost, castings, and organic amendments acts like a slow-release bank, forgiving mild pH swings and feeding the plant passively for weeks. Coco coir and rockwool do almost none of that, so you take full control of pH and EC with every watering. Neither approach is better in isolation. The right choice depends on your experience level, how much you want to manage daily, and whether you're growing indoors or outdoors.
- Aeration and drainage: target at least 20 to 30% perlite or equivalent in any soil or coco mix
- Moisture retention: enough to avoid drying out in under 24 hours, but never staying wet for more than 2 to 3 days
- pH stability: soil buffers naturally; coco and hydro require active pH management every feed
- Nutrient availability: pre-amended soils feed passively for the first few weeks; coco and hydro need nutrients from the start or very early on
- Container drainage: always use containers with drainage holes at or near the bottom, regardless of medium
Best medium recommendations: soil mixes and pre-made options
For most home growers, a quality pre-amended potting soil is the best starting point. The goal is a mix that is light enough to allow root penetration from day one but has enough organic matter to feed the plant through at least the first three to four weeks without any added nutrients. The worst thing you can do is use dense, heavy garden soil straight from a bag. It compacts in containers, drains poorly, and suffocates young autoflower roots almost immediately.
FoxFarm Ocean Forest and FoxFarm Happy Frog are two of the most consistently recommended pre-made options in the home growing community, and for good reason. Both are built on a base of peat moss for moisture retention, combined with perlite for drainage and airflow, plus earthworm castings, bat guano, and aged forest products for organic nutrient content. FoxFarm's own documentation confirms that the perlite in these mixes creates air spaces for drainage while the peat retains moisture, which is exactly the balance autoflowers need in a container environment.
Ocean Forest runs hotter (higher nutrient concentration) than Happy Frog, so if you're planting directly into it, some growers cut it 30 to 50% with a lighter mix or extra perlite to reduce the risk of nutrient burn on young seedlings. Happy Frog is gentler and works well straight from the bag for autoflower seedlings. Either way, if you want to go deeper on an organic soil approach, pairing these mixes with an organic dry amendment like Dr. Earth fertilizers for autoflowers is a solid and well-tested combination.
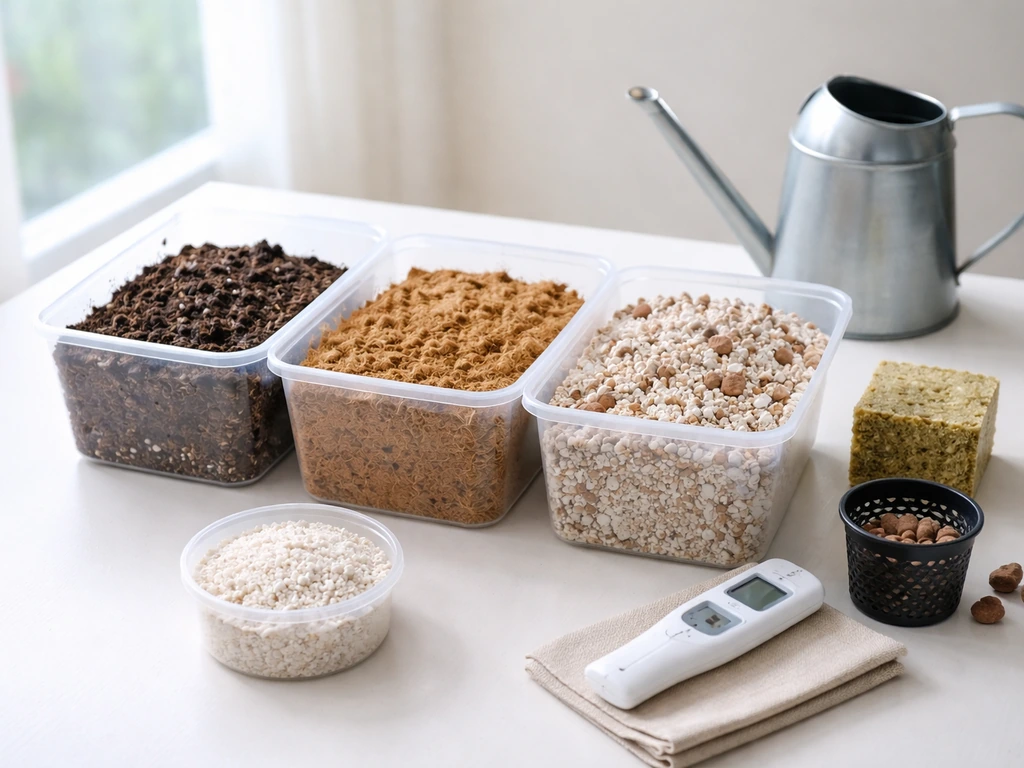
If you want to go fully custom, ATTRA (NCAT) documents that most quality potting mixes are built from peat moss or coir, vermiculite or perlite, limestone (to adjust pH), and sometimes compost. You can replicate a premium soil by mixing two parts peat or coir, one part perlite, and one part high-quality compost or worm castings, then adding a small amount of dolomite lime to stabilize pH. This approach costs less per gallon than branded mixes and lets you dial in the structure exactly. For organic growing, this DIY route pairs naturally with the methods described in a full guide on growing autoflowers organically.
Container size matters here too
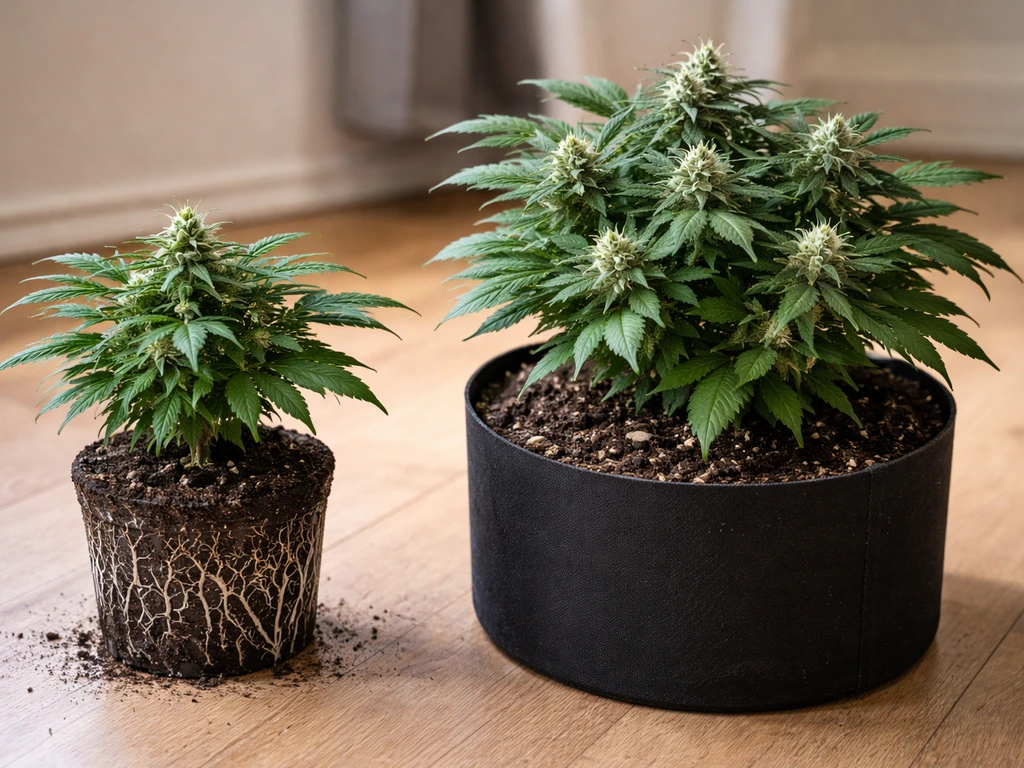
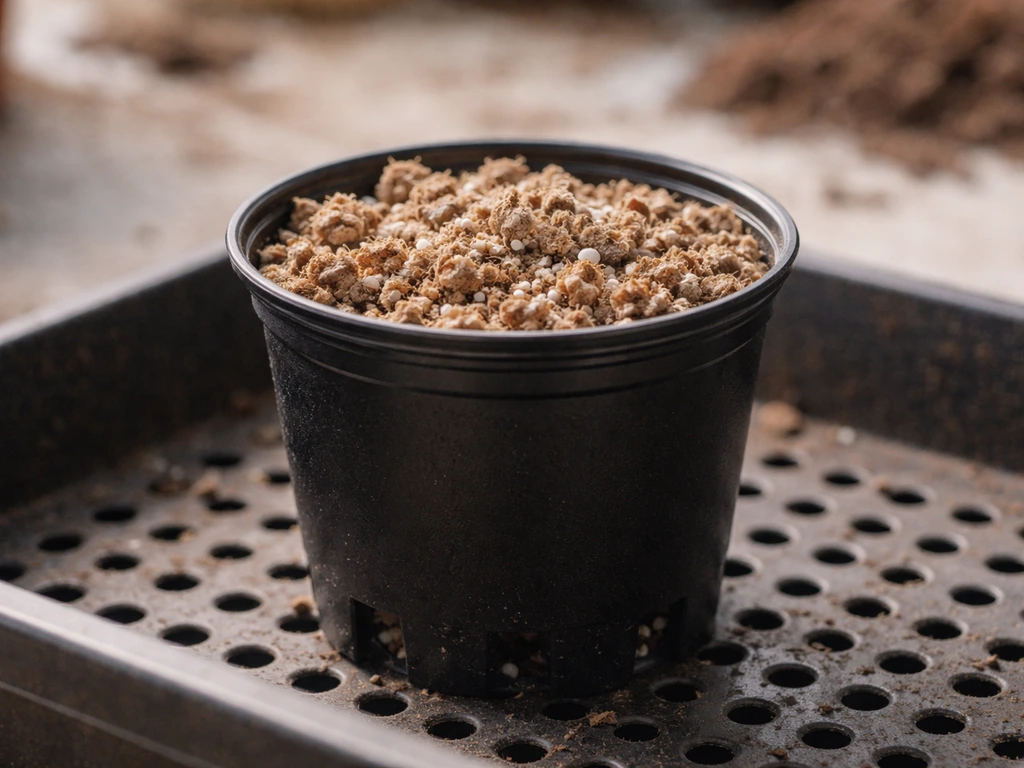
For soil, autoflowers do best in 3 to 5 gallon containers indoors, or 5 to 7 gallon outdoors where they can stretch more. Too small and the roots hit the wall early, limiting yield. Too large and the excess wet soil around undeveloped roots stays saturated, which is one of the most common causes of slow growth in early weeks. Fabric pots are worth the minor extra cost because they air-prune roots and drain faster than plastic, which solves a lot of overwatering problems passively.
Best medium recommendations: coco coir and peat-based blends
Coco coir is the medium I'd recommend to any grower who has one or two soil grows under their belt and wants more control and faster development. It sits right at the crossover between soil and hydroponics. The fibers hold moisture and air simultaneously, giving you frequent watering opportunities without drowning roots. You can water coco daily or even multiple times per day in late flower without the same overwatering risk you'd have in dense soil.
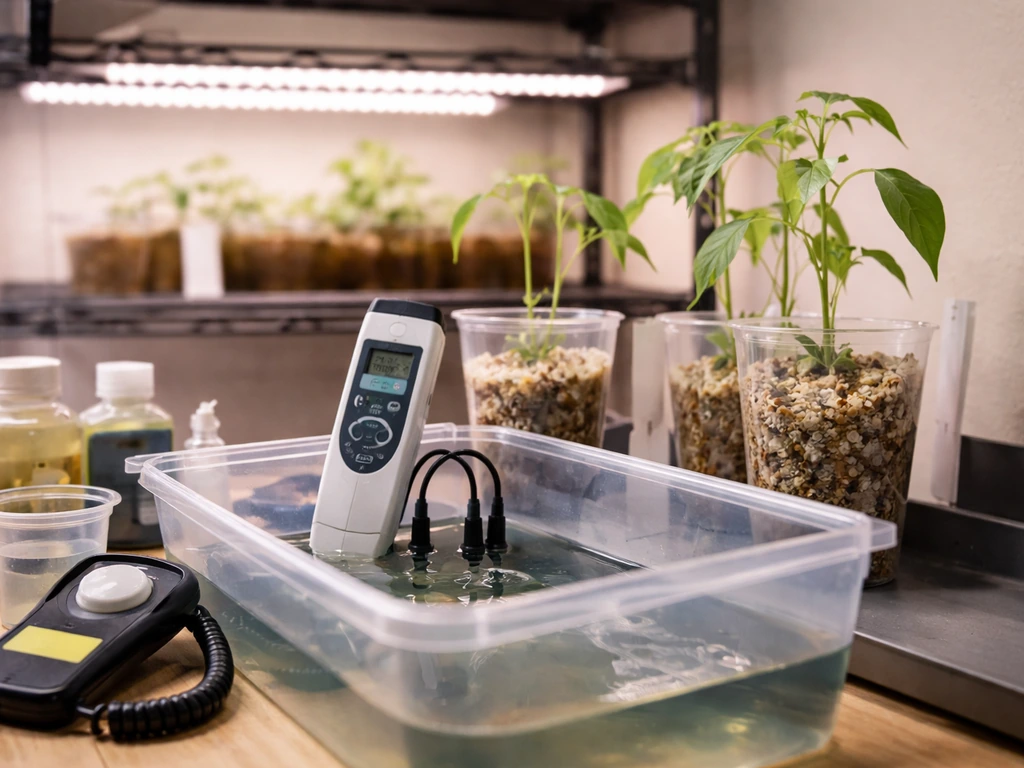
The critical thing about coco is that it does not buffer pH the way soil does. CocoForCannabis is direct about this: coco does not buffer the pH of nutrient solution as effectively as soil, so you are responsible for hitting the right inflow pH every single time you water. The target range for coco is roughly 5.5 to 6.5, with most experienced growers aiming for around 5.8 to 6.0 as a daily average. Cannagardening's coco guidelines list a target pH of 5.5 to 6.2 and EC values of roughly 1.1 to 1.3, which aligns with what most autoflower coco growers report working well. ATAMI's coco grow guide puts the substrate target pH at 5.5 to 6.0 with EC ranging from 1.2 to 2.8 depending on growth stage.
Before you use coco, you need to buffer it. Fresh coco has a natural cation exchange behavior that will pull calcium and magnesium out of your nutrient solution unless you pre-charge it first. The buffering process described by Percys Grow Room involves soaking the coco in a Cal/Mag solution and then rinsing with pH-adjusted water until the runoff EC matches or drops below the EC of your prepared nutrient solution. Biology Insights suggests continuing that rinse until runoff EC falls below about 0.5 to 0.6 mS/cm as a target for a fully stabilized substrate.
Peat-based blends like PRO-MIX fall between straight coco and amended soil on the control spectrum. Premier Tech describes PRO-MIX as a peat-based premium potting mix, with some formulations including coconut coir fiber to increase water holding capacity. These mixes have some pH buffering from the peat and added limestone, but far less than a fully amended soil. They work well for growers who want the lighter texture and faster drainage of coco but with a slightly more forgiving pH environment. You still need to manage pH actively, but the medium itself provides a little more stability between waterings.
Soilless and hydro options: perlite, rockwool, and DWC
Once you move beyond coco, you're in fully soilless territory. These setups remove the medium's role in nutrient delivery almost entirely and put all control in your hands. They can produce faster vegetative growth and bigger yields per square foot, but they punish mistakes quickly and require daily attention.
Perlite-based mixes
Pure or high-percentage perlite (70 to 100% perlite) is used by some advanced growers as a fully inert, soilless medium that drains almost instantly and provides maximum aeration. It holds almost no nutrients on its own, so every watering must include a complete nutrient solution at the correct pH and EC. This is closer to running a hydro system in a pot format. It's fast and responsive but has essentially zero buffer for mistakes.
Rockwool
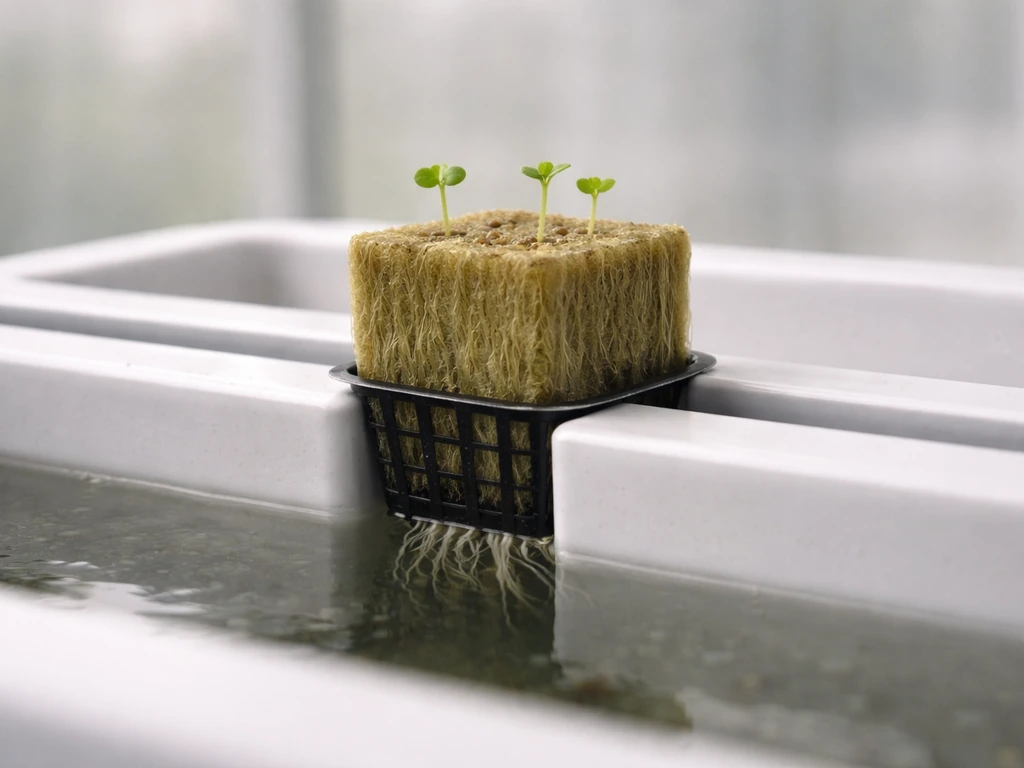
Rockwool is a popular choice for clones and seedlings, and it's used as a standalone medium in many hydro setups. Grodan's official instructions for their rockwool blocks specify saturating the blocks with a balanced nutrient solution at EC 1.5 to 3.0 mS/cm and keeping nutrient solution pH no lower than 5.2. Some growers soak new rockwool slabs for 24 hours in a solution at pH around 4.5 and low EC (0.5 to 0.6) to neutralize the naturally high alkaline pH of fresh rockwool, then stabilize to around pH 5.5 before transplanting seedlings. The Autoflower Network community recommends presoaking rockwool cubes at around pH 5.5 when starting autoflower seeds specifically.
Deep Water Culture (DWC)
DWC suspends plant roots directly in an oxygenated nutrient solution, with no solid medium at the root zone beyond a small net pot and some hydroton or rockwool to anchor the plant. It's the fastest-growing hydro system available and a real option for autoflowers because their short cycle means the speed advantage compounds quickly. If you're interested in running this system, a detailed breakdown of the setup and management is covered in a practical guide to growing autoflowers in DWC.
The two biggest risks in DWC are pH drift and root rot. Soil Free Harvest and Drip Canopy both emphasize checking EC and pH daily in DWC, since the reservoir conditions can shift significantly overnight. Root rot (usually Pythium) is driven by oxygen depletion and warm water. Greenway Biotech confirms that the pathogen thrives when dissolved oxygen drops and water temperature rises. Keeping your reservoir between 18°C and 27°C (roughly 65°F to 80°F) is the standard target for high dissolved oxygen and optimal root absorption. If you do see brown, slimy roots, GrowDoctorGuides recommends a hydrogen peroxide rinse as a treatment approach alongside lowering reservoir temperature.
Medium comparison at a glance
| Medium | pH Buffering | Watering Frequency | Nutrients Needed From | Best For | Difficulty |
|---|---|---|---|---|---|
| Amended soil (e.g., Ocean Forest) | High | Every 2 to 3 days | Week 3 to 4 | Beginners, organic growers | Easy |
| Peat-based blend (e.g., PRO-MIX) | Moderate | Every 1 to 2 days | Week 1 to 2 | Intermediate growers | Moderate |
| Coco coir | Low | Daily to twice daily | From day 1 | Intermediate to advanced | Moderate |
| High-perlite soilless mix | None | Multiple times daily | From day 1 | Advanced growers | Hard |
| Rockwool | None | Managed by feed schedule | From day 1 | Hydro setups, cloning | Hard |
| DWC | None | Continuous reservoir | From day 1 | Advanced, max yield | Hard |
Watering, aeration, and nutrient delivery in practice
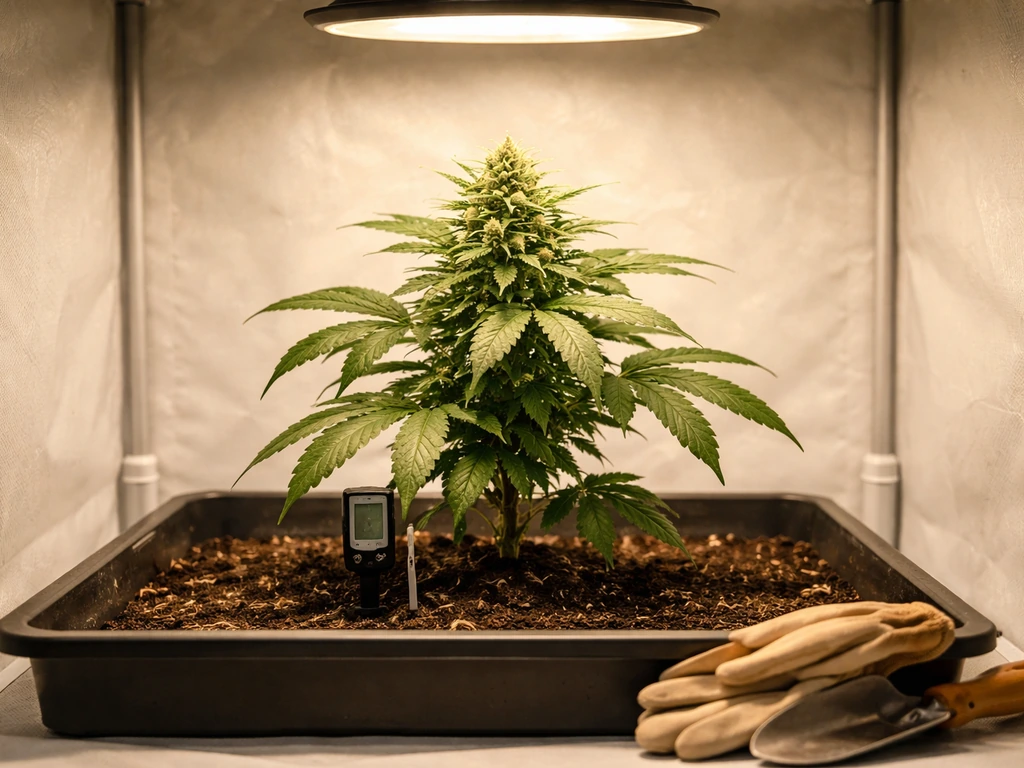
The lift test is the most reliable watering cue across all solid media. Pick up the container after watering and again when you think it needs water. You want to water when it feels noticeably lighter and the top inch or two of medium is dry, but before the plant shows any wilt. In soil, that typically means watering every 2 to 3 days for a young autoflower in a 3-gallon pot under good lighting. As the plant matures and roots fill the container, that frequency increases to daily or close to it.
In coco, daily watering is standard once the plant is past seedling stage. Water until you get 10 to 20% runoff from the bottom of the pot, then stop. That runoff flushes any salt buildup and confirms the medium is saturated evenly. Monitoring your runoff EC is just as important as monitoring inflow EC in coco: if runoff EC is climbing much higher than your inflow EC, you have salt accumulation and need to flush or reduce nutrient concentration. CocoForCannabis makes a useful practical point here: when you need to dilute your nutrient solution to hit a target EC, dilute with Cal/Mag water rather than plain water, since coco is a calcium and magnesium sink.
Aeration in any medium comes down to structure and container choice. The 20 to 30% perlite target mentioned earlier holds for both soil and coco blends. In straight coco, the fiber itself provides good aeration, but many growers still add 10 to 20% perlite to improve drainage speed. In DWC, aeration comes from your air pump and air stones, which need to run 24 hours a day. Skimping on air stone coverage or pump capacity is one of the fastest ways to trigger root rot in a DWC system.
For soil grows, nutrient delivery follows the medium's own schedule: quality amended soils provide nitrogen, phosphorus, potassium, and micronutrients for the first three to four weeks without any added feeding. Transition to light feeding around week three to four, watching for signs of deficiency rather than following a rigid schedule. For coco and hydro, you're feeding from the start, starting at a low EC around 0.5 to 0.8 for seedlings and ramping to 1.2 to 1.8 through veg and early flower, then adjusting based on plant response and runoff readings.
If you're using a slow-release granular product like Grow Dots, the approach differs significantly from liquid feeding schedules. Understanding how to use Grow Dots for autoflowers specifically can simplify the feeding process in soil considerably, since you mix them into the medium at the start and they release nutrients over time.
Common mistakes and troubleshooting by medium
Slow growth and stunted seedlings
Slow early growth in soil is almost always one of two things: overwatering or a medium that is too dense. If you water a small seedling in a large container, the unused outer edges of wet soil stay saturated for days. Iowa State Extension's research confirms that overwatered roots concentrate near the surface where oxygen exists, rather than spreading downward. The fix is to start seedlings in smaller containers (solo cups or 1-gallon pots) and transplant up only once roots are visible at the drainage holes, or to use fabric pots that dry out faster and self-regulate to some degree. For autoflowers specifically, many growers skip transplanting entirely and germinate directly in the final container using a smaller watered zone around the seedling.
Nutrient deficiencies and lockout
In soil, yellowing leaves and spotting in the first two weeks usually point to pH being too high or too low, not to a nutrient shortage. Soil pH should be maintained between 6.0 and 7.0, with 6.2 to 6.8 being the sweet spot for most nutrient availability. In coco, the same symptoms typically mean you're feeding at the wrong pH or you skipped buffering and the medium is stripping calcium and magnesium from your solution. Cannagardening notes that coco can act as a pH buffer to some degree but may require resetting if pH drifts significantly from the target range. Check inflow and runoff pH together before assuming a deficiency is a nutrient problem.
Overwatering in coco vs. soil
Overwatering in coco looks different than in soil. Because coco drains so fast, true overwatering in coco is actually more about watering frequency than volume. If you water coco before it has had any chance to partially dry out, you reduce the oxygen available at the root zone. In clayey, compacted, or permanently wet soils, Colorado State University Extension notes that low oxygen levels in deeper layers often lead roots to grow shallower rather than deeper. The fix is to let coco get to roughly 50 to 60% moisture retention before the next watering rather than watering on a rigid clock schedule. A moisture meter or the lift test both work well here.
DWC root rot and pH crashes
In DWC, root rot appears as brown, slimy roots and a foul smell from the reservoir. By the time you see it, the infection is already advanced. Prevention is far easier than treatment: keep reservoir temperature below 24°C (75°F), run adequate air stones, and change or top off the reservoir regularly to prevent salt buildup and pathogen growth. Greenway Biotech recommends disinfecting all equipment between grows with a 3% hydrogen peroxide solution as a standard hygiene practice. If you catch rot early, a hydrogen peroxide treatment of the reservoir can knock it back, but you also need to address the underlying cause (usually warm water or low dissolved oxygen) or it will return.
Best medium for beginners vs. experienced growers
For beginners: start with a quality amended soil
If this is your first or second grow, use FoxFarm Happy Frog or a similar quality pre-amended potting soil, add 20 to 25% perlite, and put it in a 3 to 5 gallon fabric pot. Maintain pH between 6.2 and 6.8 for your water input, start feeding lightly around week three or four, and use the lift test to guide watering frequency. This setup is forgiving, inexpensive, and still capable of producing excellent results. Following a week-by-week autoflower growing guide alongside your first grow will help you know what to expect at each stage and catch problems before they compound.
For intermediate growers: move to coco
If you've got a successful soil grow behind you and want more control and faster development, coco coir with 10 to 20% added perlite is the upgrade. Buffer it properly before use, dial in your pH to 5.8 to 6.0, start feeding from seedling stage at low EC, and water daily with 10 to 20% runoff. Monitor both inflow and runoff EC and pH consistently. The faster response cycle of coco means you can correct problems quickly, but it also means problems show up faster if you're not watching. Growers chasing maximum yield from specific genetics, like those running a Gorilla Glue autoflower grow, often find coco gives them the edge they need for heavier, denser harvests.
For advanced growers: DWC or soilless systems
If you're comfortable managing daily EC and pH checks, maintaining reservoir temperatures, and troubleshooting fast-moving hydro problems, DWC or high-perlite soilless setups can push autoflowers to their genetic ceiling. These systems reward attention and punish neglect. Container sizing is replaced by net pot sizing (usually 2 to 4 inch net pots in a DWC bucket), and your entire feeding regime is managed through the reservoir. Many growers running these systems are specifically trying to grow bigger autoflowers than they'd typically achieve in soil, and with proper setup, the results can be significantly larger.
Your next step: a simple shopping and setup plan
Pick your medium based on your experience level using the table above, then set up your container and drainage before anything else. Get a pH meter and EC meter regardless of which medium you choose: even in soil, knowing your water input pH saves you from most common deficiency problems. For soil growers, that's honestly most of what you need to get started. For coco and hydro growers, add a Cal/Mag supplement and a complete base nutrient line designed for your chosen medium, then follow a feeding schedule at the lower end of the recommended EC range until you've dialed in your specific genetics and environment.
FAQ
What’s the best grow medium for autoflowers if I don’t want to do daily pH and EC checks?
Choose a medium based on how you’ll measure and respond. If you do not plan to track inflow and runoff pH (especially in coco) or daily EC in hydro, a quality pre-amended soil with added perlite and a fabric pot is usually the lowest-stress path. If you are willing to check EC and pH consistently and adjust quickly, coco or DWC become much more forgiving of slow progress because they respond faster to corrections.
How do I know when to flush in coco, and what should I look for on runoff EC?
In coco, runoff is your safety signal, not just confirmation. If runoff EC rises above inflow EC, you are accumulating salts and the root zone can become nutrient-imbalanced even if the plant “looks fine” initially. In that case, flush with correctly pH’d Cal/Mag water (or dilute your nutrient plan) until runoff EC trends back toward inflow values.
Is buffered coco still risky for pH, and how can I verify it before planting?
Do not assume “pre-buffered” means “ready to water and feed.” Even buffered coco should be tested, because water source and your nutrient line can shift starting conditions. Practical move: after buffering, water with your intended inflow water (including Cal/Mag if you use it) and verify runoff pH and EC stay near your targets before committing to seedling feeding.
What’s the biggest mistake with container size for autoflowers, especially in soil?
Start by matching container size to your watering ability, not your end-of-grow ambition. A common mistake is using a large pot too early, then watering before the whole root ball has developed aeration, which keeps wet media around the seedling. If you start small (for example, 1 gallon or less) and move up only when roots are visible at the drainage holes, you reduce the chance of early oxygen starvation.
My autoflower seedling is yellowing early in soil, does that mean I need more fertilizer?
In soil, yellowing in the first couple weeks is more often a pH or water issue than a pure nutrient shortage, because pre-amended mixes already include an early nutrient bank. Use a pH meter to check inflow, and if possible test runoff. Then correct watering frequency before adding stronger nutrients.
What temperature targets matter most in DWC, and what’s the practical fix if my room is warm?
For DWC, temperature management is a form of root health. Warm reservoirs reduce dissolved oxygen and can push conditions toward rot, even if your pH looks okay. If your room runs warm, the most effective mitigation is chiller or active cooling, and you still need strong air coverage with enough air pump capacity.
If I suspect root rot in DWC, what should I do immediately besides adding peroxide?
Brown, slimy roots usually mean the problem is already advanced, so prevention and early response matter most. If you catch it early, treat the reservoir and immediately correct the cause, typically oxygen and temperature, then disinfect and replace any affected media components if applicable. Do not just rely on peroxide without stabilizing dissolved oxygen and water temps.
In coco, should I water on a strict schedule, or does timing depend on moisture?
Yes, especially in coco, where daily watering is typical once past seedling stage, but the real rule is moisture readiness. Let the coco reach about half-dry (around 50 to 60% moisture retention) before the next watering, using the lift test or a moisture meter. Watering too early can reduce oxygen even though the plant is not “saturated” for long.
How often should I adjust pH if runoff pH keeps drifting in coco?
Don’t overcorrect pH by changing it on every watering. Autoflowers respond to a stable root zone, so aim for your target range and adjust gradually if you see runoff drift. A useful workflow is: calibrate your meters, check inflow pH, measure runoff pH, then change only one variable (nutrient strength or pH correction) and observe the next cycle.
When should I start feeding if I’m using a pre-amended potting soil in a short 70 to 90 day autoflower cycle?
Most “nutrient-free” behavior happens only when the medium itself is amended well and stays correctly aerated. Even in amended soil, the plant’s demand rises fast during stretch, and feeding too late can stall growth. A safe approach is light feeding around week three to four, then increase based on leaf color and any pH adjustments you had to make.
What’s the correct watering method difference between soil and coco (top watering vs full saturation)?
Watering technique changes depending on medium. In soil, water to saturation then stop and let the pot lighten before the next watering. In coco, water until you get meaningful bottom runoff (often 10 to 20%), because that runoff helps flush salts and confirms saturation. Using soil-style “small top-ups” in coco often increases salt buildup.