The best beginner hydroponics grow system right now is a deep water culture (DWC) setup, either a simple bucket kit or a purpose-built grow box that includes everything in one enclosure. You can be up and growing in a weekend for under $100 if you go the DIY route, or spend $200 to $500 on a complete kit that takes most of the guesswork out of your first run. Below is exactly how to choose, set up, and maintain whichever option fits your space and budget.
Hydroponics Grow Systems for Beginners: Setup, Buy List

Marcus Holloway
4 Apr 2026
What hydroponics actually is (and what a grow system includes)
Hydroponics means growing plants in a nutrient-rich water solution instead of soil. The roots get everything they need: minerals, water, and oxygen delivered directly rather than having to search through soil for them. That directness is why hydroponics can grow plants 30 to 50 percent faster than soil under the same conditions. If you want a deeper dive into the theory before you shop, a good beginner's walkthrough of hydroponics fundamentals is worth reading alongside this guide.
A complete hydroponic grow system is made of several parts working together. Understanding each one helps you shop smarter and troubleshoot faster when something goes wrong.
- Reservoir: the container that holds your nutrient solution (water + dissolved minerals)
- Water pump or air pump: circulates or aerates the solution so roots get oxygen
- Tubing and fittings: connect the pump to the growing site and back to the reservoir
- Growing medium: the physical material that holds your plant in place (clay pebbles, rockwool, coco coir)
- Net pots: mesh cups that hold the medium and sit your plant over the nutrient solution
- Nutrient solution: a two- or three-part liquid concentrate you mix into the reservoir water
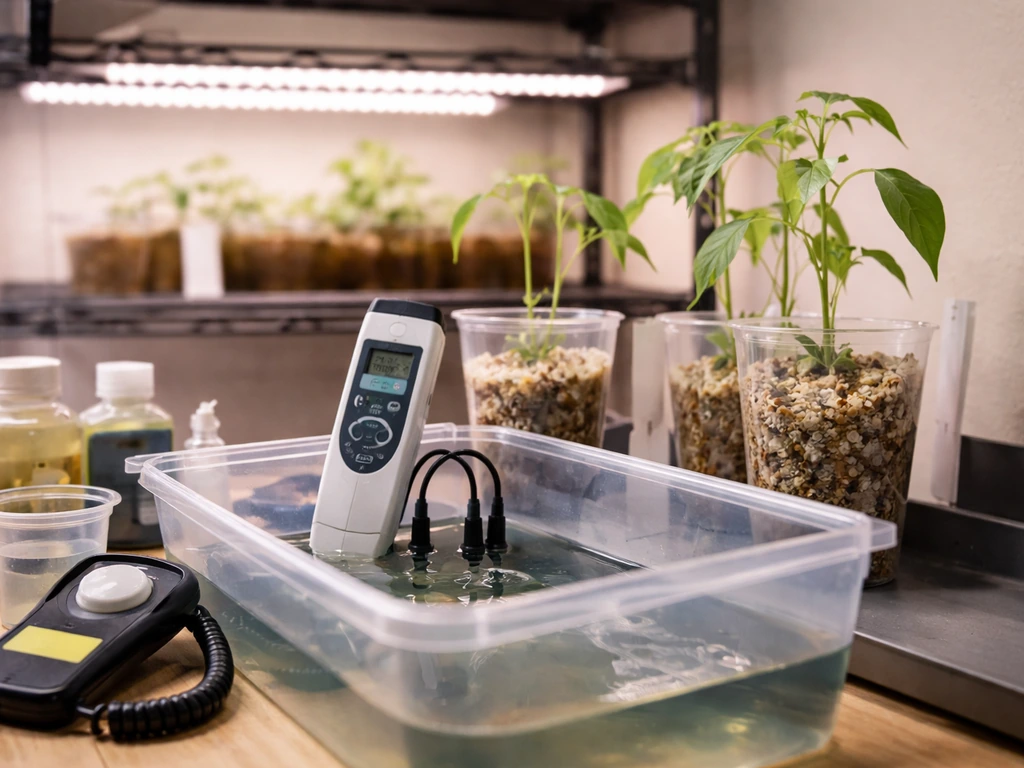
- pH and EC meters: instruments you use to monitor water chemistry every few days
- Lighting: required for indoor grows; grow boxes often include this built in
- Timer: automates pump cycles in ebb-and-flow and drip systems
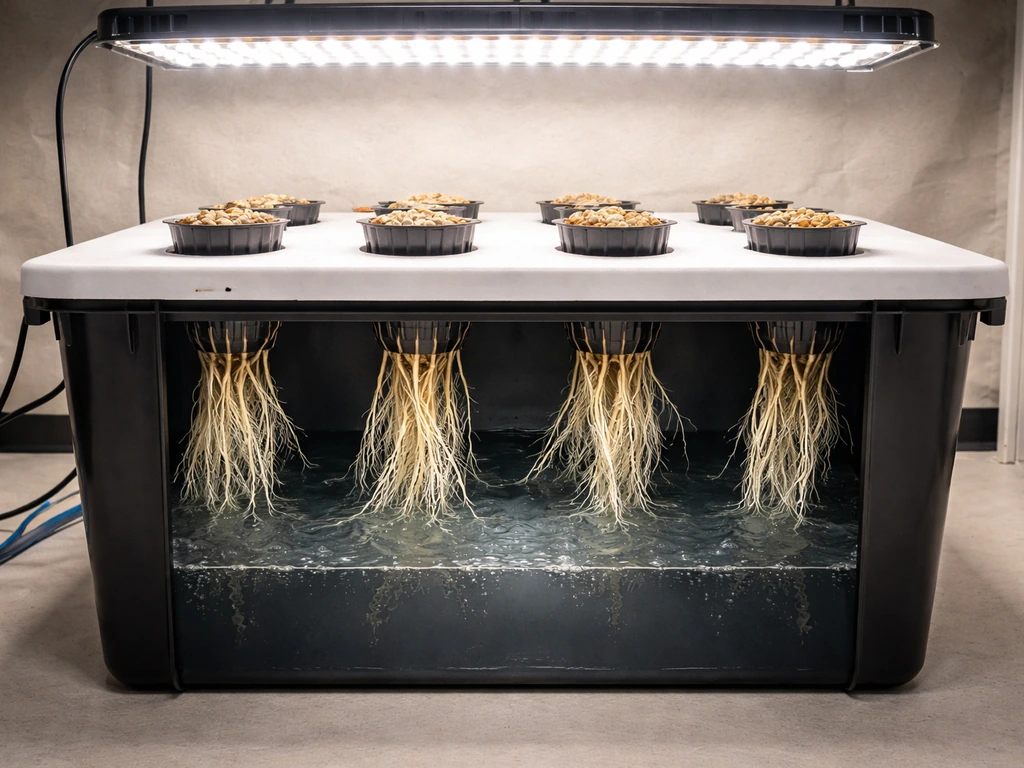
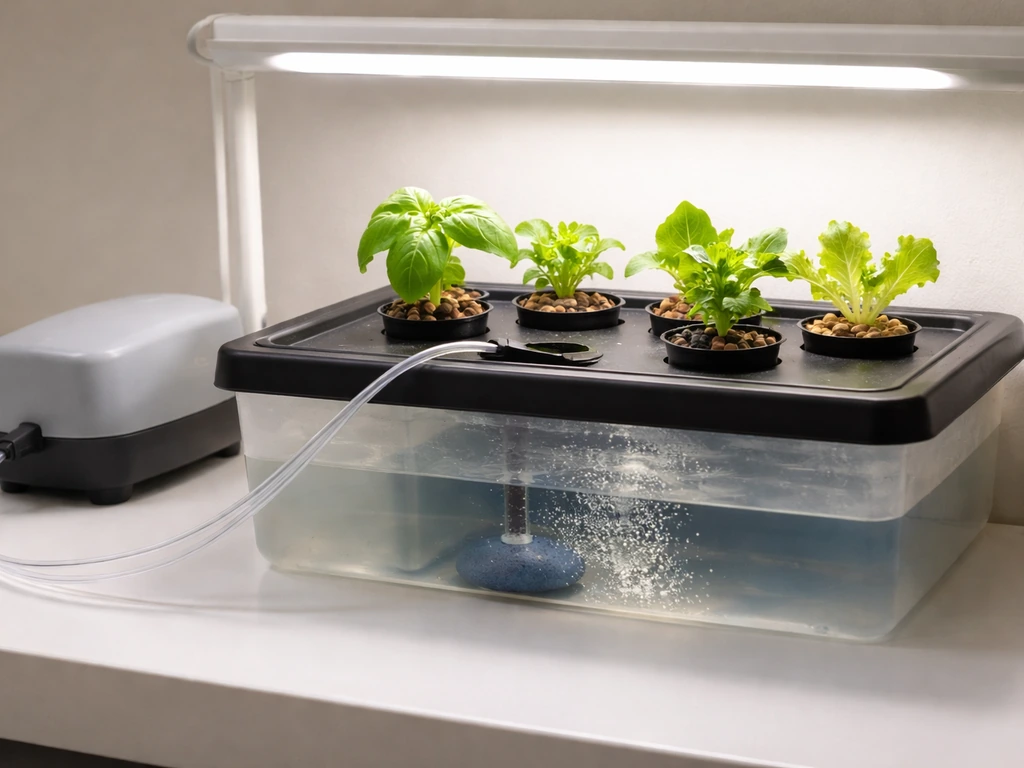
The four system types beginners most commonly encounter are wick, deep water culture (DWC), nutrient film technique (NFT), and ebb-and-flow (flood-and-drain). Wick systems use capillary action to pull solution to roots with no pump at all, making them the absolute simplest but also the slowest and least scalable. DWC suspends roots directly in aerated, oxygenated nutrient solution using an air pump and airstone. NFT runs a thin, continuous film of nutrient solution along a sloped channel past the roots. Ebb-and-flow periodically floods a grow tray and then drains it back to a reservoir on a timer cycle. For most beginners, DWC offers the best balance of simplicity, visibility, and plant response speed.
Grow box vs. open system: which setup is right for you
This is the first real decision you need to make. A grow box (also called a grow tent enclosure with integrated hydro hardware, or a fully enclosed cabinet system) bundles lighting, ventilation, odor filtration, and sometimes a built-in reservoir into one contained unit. An open system is a reservoir, pump, and net pot setup in an open space, usually a garage, basement, or spare room where you supply the lighting and environmental controls separately.
The main advantage of an enclosed grow box is environmental control. Light leaks are sealed, temperature and humidity are easier to manage, and the integrated ventilation keeps heat from stacking up around your plants. That matters a lot for indoor grows where ambient room temperature, humidity swings, and light pollution from windows or room lighting could otherwise interfere. Grow boxes also dramatically reduce the chance of algae growing in your reservoir, since light exposure to nutrient solution is one of the primary triggers for algae and biofilm problems.
The tradeoff is cost and flexibility. A quality enclosed box setup starts around $200 to $250 and can run much higher for larger units. An open DWC bucket setup can be built for $60 to $80 in parts. If you have the budget and want a low-drama first grow with everything integrated, go with a box. If you want to learn the mechanics hands-on and don't mind sourcing parts separately, an open DWC system teaches you more and costs less.
| Feature | Grow Box / Enclosed System | Open / DIY System |
|---|---|---|
| Starting cost | $200–$500+ | $60–$150 |
| Built-in lighting | Usually yes | No, you source separately |
| Environmental control | High (sealed, ventilated) | Low to moderate (room dependent) |
| Algae/light leak risk | Low (sealed reservoir/enclosure) | Higher without careful light management |
| Setup complexity | Low to moderate | Moderate (more parts to source) |
| Scalability | Limited by enclosure size | Easier to expand |
| Best for | Apartment growers, odor-sensitive spaces, beginners who want plug-and-play | Garage/basement growers, hands-on learners, budget-conscious beginners |
My honest recommendation: if you're growing cannabis or other plants where odor and light control matter, the grow box is worth the extra cost on your first run. If you're starting with leafy greens or herbs in a basement or garage, an open DWC system gets you growing faster and cheaper. You can find a detailed rundown of current top-rated options in this comparison of the best hydroponics grow systems on the market right now.
What you need to buy, what it costs, and how to set it up
Parts list for a beginner DWC setup
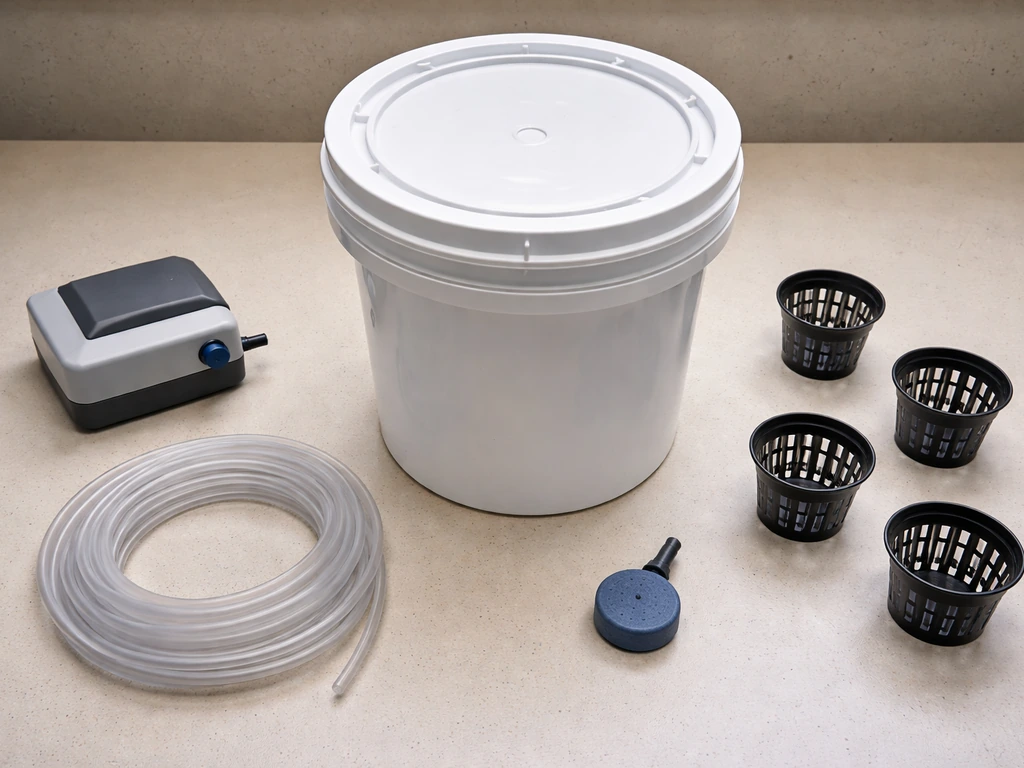
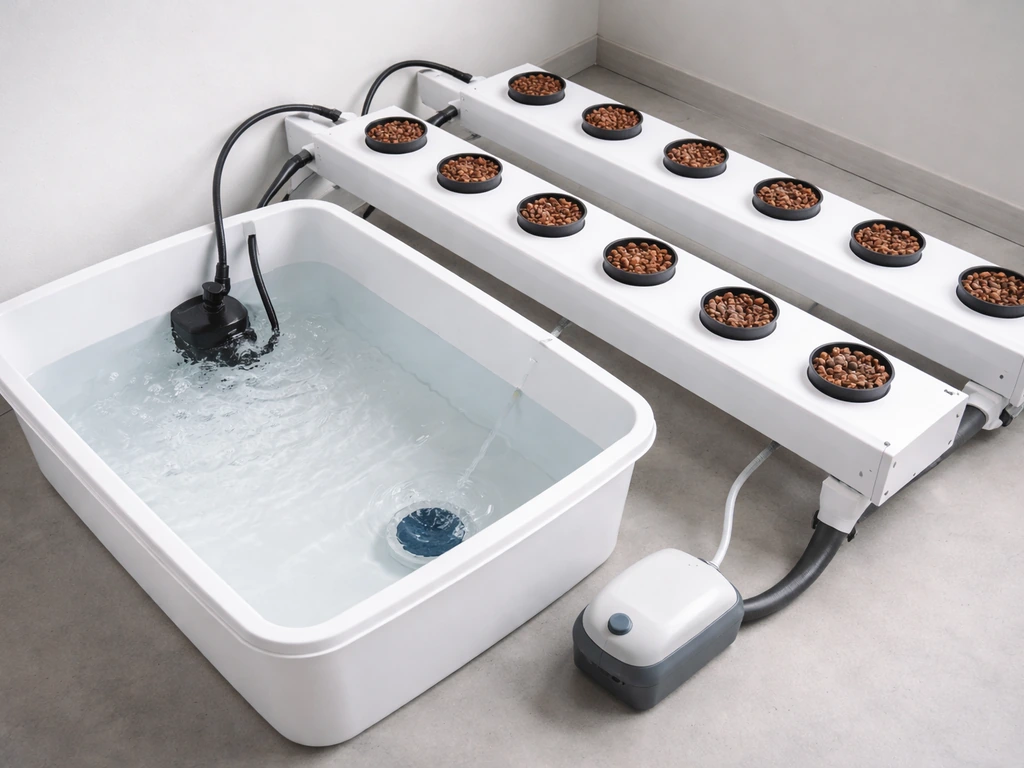
- 5-gallon opaque bucket with lid (opaque blocks light, critical for algae prevention): $5–$8
- Air pump rated for the bucket size (e.g., a single-output 3W pump for a 5-gallon): $10–$15
- Airstone and tubing (comes with most air pump kits): included or $5
- 2-inch net pots (3 to 4 per lid, depending on crop): $5 for a pack of 10
- Clay pebbles (hydroton) or rockwool starter cubes: $10–$15
- Two-part or three-part liquid nutrients (e.g., General Hydroponics Flora Series): $25–$40
- pH meter and calibration solution: $15–$30
- EC/TDS meter: $10–$20
- pH Up and pH Down solutions: $10–$15
- LED grow light (if indoor, open system): $40–$120 depending on coverage area
Total for a basic open DWC system without a light runs $80 to $100. With a quality LED panel for a 2x2 ft space, expect $130 to $200. A prebuilt all-in-one grow box with hydro hardware and lighting runs $200 to $500 for beginner-scale units. If you plan to grow cannabis specifically, there are purpose-built systems worth comparing, and this guide to the best hydroponic grow systems for cannabis covers those options in detail.
Step-by-step setup for a DWC bucket system
- Cut net pot holes in the bucket lid using a hole saw or sharp knife, sized to match your net pots (typically 2-inch).
- Drill a small hole near the top of the bucket for the air tubing. Feed the tubing through, attach the airstone inside at the bottom of the bucket, connect the other end to your air pump outside the bucket.
- Fill the bucket with water to about 1 inch below the bottom of the net pots. This air gap is important: roots should not be submerged at the seedling stage; they grow down to the water as they develop.
- Mix your nutrient solution according to the manufacturer's feed chart for the vegetative stage. General Hydroponics Flora Series feed charts give stage-by-stage EC targets you can follow directly.
- Check pH after mixing nutrients. Adjust to the 5.5 to 6.5 range using pH Up or pH Down (add a few drops at a time, stir, and recheck before adding more).
- Check EC with your TDS/EC meter. For seedlings and leafy greens, target EC 1.2 to 1.6 mS/cm. Increase to 1.8 to 2.2 mS/cm once plants are in active vegetative growth.
- Place rockwool starter cubes or clay-pebble-filled net pots into the lid. If starting from seed, pre-soak your rockwool cube in pH-adjusted water (pH 5.5) before planting.
- Run the air pump continuously so the solution stays oxygenated at all times.
- If using a separate grow light, hang it at the manufacturer's recommended height above the canopy and set a timer (18 hours on / 6 hours off for vegetative growth).
- Monitor pH and EC every 2 to 3 days. Top off with plain pH-adjusted water between reservoir changes, and do a full reservoir change every 7 to 14 days.
Nutrients, pH, and water quality: what beginners actually need to know
This is where most beginners either nail it or slowly kill their plants without knowing why. Hydroponics requires you to manage plant nutrition actively, because there's no soil buffering chemistry the way there is in a living soil bed. That said, it's not complicated once you understand the three things to watch: pH, EC, and water quality.
pH: the most important number in your reservoir
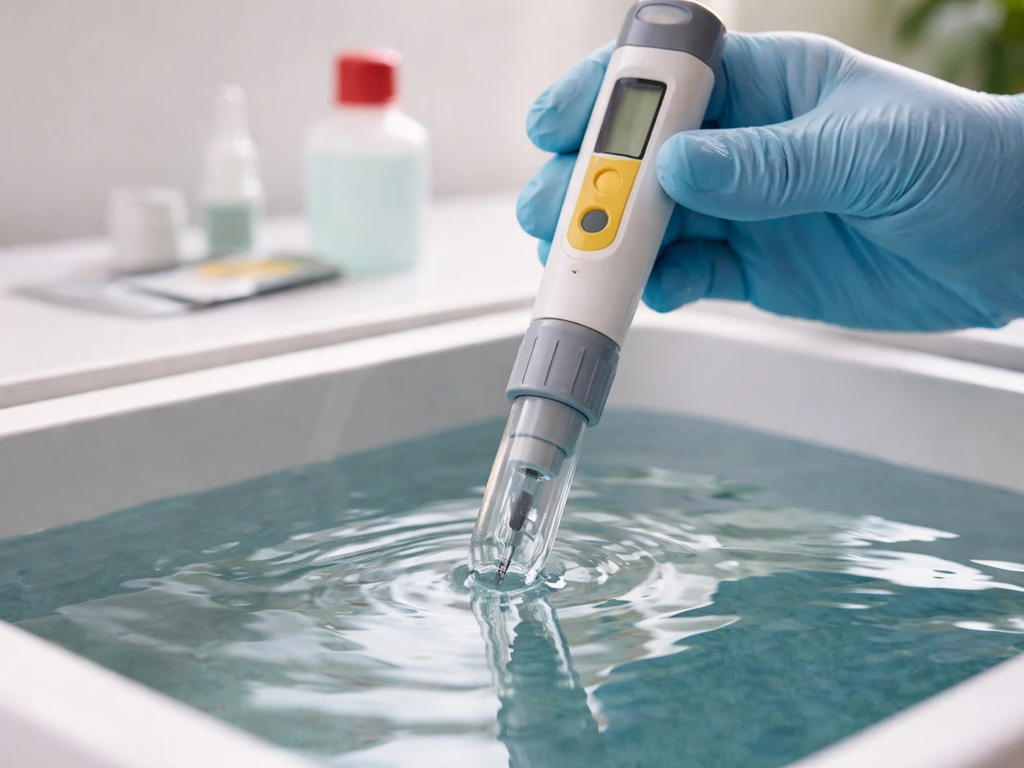
Keep your reservoir pH between 5.5 and 6.5. Outside that range, nutrients become chemically unavailable to roots even if they're present in the water at the right concentration. This is called nutrient lockout, and it looks like deficiency symptoms even when your EC reads fine. When lockout occurs, the fix is to flush the root zone with fresh pH-balanced water and then reintroduce a fresh, properly mixed solution. Always adjust pH gradually using pH Up and pH Down solutions, adding just a few drops at a time, stirring thoroughly, and rechecking before adding more. Never dump in a large amount at once or you'll swing past your target and create more instability.
Calibrate your pH meter before use and regularly during your grow using a standard reference calibration solution. Pure Hydroponics also sells Bluelab pH calibration solutions for 4.0 and 7.0 and recommends using them to improve calibration accuracy standard reference calibration solution. An uncalibrated or drifting pH meter is one of the most common reasons beginners have persistent pH problems they can't seem to fix.
EC: measuring nutrient solution strength
EC (electrical conductivity) measures the total dissolved mineral content in your solution, which is a reliable proxy for nutrient strength. Leafy greens and herbs run well at EC 1.2 to 2.0 mS/cm. Fruiting plants and cannabis require higher EC in the 1.8 to 2.5+ range during peak vegetative and flowering stages. blank" rel="noopener noreferrer">Use a manufacturer feed chart as your starting reference, then adjust based on how your plants respond. A detailed hydroponic grow guide will show you exactly how to scale EC through different growth stages.
Water quality and chlorine removal
Standard tap water contains chlorine and chloramine, disinfectants that are added by municipalities to kill microbes. In a hydroponic system those same chemicals can harm root health and kill beneficial microbial populations. For small systems, letting tap water sit uncovered for 24 hours will off-gas most chlorine, but it won't remove chloramine, which is increasingly common in municipal water supplies. The reliable fix is either a dedicated dechlorination product (sodium thiosulfate drops, available cheaply from aquarium suppliers) or, for the cleanest possible starting water, a reverse osmosis filter. RO water removes chlorine, chloramine, and most other contaminants, giving you a near-zero starting EC so you control exactly what goes into your nutrient solution from scratch.
Oxygenation and water temperature
In a DWC system, the air pump and airstone run continuously for a reason: plant roots need dissolved oxygen to function. When oxygen drops, roots suffocate, turn brown and slimy, and root rot sets in fast. Warm water holds less dissolved oxygen than cool water, so if your reservoir temperature climbs above 72 to 75°F (22 to 24°C), you're compounding the risk. Keep your reservoir in a cool location or use a small aquarium chiller if needed, and never let your air pump run intermittently. On the question of whether the extra complexity of hydroponics is worth it compared to soil, a direct comparison of hydroponic vs. soil growing can help you weigh the tradeoffs for your specific situation.
Which plants to start with and how to match them to your system
Start with forgiving, fast-cycling crops. Leafy greens are the gold standard for first-time hydroponic growers: lettuce, spinach, kale, basil, and Swiss chard all grow quickly, show you visible results in 2 to 3 weeks, and tolerate minor pH and EC fluctuations better than fruiting plants. They also run at low EC (1.2 to 2.0 mS/cm), which is easier to maintain and less punishing if you overshoot slightly.
Herbs like basil, cilantro, and mint are nearly as forgiving and grow well in a small DWC bucket or NFT channel. If your goal from day one is cannabis, a DWC or NFT system works well, but the higher EC requirements and longer growth cycle mean there's less margin for chemistry mistakes early on. Get one crop of leafy greens through your system first to build confidence with pH and EC management, then transition to a more demanding crop.
| Crop | Best System Type | Target EC (mS/cm) | Difficulty |
|---|---|---|---|
| Lettuce / Spinach | DWC, NFT, Wick | 1.2–1.6 | Easy |
| Basil / Herbs | DWC, NFT | 1.4–1.8 | Easy |
| Kale / Swiss Chard | DWC, Ebb-and-Flow | 1.6–2.0 | Easy-Moderate |
| Tomatoes / Peppers | DWC, Ebb-and-Flow, Drip | 2.0–3.5 | Moderate |
| Cannabis | DWC, NFT, Ebb-and-Flow | 1.8–2.5+ (stage-dependent) | Moderate-Advanced |
| Cucumbers | DWC, NFT | 1.8–2.5 | Moderate |
For seedling starts in any of these crops, rockwool cubes are the most reliable beginner choice. Pre-soak them in pH 5.5 water for at least 30 minutes before planting a seed or clone cutting. Once roots emerge from the cube and reach the nutrient solution level, growth accelerates noticeably. Growing medium choice matters more than most beginners expect, and if you want to compare rockwool against clay pebbles and coco coir in more depth, a dedicated hydroponic grow book recommendation can give you a comprehensive reference to keep on hand throughout your grow.
Maintenance, troubleshooting, and the mistakes that kill beginner grows
Your ongoing maintenance routine
- Every 2 to 3 days: check pH and EC, top off with plain pH-adjusted water if level has dropped, adjust pH if it has drifted outside 5.5 to 6.5
- Every 7 to 14 days: full reservoir change with freshly mixed nutrient solution
- Weekly: visually inspect roots for color (white and healthy vs. brown and slimy), check tubing and pump for blockages
- Monthly (or between crops): fully drain and clean reservoir, tubing, net pots, and airstone with a dilute hydrogen peroxide solution (3 percent H2O2) to remove biofilm and mineral buildup
The most common beginner problems and how to fix them

Root rot is the most feared beginner problem, and it's almost always caused by one of three things: warm reservoir water, insufficient aeration, or light leaking into the reservoir and feeding algae growth. The fix is straightforward: keep water below 72°F, run the air pump continuously, and make sure your reservoir is fully opaque (wrap it in black poly film if it's translucent). If you already have brown, slimy roots, remove the plant, rinse roots gently with clean pH-balanced water, dose the reservoir with a small amount of 3 percent hydrogen peroxide (about 1 to 3 mL per liter), and improve your aeration immediately.
Algae and biofilm showing up in your reservoir or tubing is a sign of a light leak. Even a small crack around a net pot or a clear section of tubing exposed to your grow light is enough. Cover all light entry points with black tape or opaque covers. Once algae is established, drain and clean the entire system before resuming.
Nutrient lockout shows up as yellowing leaves, purple stems, or deficiency symptoms despite a well-mixed reservoir. If your pH is drifting outside 5.5 to 6.5, that's almost certainly your culprit. Recheck your pH meter calibration, perform a full reservoir change with fresh solution, and adjust pH precisely before returning plants to the system.
pH instability that keeps drifting upward after you adjust it is normal in systems with active roots, because plants consume nutrients selectively and their uptake changes the solution chemistry. If you're checking every 2 to 3 days and making small adjustments, you'll stay ahead of it. If pH is swinging dramatically between checks, do a full reservoir change and verify your water quality. Hard tap water with high alkalinity will constantly push pH upward; this is a strong argument for using RO or dechlorinated, softened water as your base.
Clogged tubing and pump failure are mechanical problems beginners sometimes ignore until a plant is already stressed. Check your pump's output weekly by listening for bubbling at the airstone and watching solution movement. Mineral buildup in tubing can be cleared by flushing with a dilute citric acid solution, then rinsing thoroughly with clean water before returning to nutrient solution.
The best way to build confidence fast is to treat your first grow as a learning run, document your pH and EC readings in a simple notebook or spreadsheet, and follow the maintenance schedule strictly for the first 30 days. Most beginner failures aren't caused by complicated problems. They're caused by skipping checks for a week and coming back to a pH of 7.2 and a dead airstone. Stay consistent and your system will reward you with faster, healthier growth than you'd ever get from soil in the same timeframe.
FAQ
How long should I wait after mixing nutrients before measuring pH and EC again?
Start with a small test batch (even 1 to 2 gallons) and mix nutrients exactly to the EC range for your crop, then recheck pH and EC after 15 to 30 minutes. If the numbers drift quickly, your water base or mixing order is off, and fixing it in a test batch is cheaper than losing a reservoir worth of solution.
How many plants can I safely run in a beginner DWC bucket without running into trouble?
For DWC, most beginners avoid growing too many plants at once because oxygen demand rises quickly. If you are using a bucket or tote, keep plant numbers low enough that the roots stay well suspended and you can maintain reservoir temperature under 72 to 75°F. A crowded system often looks like nutrient deficiency, but the root cause is usually reduced oxygen plus warmer water.
How often should I calibrate my pH meter, and what signs mean it is failing?
Calibrate pH less often than beginners think, but do it reliably: calibrate before you start a grow and whenever you notice “impossible” pH behavior (like readings that keep jumping after small adjustments). Use fresh calibration standards, and store the meter properly between checks so the probe does not dry out.
Will high-alkalinity tap water make pH impossible to keep stable in hydroponics?
Yes, especially if you rely on tap water. If your water has high alkalinity, pH tends to climb even after you correct it. Using RO or a consistent dechlorinated base water (and tracking alkalinity-like behavior by observing how fast pH rises) helps you stop chasing symptoms and instead stabilize your baseline.
What should I do before the first grow to prevent early algae or biofilm?
Clean water in, clean system parts matter. Before a first run, rinse and sanitize the reservoir, lids, tubing, and air stones, then run the system with dechlorinated water for 24 hours and confirm temperature and airflow are stable. This reduces “mystery” algae and biofilm that often appear right away in new setups.
My air stone is bubbling, but the roots still look stressed. What else should I check for oxygenation?
In DWC, oxygenation is not just about running the pump, it is also about airflow delivery. Make sure the air stone is fully submerged, and confirm bubbling is visible and consistent across the stone. If bubbles are weak, replace the stone or check airline blockages before changing nutrients or pH.
Is hydrogen peroxide safe to use in a DWC system, and can I keep using it if problems return?
Dose hydrogen peroxide carefully and treat it as a one-time rescue, not a routine chemical. Use the small amounts recommended for root-zone treatment (about 1 to 3 mL per liter of a 3 percent solution), then improve aeration and light control immediately. After the root issue improves, return to your normal nutrient schedule rather than repeatedly dosing.
What is the right cleanup process when algae or biofilm comes back?
If you smell a strong “sour” odor or see slimy biofilm on tubing, draining alone may not be enough. You should disassemble and clean affected tubing sections, scrub the reservoir surfaces, and replace any porous parts that trap residue (like worn air stones). After cleaning, restart with fresh, properly prepared solution and monitor pH for the first day.
When I see yellow leaves, should I adjust EC or pH first?
Do not wait until plants are fully yellow to act. A practical approach is to check pH, then EC, then water temperature on the same day you see symptoms. If pH is out of range, correct it gradually and refresh the solution if it has been sitting too long, then reassess leaf color after 12 to 24 hours.
How do I handle power outages or pump interruptions in a beginner DWC setup?
If you stop aeration even briefly, damage can start quickly in DWC because roots rely on dissolved oxygen. As a beginner safeguard, plug the pump into a timer that is always on, or use a dedicated outlet without accidental power cycling. If power fails, restart aeration immediately when power returns and check roots the same day.
What routine checks prevent clogged tubing and pump problems before plants are stressed?
Do a weekly “mechanics check” rather than guessing: confirm visible movement at the airstone, inspect tubing for mineral buildup, and verify any valves or fittings are secure. If you use a pump that is not rated for continuous duty, consider upgrading early, because intermittent or underpowered pumps are a common beginner failure mode.
How should I start EC for seedlings in rockwool so I do not shock them?
If you are using rockwool, you can reduce early nutrient shock by pre-soaking at pH 5.5, then starting with a lower EC than you would for mature growth. Once roots reach the nutrient solution level and are established, gradually increase EC toward your target range instead of jumping straight to peak numbers.