Hydroponics is faster, more controlled, and more productive per square foot than soil growing, and you can set up a working system at home this week without a massive budget or an engineering degree. The core idea is simple: instead of letting plants pull nutrients from soil, you deliver exactly what they need directly to the roots through water. That precision is what makes hydroponics so powerful, and also what trips up beginners who skip the fundamentals. This guide walks you through every step, from picking your first system to harvesting your first crop, with the specific numbers and routines you actually need.
Grow Guide Hydroponic: Step-by-Step Setup, pH, EC, and Troubleshooting

Marcus Holloway
7 Apr 2026
Pick your hydroponic system and setup goals
Before you buy anything, get honest about your space, budget, and how hands-on you want to be. A spare bedroom closet, a garage corner, or a spare bathroom all work. What matters most at this stage is matching the system type to your reality, not chasing the "best" option in theory.
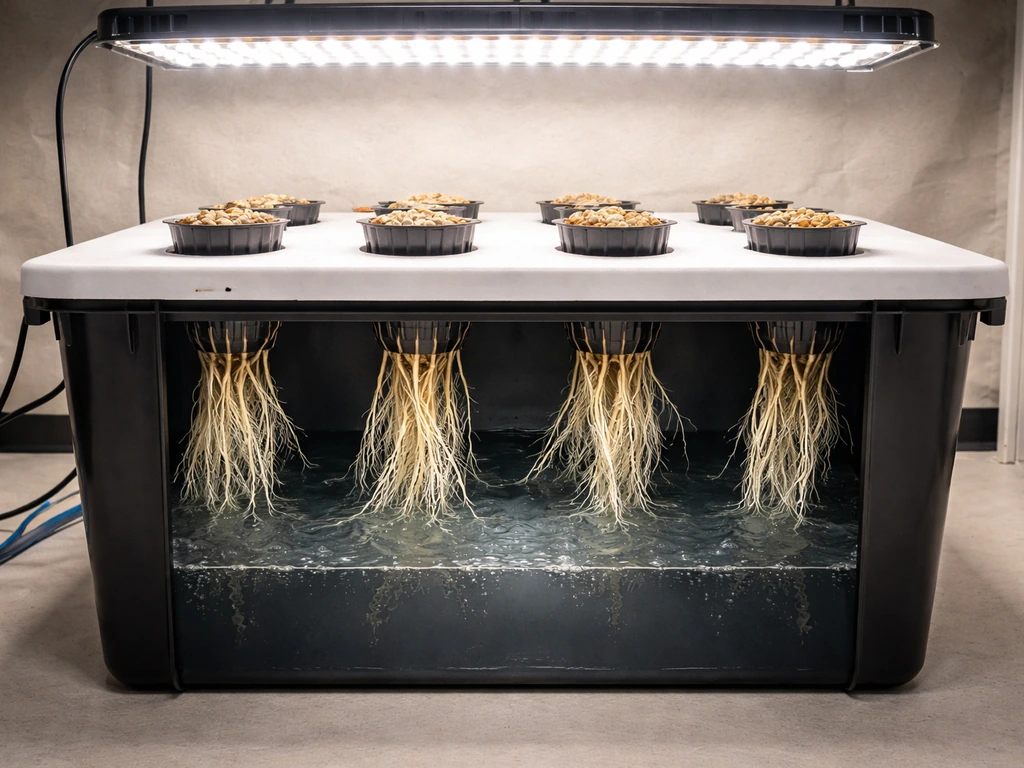
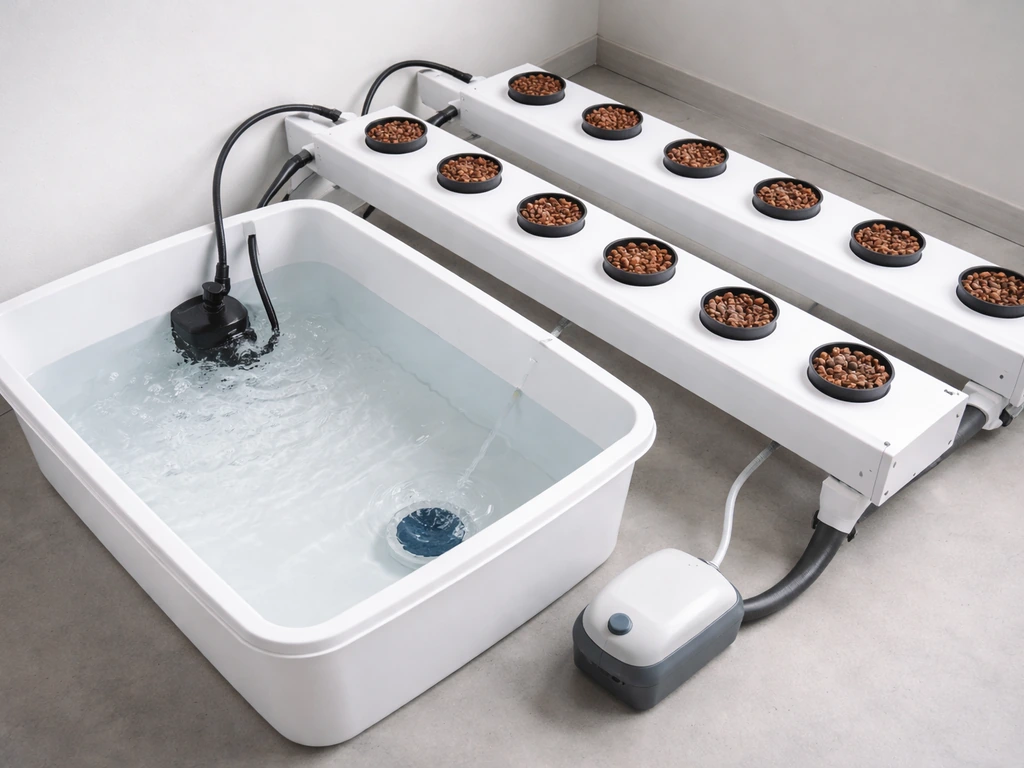
There are six main hydroponic system types you'll encounter: Deep Water Culture (DWC), Nutrient Film Technique (NFT), Ebb and Flow (flood-and-drain), Kratky (passive, no pump), Drip systems, and Aeroponics. Each has real trade-offs. Here's how they stack up:
| System | Skill Level | Cost to Start | Best For | Main Weakness |
|---|---|---|---|---|
| Deep Water Culture (DWC) | Beginner-friendly | Low ($30–$100 DIY) | Leafy greens, cannabis, tomatoes | Pump failure = fast root death |
| Kratky (passive DWC) | Absolute beginner | Very low ($10–$40) | Lettuce, herbs, small plants | Not suitable for heavy feeders |
| NFT (Nutrient Film Technique) | Intermediate | Medium ($100–$300) | Lettuce, strawberries, herbs | Clogs easily, no buffer if pump fails |
| Ebb and Flow | Intermediate | Medium ($150–$400) | Variety of crops, versatile | More parts to maintain |
| Drip System | Intermediate to advanced | Medium-high ($200–$500+) | Tomatoes, peppers, large plants | Emitters clog without filtration |
| Aeroponics | Advanced | High ($400–$1,000+) | Fast growth, R&D growers | Complex, punishing if something fails |
For most home growers starting out, DWC or Kratky is the right call. DWC puts roots in an oxygenated nutrient reservoir with an air pump and airstone keeping dissolved oxygen high. Kratky skips the pump entirely and relies on a gap of air between the water surface and net pot, which works brilliantly for lettuce and herbs but doesn't have enough oxygen delivery for thirstier plants. If you want to explore the full range of ready-to-run options, checking out the best hydroponics grow systems is a useful next step before you commit to a purchase. And if you're completely new to this, the purpose-built kits covered in hydroponics grow systems for beginners remove a lot of the guesswork on component selection.
Set your goals clearly before spending money. Are you growing leafy greens for the kitchen year-round? Do you want to grow cannabis? Are you trying to maximize yield per square foot or just experiment? Your goal determines your system, your light, and your timeline. Mixing goals early (e.g., trying to grow tomatoes, lettuce, and cannabis in the same reservoir) is one of the most common beginner mistakes. Each crop wants a different nutrient strength and sometimes different pH, so keep it simple: one crop type per reservoir when you're starting.
Choose crops and match them to the right hydroponic style
Not every plant thrives in every hydroponic system, and matching plant type to system type is one of the highest-leverage decisions you'll make. Here's a practical breakdown of what grows well where:
- Lettuce, spinach, kale, and most leafy greens: ideal for Kratky, DWC, or NFT. These are the easiest crops in hydroponics. They have low nutrient demands, short cycles (30–45 days from seedling to harvest), and are extremely forgiving of minor pH swings.
- Herbs (basil, cilantro, mint, parsley): work well in DWC or NFT. Basil in particular thrives with slightly warmer root temperatures (68–75°F). Mint is aggressive and best kept in its own system.
- Strawberries: excellent in NFT channels or vertical tower systems. They prefer EC around 1.4–2.0 dS/m and do well with slightly cooler root zones.
- Tomatoes and peppers: best in DWC, drip, or ebb-and-flow. These are heavy feeders and need strong root support; they are not suited for Kratky beyond early stages. Expect 60–90+ days to harvest.
- Cannabis: performs exceptionally well in DWC, with many growers also using ebb-and-flow or drip setups for larger plants. For a thorough rundown of setups purpose-built for this crop, the best hydroponic grow system for weed guide covers the specific options in detail.
- Cucumbers and beans: possible in DWC or drip, but need vertical trellis support and strong nutrient programs. Better suited for intermediate growers.
Variety selection matters too. Within each crop category, look for varieties bred for indoor or container growing. Determinate tomato varieties like 'Bush Early Girl' or 'Tumbling Tom' stay manageable in indoor hydro setups. For lettuce, loose-leaf varieties like 'Black Seeded Simpson' or 'Buttercrunch' outperform iceberg types in DWC because they don't need the same root mass. Compact herb varieties outperform full-size ones in smaller systems. The general principle: choose varieties that stay smaller, mature faster, and tolerate humidity, because indoor hydro spaces tend to be humid and warm.
Water, pH, EC, and your nutrient regimen
This is the most important section in this guide. More hydroponic grows fail because of pH and nutrient mismanagement than any other cause. Get this right and you're 80% of the way to success.
Start with your water source
Tap water works for most home growers, but you need to know what's in it. Hard water (high calcium and magnesium) means you may need to reduce those elements from your nutrient formula. Heavily chlorinated water should sit out for 24 hours or be treated with a campden tablet before use, since chlorine can suppress beneficial root biology. If your tap water comes in above 0.5 EC on its own, account for that when calculating your final solution strength. Reverse osmosis (RO) water gives you a clean baseline but strips everything, so you'll need to add a cal-mag supplement.
pH targets and how to hit them
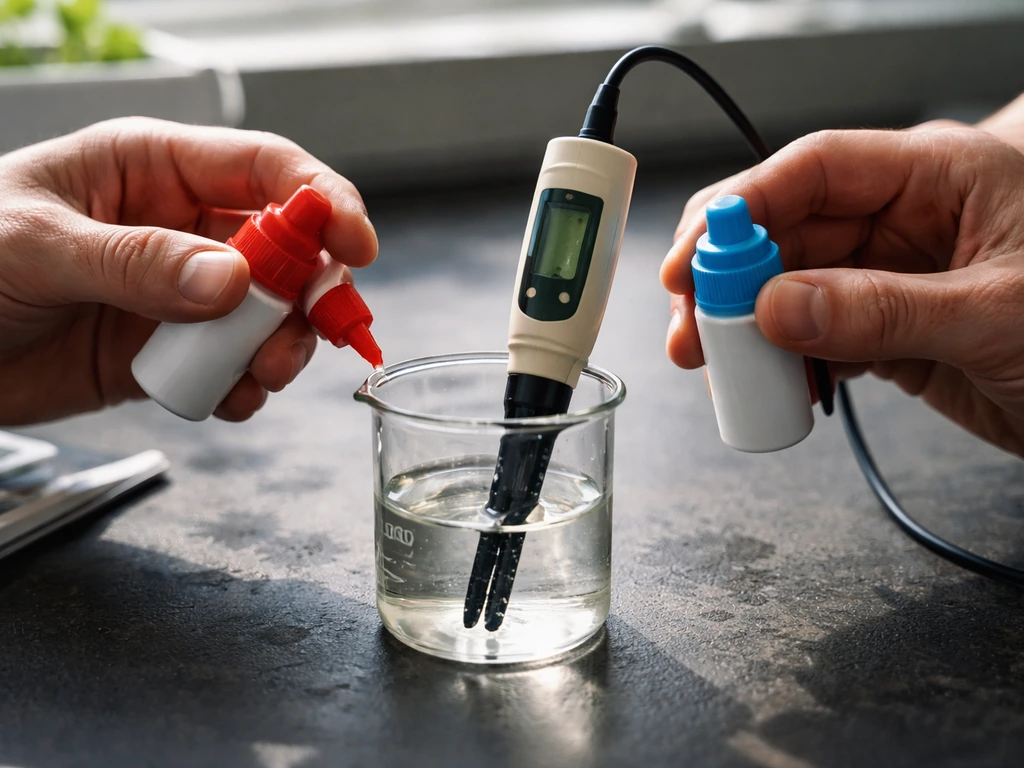
blank" rel="noopener noreferrer">Oklahoma State University Extension recommends maintaining hydroponic nutrient solution pH between 5.0 and 6.0, with around 5.5 being the common target, and keeping root-zone pH around 6. Oklahoma State University Extension recommends that for hydroponic nutrient solutions, pH should be about 5 to 6 (usually around 5.5), while the root environment is maintained around pH 6.0 to 6.5 blank" rel="noopener noreferrer">keeping root-zone pH around 6. 0 to 6.5. These ranges matter because nutrient availability is directly tied to pH. Iron and manganese become unavailable above 6.5. Calcium and magnesium get locked out below 5.5 in some systems. The sweet spot for most crops is 5.8 to 6.2. Adjust pH after mixing nutrients, not before. General Hydroponics specifically advises mixing your nutrient solution first and then bringing pH to your target range, since the nutrients themselves shift pH significantly.
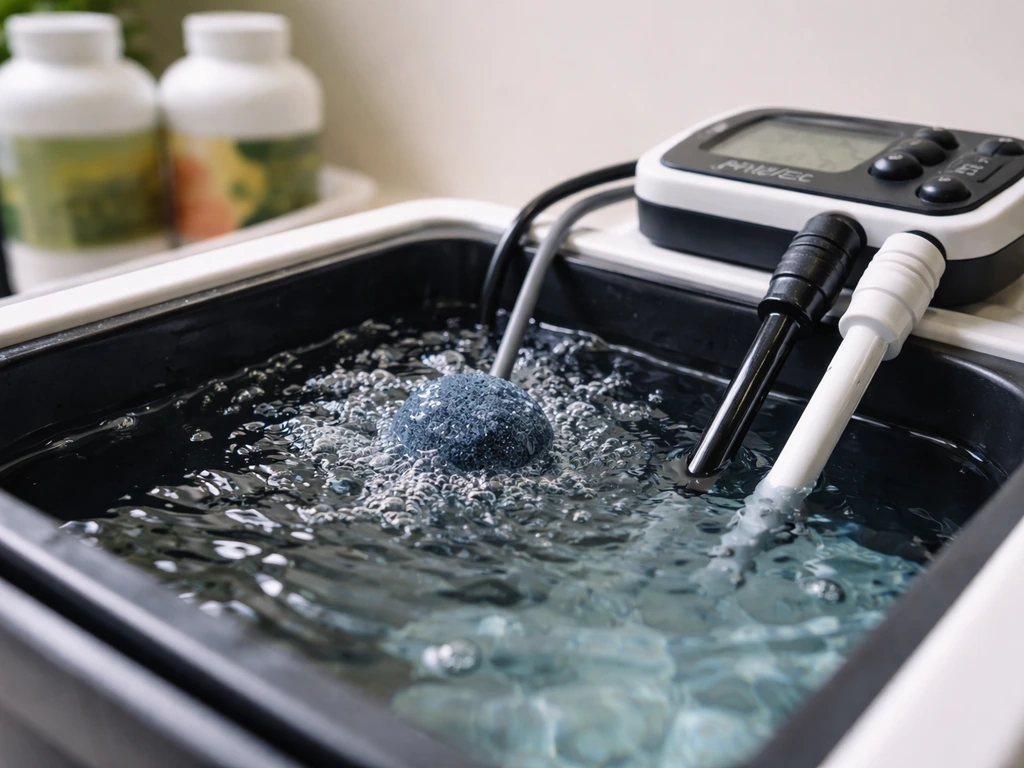
To raise pH, use pH Up (potassium hydroxide-based). To lower it, use pH Down (phosphoric or citric acid-based). Always add these in small drops and retest. You'll need a reliable pH meter. Do not rely on cheap paper strips for hydroponics; they are not accurate enough. A decent digital pH pen runs $20 to $60 and is essential.
EC (electrical conductivity) and nutrient strength
EC measures how much dissolved salts (nutrients) are in your solution. Higher EC means stronger nutrient concentration, but more is not always better. OSU Extension recommends an EC of 1.5 to 3.0 dS/m for hydroponic culture, with the right point within that range depending on crop and growth stage. Seedlings and young plants need weaker solution (0.8 to 1.2 dS/m). Vegetative growth sits well at 1.5 to 2.0. Fruiting and flowering plants can handle 2.0 to 3.0. Cannabis in late flower often runs up to 2.5 dS/m. General Hydroponics advises using a weaker solution than you might expect, especially when starting out, because over-feeding causes more damage than under-feeding in most home setups.
OSU notes that EC meters typically range from $100 to $500 for professional-grade options, but home growers can find reliable combined pH/EC pens for $50 to $100 that work perfectly well. Calibrate your meters weekly with calibration solution to keep readings accurate. A meter that drifts by 0.3 pH units will quietly wreck your grow.
What to mix and in what order
The safest nutrient approach for beginners is a three-part liquid system (Grow, Bloom, Micro) or a two-part system (A and B). The golden rule: never mix concentrates directly together. Always add each concentrate separately to your reservoir water. Mixing concentrates causes precipitation, where calcium and phosphate bond together and fall out of solution, locking out nutrients before your plants ever see them. The correct order is: fill reservoir with water, add Part A (or Grow), stir, add Part B (or Bloom/Micro), stir, then adjust pH. Check EC after mixing to confirm you're in the right range before adding plants.
Lighting, environment, and airflow basics
Your plants can have perfect nutrients and pH and still fail if the light is wrong, the temperature is off, or the air isn't moving. These three factors work together, so treat them as a system rather than isolated settings.
Lighting: spectrum, intensity, and duration
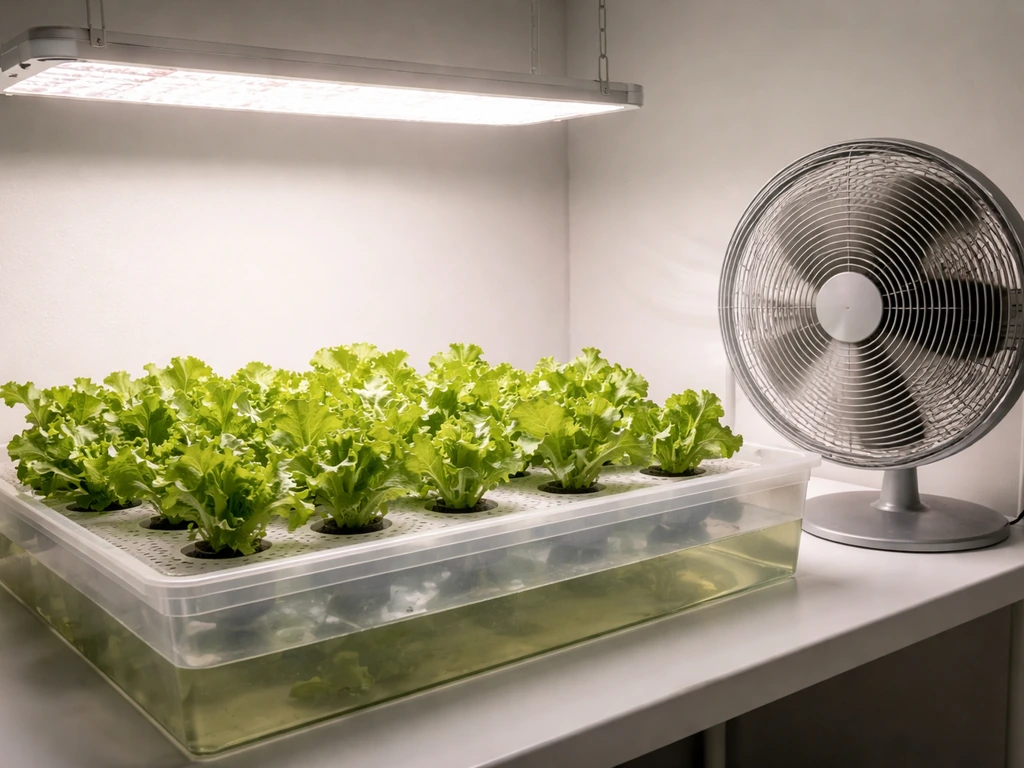
For indoor hydroponics, LED grow lights are now the clear choice for most home growers. Modern full-spectrum LEDs (quantum board style) deliver efficient photons across both the blue (vegetative) and red (flowering) spectrum without the heat of older HPS or MH fixtures. For leafy greens and herbs, you need roughly 200 to 400 PPFD (micromoles per square meter per second) at canopy level. Tomatoes, peppers, and cannabis in flower want 600 to 1,000+ PPFD. Light duration matters too: most leafy greens do well at 16 hours on / 8 hours off. Cannabis in vegetative growth runs 18/6, then switches to 12/12 to trigger flowering. Use a mechanical or digital timer so your light schedule is consistent every single day. Inconsistent photoperiods stress plants and, in cannabis, can cause hermaphroditism.
Temperature and humidity
Most hydroponic crops prefer air temperatures between 65°F and 80°F (18°C to 27°C) during lights-on. Root-zone temperature is equally important: keep your reservoir between 65°F and 72°F (18°C to 22°C). Warm reservoirs (above 75°F) hold less dissolved oxygen and breed pythium (root rot) faster than almost any other single factor. If your grow space runs hot, a small aquarium chiller or frozen water bottles can bring reservoir temps down. Relative humidity ideally sits at 50 to 70% during vegetative growth and drops to 40 to 50% during flowering to reduce mold risk.
Airflow and CO2
Every indoor grow needs active airflow. At minimum, run an oscillating fan that gently moves all leaves. This does three things: strengthens stems through mechanical stimulation, prevents humid stagnant pockets where mold starts, and replenishes CO2 at the leaf surface. For sealed or nearly-sealed rooms, you'll need an intake fan bringing in fresh air and an exhaust fan (usually with a carbon filter for odor control) moving stale air out. A good rule of thumb: exchange the room's air volume completely once every 1 to 3 minutes under high light and heat. For most home grow tents (2x4 ft or 4x4 ft), a 4-inch or 6-inch inline fan handles this comfortably.
Planting method, growing medium, and seeding
Hydroponics uses either an inert medium to support roots in net pots, or no medium at all (as in NFT and aeroponic systems). Your choice of medium affects how you water, how you transplant, and what problems you're likely to encounter.
Common growing media compared
| Medium | Best Systems | pH Neutral? | Reusable? | Notes |
|---|---|---|---|---|
| Rockwool (stonewool) | DWC, drip, NFT | No (pre-soak to 5.5) | No | Excellent seedling starter; pre-soak 24hrs in pH 5.5 water |
| Hydroton (LECA / clay pebbles | DWC, ebb-and-flow, drip | Yes | Yes (rinse well) | Great drainage and oxygen; rinse to remove dust first |
| Coco coir | Drip, hand-watered, ebb-and-flow | Close (5.5–6.5) | No | Behaves like soil but is inert; needs cal-mag |
| Perlite | Often blended with coco | Yes | No | Cheap, good drainage; used in blends not usually alone |
| No medium (bare root) | NFT, DWC, Kratky, aeroponics | N/A | N/A | Roots hang directly in solution or mist; very efficient |
For DWC and Kratky, clay pebbles (hydroton/LECA) in net pots are the most practical choice. They're pH-neutral, reusable after cleaning, and provide excellent root aeration. For drip systems or ebb-and-flow, coco coir gives you more buffer and forgiveness if your irrigation schedule slips, which is why many intermediate growers prefer it. For seedling propagation across almost any system, rockwool cubes are the go-to: easy to use, widely available, and roots transfer cleanly into net pots.
How to start seeds or clones in hydroponics
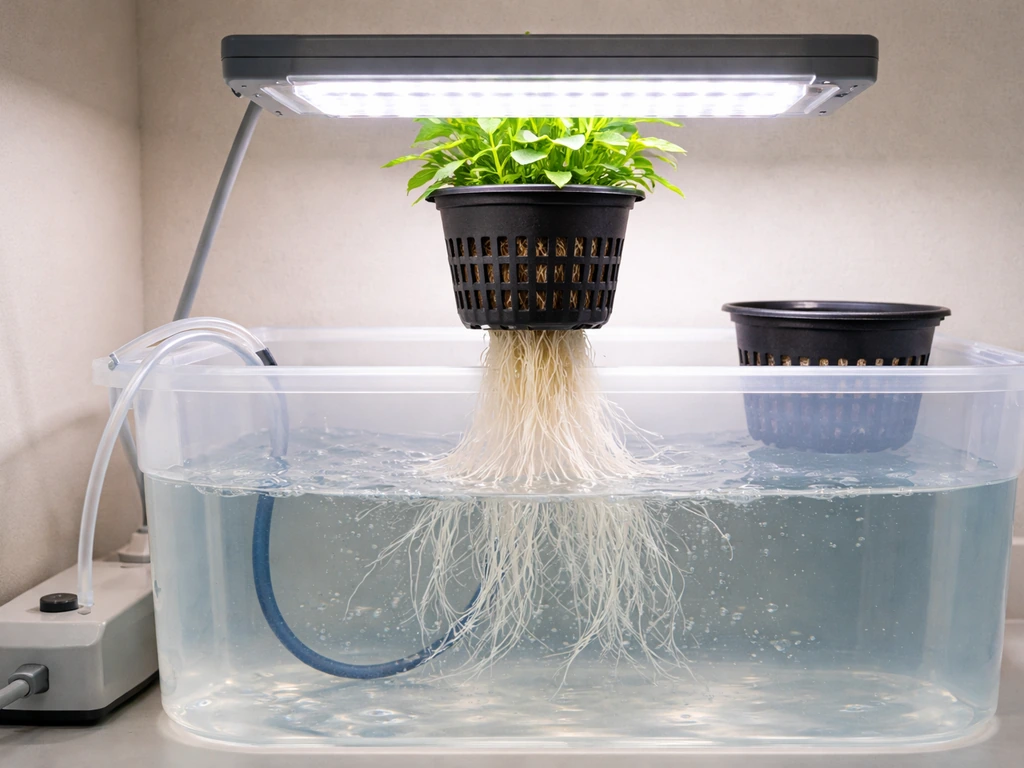
For seeds: soak rockwool cubes in pH 5.5 water for 30 minutes, then place one seed per cube about 5mm deep. Keep cubes in a warm (75–80°F), humid environment (a seedling dome works perfectly) under low light (18 hours) until the seed germinates, usually 3 to 7 days. Once the seedling has its first set of true leaves and roots are poking from the cube, transplant it into your net pot with clay pebbles and lower it into your reservoir. In DWC, the water level should just barely touch the bottom of the net pot at first, then drop 1 to 2 inches below as roots extend into the solution.
For clones: root cuttings in rockwool or a dedicated clone collar with a cloning machine or simple humidity dome. Clones skip the seed germination phase entirely and give you a genetic copy of a proven plant, which is particularly useful in cannabis growing. Transplant once roots are 1 to 2 inches long and white. Avoid brown or slimy roots at transplant; that's pythium already.
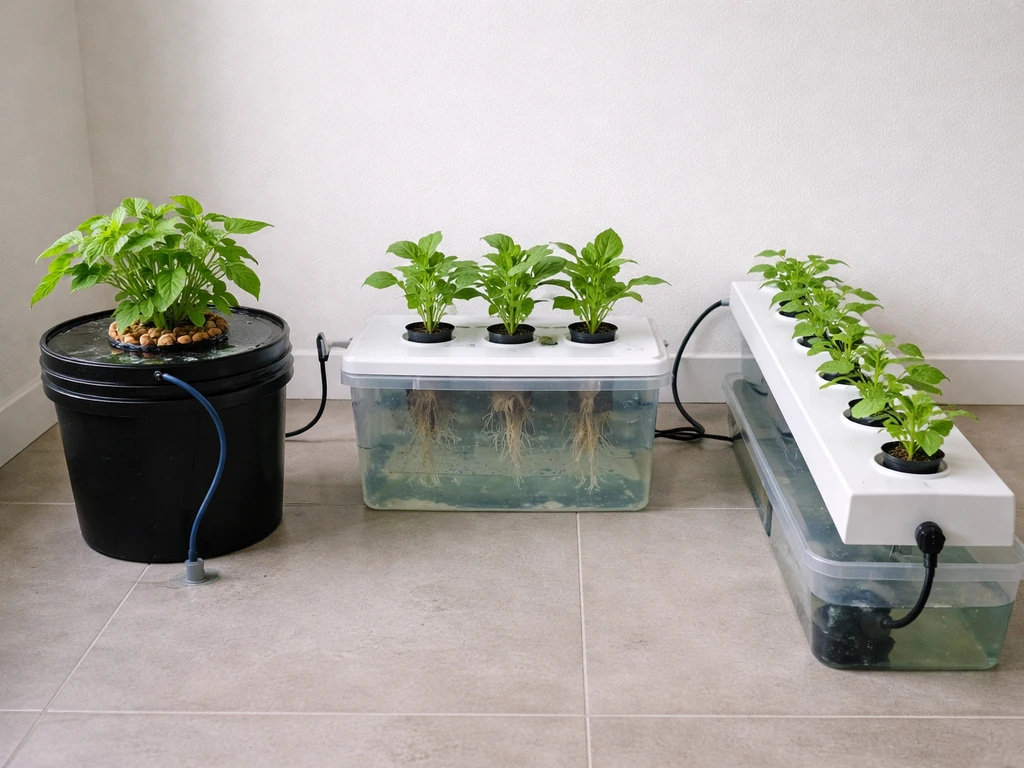
Hydro vs. soil: what actually changes for the grower
If you've grown in soil before, hydroponics will feel more active and more precise. Soil buffers a lot of mistakes because organic matter and beneficial microbes convert nutrients into plant-available forms over time, giving you a margin for error. In hydroponics, you are the buffer. There's no soil biology to correct your mistakes, so pH swings and EC spikes hit plants directly and fast. That said, the rewards are real: hydroponic plants typically grow 20 to 50% faster than soil-grown equivalents, and you have direct, instant control over what your plants receive. For a fuller picture of the trade-offs before you commit, the breakdown in this hydroponic vs soil grow comparison is worth reading. The core takeaway: hydroponics rewards consistency and attention; soil rewards patience.
Your maintenance routine and how to fix common problems
A hydroponic system needs regular, lightweight attention rather than occasional heavy interventions. The growers who succeed are the ones who check their system daily (which takes 5 to 10 minutes) rather than the ones who try to set-and-forget.
Daily and weekly routine
- Daily: Check water level in reservoir and top off with pH-adjusted plain water (not full nutrient solution) to compensate for plant uptake and evaporation. Plants drink more water as they grow larger, so monitor closely.
- Daily: Observe plant leaves and stems. Yellowing, curling, spots, or wilting are early warning signs. Catch problems here before they escalate.
- Every 2–3 days: Test pH and EC with your meters. pH tends to drift up over time as plants consume nutrients. Adjust back to your target range as needed.
- Weekly: Do a partial reservoir change (25–50%) to prevent salt buildup and reset your nutrient baseline. This is especially important in small reservoirs.
- Every 2–3 weeks: Do a full reservoir drain and refill with fresh nutrient solution. Clean reservoir walls with 3% hydrogen peroxide if you see any algae or slime.
- Monthly (or between crops): Deep-clean your entire system, including pumps, tubes, airstones, and net pots, with diluted bleach or hydrogen peroxide solution. Rinse thoroughly before reusing.
Troubleshooting the most common problems
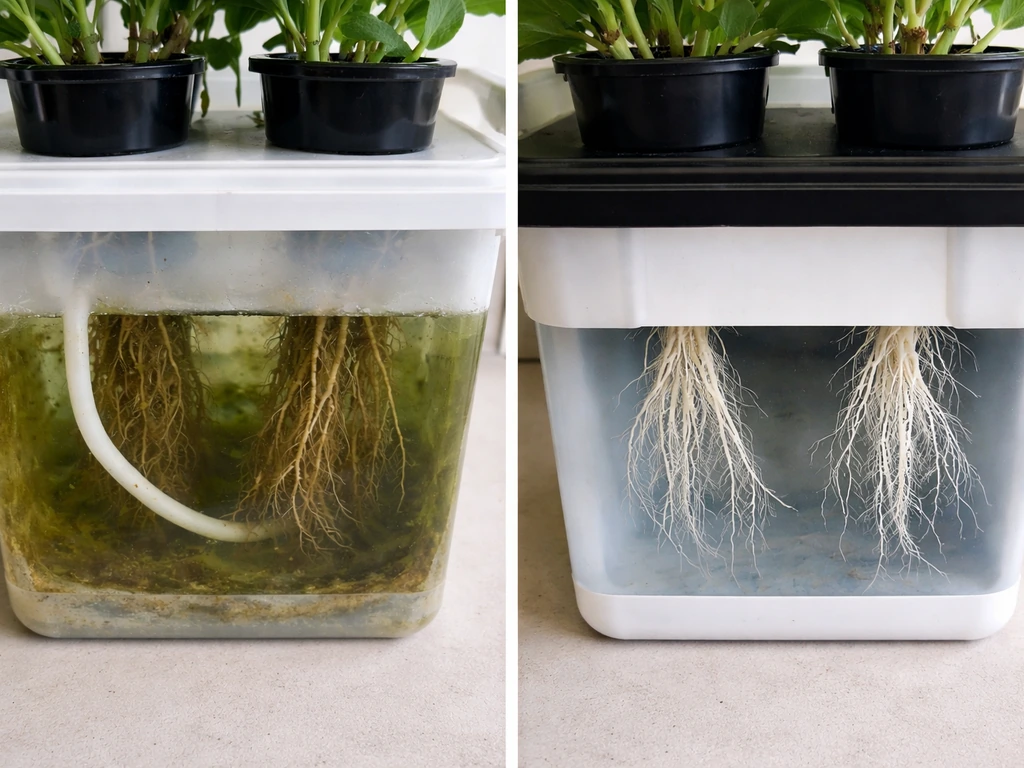
Algae growth (green or brown slime on reservoir walls, tubing, or medium): caused by light reaching your nutrient solution. Cover all reservoir surfaces with opaque material. Algae competes with plants for oxygen and nutrients and creates anaerobic zones where root rot thrives. Prevention is far easier than treatment.
Root rot (brown, slimy, smelly roots instead of white and firm): caused by warm reservoir temps, low dissolved oxygen, or pathogen introduction. Immediate response: drop reservoir temperature below 68°F, increase airflow from airstone, and treat with a hydrogen peroxide flush (3ml of 3% H2O2 per liter of water) or a beneficial bacteria product like Hydroguard. Healthy roots are white, firm, and have a slight fuzzy appearance from root hairs.
Nutrient deficiencies vs. toxicity: yellowing older leaves typically signals nitrogen deficiency or pH lockout. Yellowing new growth with green veins (interveinal chlorosis) often means iron or manganese deficiency, usually caused by pH above 6.5. Brown leaf tips and edges suggest nutrient toxicity (EC too high) or potassium excess. Always check pH first when you see deficiency symptoms, because the actual nutrient may be present but unavailable due to pH being out of range.
Pump or filter clogs: drip emitters and NFT channels clog with mineral deposits and plant debris. Run your system with plain pH-adjusted water for 30 minutes after a full drain to flush residue. Inspect emitters and airstones monthly. A blocked airstone in a DWC system can drop dissolved oxygen fast enough to stress roots within hours.
If you want to go deeper into the underlying principles driving these problems, the concepts are explained well in a good reference resource. The best hydroponic grow book recommendations on this site cover which titles are actually worth your time versus which ones are padded with theory and light on practical instruction.
Week-by-week timeline from seed to harvest
This calendar is based on a lettuce or leafy green crop in a DWC system, which is the ideal first grow. Adjust timelines for heavier crops like tomatoes or cannabis, which run 8 to 16 weeks longer.
| Week | Stage | Key Actions | Target pH / EC |
|---|---|---|---|
| Week 1 | Germination / seedling | Soak rockwool, plant seeds, keep warm and humid under low light | pH 5.5 / EC 0.5–0.8 |
| Week 2 | Early vegetative | Transplant to net pots once roots emerge, drop into reservoir | pH 5.8–6.0 / EC 1.0–1.2 |
| Week 3 | Active vegetative | Increase light intensity, top off reservoir daily, check EC/pH every 2 days | pH 5.8–6.2 / EC 1.4–1.8 |
| Week 4 | Pre-harvest (leafy greens) | Begin harvesting outer leaves, flush with plain water last 3 days | pH 6.0 / EC 1.2–1.5 |
| Week 5 | Full harvest | Cut entire plant at base or harvest leaves; clean system immediately | N/A |
For tomatoes or peppers, weeks 1 through 4 follow the same seedling and vegetative pattern, then the plant transitions into flowering (triggered by maturity, not photoperiod for most tomato varieties) around weeks 5 to 8, with fruit set and ripening extending to weeks 10 to 16 depending on variety. Cannabis follows a separate vegetative (18/6 light) and flowering (12/12 light) cycle with total timelines of 12 to 20 weeks depending on strain. If you want a fuller introduction to how hydroponics works before diving into your first grow, learn how to grow hydroponics covers the foundational concepts that underpin everything in this guide.
Harvest time and what comes after
Knowing when to harvest is just as important as everything that comes before it. For leafy greens, harvest when leaves reach full size but before the plant bolts (sends up a flower stalk). Bolting makes leaves bitter, and in lettuce it happens fast in warm conditions or under stress. You can harvest outer leaves continuously ('cut and come again') or take the whole plant at once.
For fruiting crops like tomatoes, harvest when fruit reaches full color and gives slightly to gentle pressure. Don't wait for softness; hydroponic tomatoes continue to ripen off the vine well and benefit from being picked a day or two before peak softness. For cannabis, harvest windows are determined by trichome maturity (clear = too early, milky white = peak THC, amber = more CBN/sedative effect), checked with a jeweler's loupe or digital microscope at 60x to 100x magnification.
After harvest, flush your entire system thoroughly before replanting. Drain the reservoir completely, rinse with diluted hydrogen peroxide (3 to 5ml of 3% H2O2 per liter), scrub any visible deposits, and rinse again with clean water. This reset prevents carryover pathogens and salt buildup from contaminating your next crop. Clean airstones, replace any tubing that has visible biofilm, and inspect pump performance before refilling. Getting this post-harvest reset right means your next crop starts clean rather than inheriting problems from the previous one, and that discipline compounds into significantly better results over multiple grow cycles.
The biggest thing separating growers who succeed long-term from those who give up after one or two tries is consistency in the basics: daily water level checks, regular pH and EC monitoring, keeping reservoir temperatures cool, blocking all light from the nutrient solution, and doing a proper system reset between crops. None of these steps are complicated. They just require showing up. Get those habits locked in with your first crop and you'll have the foundation to take on more complex systems, more demanding plants, and higher yields from everything you grow.
FAQ
Do I need to measure pH and EC every day, or can I do it less often with a grow guide hydroponic setup?
At minimum, check pH and EC after mixing and then once daily during the first 1 to 2 weeks, because young plants react quickly to swings. After plants are established, you can often drop to every other day, but still do a daily quick reservoir inspection (water level, temp, smells, visible algae) since temperature and evaporation changes can shift readings fast even if nutrients are stable.
What should I do if my EC goes up but my pH stays stable (or the opposite) in a grow guide hydroponic system?
EC rising usually means water is evaporating, so you need to top off with plain pH-adjusted water (not more nutrients) until EC returns to target. If pH drifts while EC is stable, assume nutrient availability is changing due to biological activity or mixing/order issues, then verify your calibration and confirm you adjusted pH after fully mixing (not before).
Can I reuse the same nutrient solution for multiple weeks to save money?
Usually no. Even if pH and EC look acceptable, nutrient ratios shift over time and root-zone oxygen can decline, especially in DWC. For a typical home cycle, plan to replace the reservoir on a set schedule or when pH control becomes difficult, and always do a full post-harvest reset between crops.
Should I ever use tap water straight from the faucet for a grow guide hydroponic system?
Only if it meets your baseline. If your tap water chlorine is high, it can stress roots, and if your starting EC is above about 0.5 dS/m you must account for it or your final feed will run stronger than intended. Many growers also find their “same brand of nutrients” behaves differently in different seasons because water composition changes.
Why do my plants show deficiency symptoms even though I’m hitting the correct EC target?
Most often it is pH lockout. Check pH first, especially if symptoms appear on newer growth (iron or manganese issues are common when pH is too high). Also confirm you’re not accidentally mixing concentrates together or changing the mixing order, which can cause precipitation that EC alone will not reveal.
What’s the safest way to dilute nutrients when I accidentally overfeed in a grow guide hydroponic setup?
Don’t just “wait it out.” For overfeeding, drain and refill or do a partial reservoir replacement with pH-adjusted water to bring EC down gradually to the crop’s target range. Sudden big swings can stress plants too, so aim for a step-down over 24 to 48 hours rather than an instant correction.
My pH meter reads differently from the neighbor’s or from my last week, could it be wrong?
Yes, meter drift is common. Calibrate with proper calibration solution weekly as described in the article, and rinse the probe with clean water between tests. If readings don’t make sense (for example pH refuses to move after correct dosing), test the meter in a known reference solution before making nutrient changes.
Do I need to sterilize everything before starting, or is cleaning only after harvest enough?
Do both, but start simpler. Clean and rinse new or reused parts before the first run to remove dust and residue, and for any reuse like tubing or air stones, inspect for biofilm and replace if biofilm is visible. After harvest, do the full flush and scrub routine, since that is what prevents carryover pathogens and salt buildup.
How do I prevent algae without hurting oxygen levels in DWC or Kratky?
The best prevention is blocking light to the reservoir and any tubing that could transmit light, using opaque covers. Avoid putting reflective materials where they still allow light paths into the solution, and ensure the water stays properly oxygenated (air stone running in DWC) because algae often signals light exposure that can coincide with oxygen problems.
What should I do if my air stone bubbles look fine but roots still turn brown in DWC?
If roots brown with no obvious air stone failure, look for root-zone temperature above target or a sudden oxygen decline from partial clogs or airflow interruption. Lower reservoir temperature below the mid-60s°F range, increase aeration, then consider a hydrogen peroxide flush as the article outlines. Also confirm you didn’t introduce pathogens via dirty tools or contaminated water.
Is rockwool always the best choice for a grow guide hydroponic setup, or can I start without it?
Rockwool is convenient for starting seeds and clones because transplanting is clean, but it is not mandatory. You can use other propagation methods depending on system type, however if you skip rockwool you must control moisture and oxygen carefully during the first week and avoid transplant shock, since hydroponic has no soil buffer.
How can I tell whether my issue is a nutrient problem or an airflow or temperature problem?
Use pattern recognition. Nutrient and pH issues often show consistent yellowing, spotting, or lockout signs tied to specific growth phases, while airflow and temperature issues tend to cause multiple symptoms together (wilting plus stalling, rapid root problems, or mold risk in humid spaces). If reservoir temperature is high or airflow is low, fix those first, then troubleshoot pH and EC after conditions stabilize.
What’s a realistic first-crop plan if I want to keep the grow guide hydroponic learning curve small?
Start with a leafy green or herbs, run DWC or Kratky, and keep one plant type per reservoir. Use a simple light schedule with a reliable timer, monitor pH and EC early every day, and do a proper system reset even if the first harvest is successful. That combination gives you the most feedback per minute of effort.