The best soil for autoflowers is a light, well-aerated, peat or coco-based mix with roughly 20–30% perlite, a near-neutral pH in the root zone of 6.2–6.8, and a mild or no pre-loaded nutrient charge for seedlings. That single sentence covers most of what growers get wrong. The details below will tell you exactly why, how to set it up, and what to do when something goes sideways.
Best Soil to Grow Autoflowers: Mixes, pH, Feeding Tips

Marcus Holloway
22 Apr 2026
Why autoflowers need different soil than photoperiods
Photoperiod cannabis plants switch to flowering when you reduce the daily light hours. That gives you a flexible vegetative window: if the plant gets stressed, you can keep it in veg a few extra weeks to recover before flipping. Autoflowers don't work that way. They flower based on age, not light schedule, which means the clock starts ticking the moment the seed germinates and it never stops for you. A photoperiod plant can absorb a week of transplant shock or a few days of overfeeding and still bounce back before flower. An auto just keeps moving toward harvest whether it recovered or not.
That compressed timeline is the core reason soil choice matters more with autos. Stress hits harder and shows up in final yield because there's no buffer period built into the life cycle. The two most common stress triggers that trace directly back to soil are: starting in a mix that's too nutrient-rich (hot soil burning young roots), and poor drainage causing low oxygen in the root zone. Both are preventable with the right medium from day one.
Best soil types for autoflowers
There are four practical categories of growing medium most growers use with autos. Each has genuine trade-offs, and knowing them upfront saves you from chasing problems that were baked into your setup before you even planted.
Pre-fertilized bagged mixes (the most common starting point)
Products like FoxFarm Ocean Forest, Happy Frog, and PRO-MIX BX fall into this category. They're peat or bark-based, widely available, and come with a nutrient charge already mixed in. PRO-MIX BX, for example, contains sphagnum peat moss and perlite along with a starter fertilizer designed to support early plant development. The problem for autoflowers is that some of these mixes are described as 'hot', meaning they carry enough preloaded nutrients to burn seedling roots before the plant is big enough to use them. FoxFarm Ocean Forest is a frequent offender here. Growers who run it straight from the bag often see early stunting, tip burn, or yellowing in seedlings. The common practical fix is to wait about 3–4 weeks before adding any additional fertilizer when using FFOF, or to dilute it at the seed/seedling stage by blending it 50/50 with a lighter mix or coco. For autos specifically, that hot seedling phase can cost you yield you'll never recover.
Living soil and compost-based mixes
Living soil is a biologically active mix built around high-quality compost, mineral amendments, and beneficial microbes. Brands like Nature's Living Soil and BuildASoil sit in this space, and so do properly 'cooked' home builds. When it works, living soil is genuinely excellent for autos because the microbial activity converts organic matter into plant-available nutrients gradually, which tends to match the auto's consumption rate better than a synthetic-fed approach. The soil essentially feeds the plant on demand. Nature's Living Soil recommends running autos in about 3–5 gallons of medium to give the biology enough volume to stay stable. The catch is that quality matters enormously. BuildASoil is direct about the risk: randomly adding amendments without understanding mineral ratios can cause long-term nutrient imbalances that are hard to diagnose mid-run. If you're buying a reputable pre-made living soil product and using it as directed, it's a great option. If you're trying to DIY a living soil from scratch, do it with a tested recipe, not by guessing.
DIY blended soil
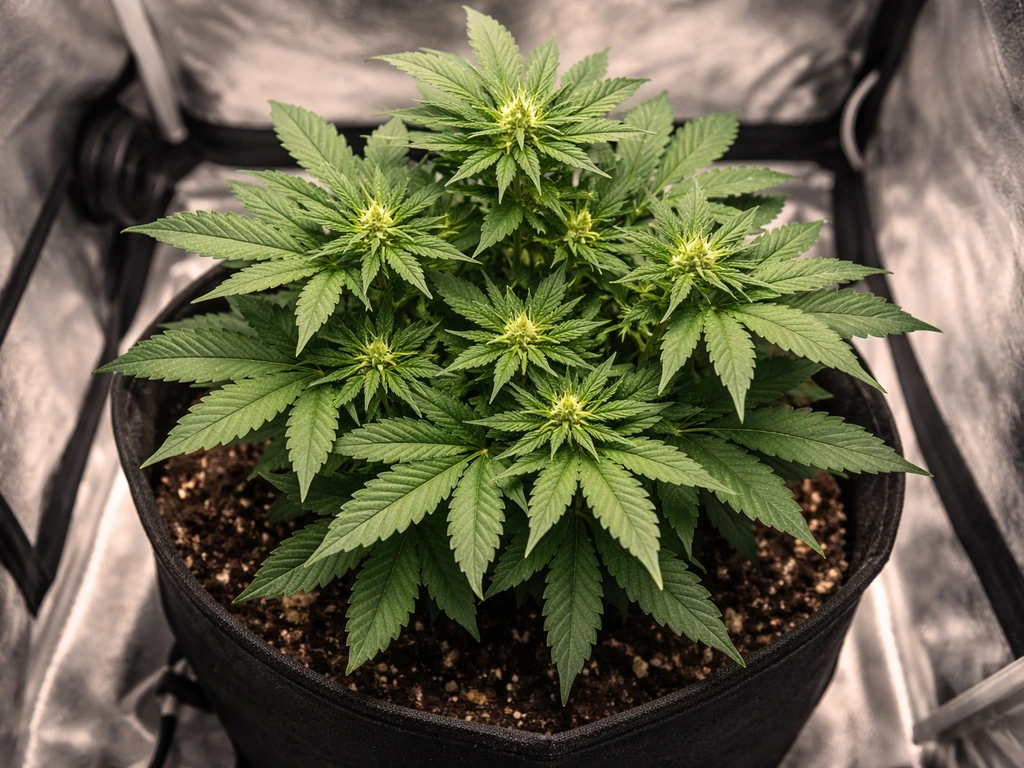
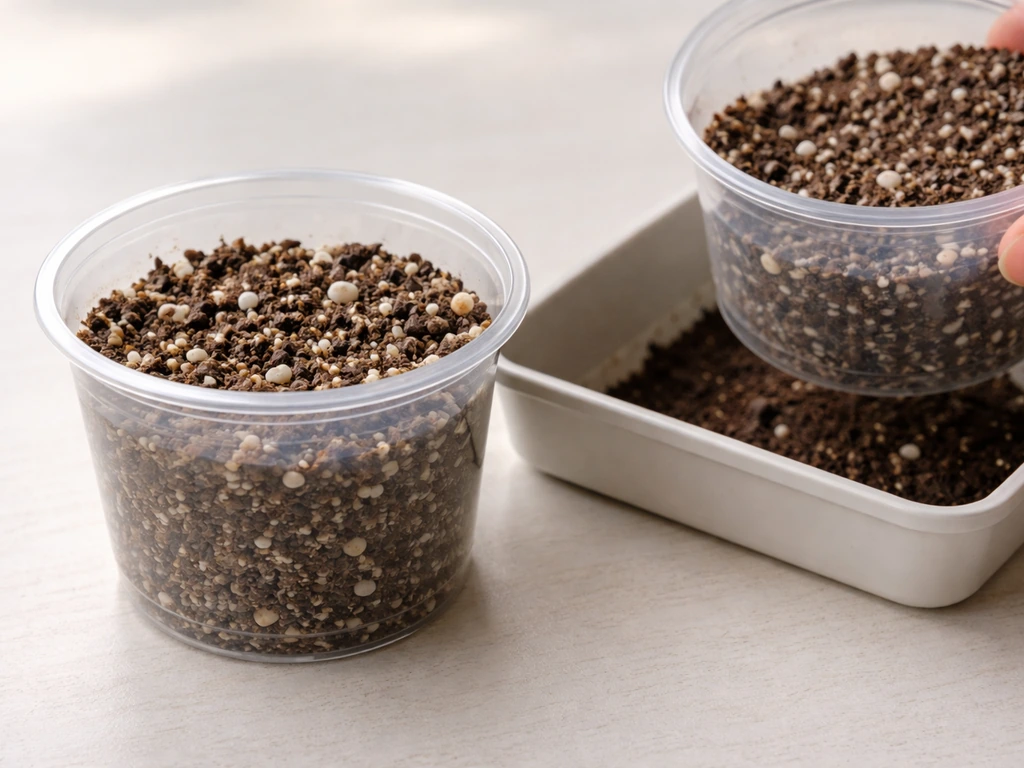
Building your own mix gives you full control over aeration, water retention, and nutrient load. The most grower-friendly framework for autos is a base of sphagnum peat moss or quality potting mix (about 50–60% of the blend), perlite at 20–30% for drainage and air porosity, and optionally some compost or worm castings at 10–20% for a gentle nutrient reserve. You're aiming for a medium that holds moisture evenly without becoming waterlogged, drains freely, and stays light enough that young roots can push through without effort. That 20–30% perlite is not decoration: perlite carries about 75% total porosity and around 30% air-filled porosity by volume, and it's what prevents the fine peat particles from packing together and strangling roots. Avoid mixing coarse and very fine particle amendments together without thinking it through, because fine particles fill the macropores and reduce the air space you just paid for.
Coco coir blends
Coco coir is technically a soilless medium, but many growers run it in containers with the same workflow as soil, especially when blended with perlite and some peat. A 70/30 coco-to-perlite blend is popular, and it performs exceptionally well with autos because it's naturally light, drains fast, and has zero nutrient charge to burn seedlings. The trade-off is that coco is almost inert, so you're responsible for all feeding from very early in the plant's life. It also holds calcium and magnesium differently than peat, which can lead to Cal-Mag deficiencies if you don't account for that in your nutrient program. Pure coco at high feeding frequency crosses into hydro territory, but a coco/peat/perlite blend used with moderate watering and soil-style nutrients is a legitimate soil-adjacent approach worth considering for experienced growers who want extra control.
What to look for in a good autoflower mix
Rather than chasing brand names, use these physical and chemical targets to evaluate any medium you're considering.
Drainage and aeration
A well-built container medium should have 20–30% air porosity after drainage, meaning about a fifth to a third of the total volume stays open for oxygen even after watering. The Perlite Institute defines “free porosity” as the air space remaining in the pore structure after excess water drains air porosity after drainage. An 80% peat and 20% perlite mix in a standard container can yield as little as 10–13% air-filled pore space, which is on the low side. That's why most growers using peat-heavy mixes push perlite additions closer to 25–30% of total volume. Oxygen starvation in the root zone is one of the most common hidden causes of stunted autoflowers, and it often gets misread as a nutrient problem when it's actually a physical media problem.
Water retention
You want a medium that holds roughly 50–60% water by volume after draining. That range keeps the root zone moist between waterings without sitting wet for days. A mix that dries out too quickly stresses the plant and makes consistent watering nearly impossible. A mix that stays saturated limits oxygen and invites root rot. The balance point is what you're engineering with your perlite and peat ratio.
pH targets and buffering
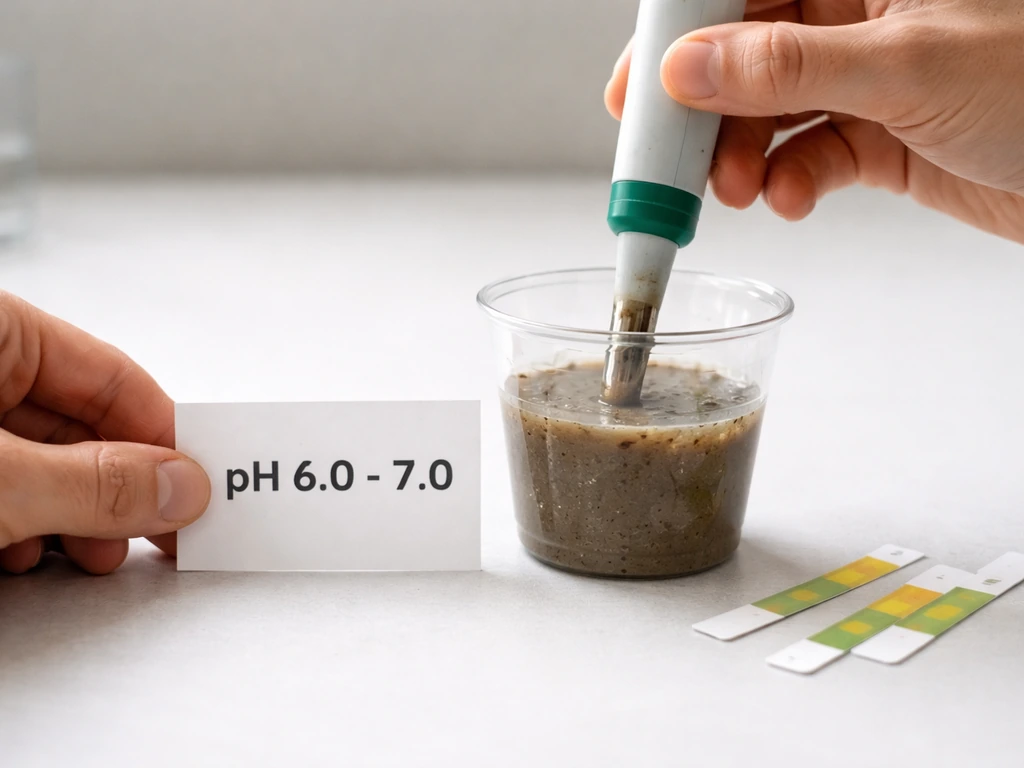
Root-zone pH for soil and peat-based mixes should stay in the range of 6.2–6.8, with most plants doing best when you spend the majority of the run between 6.3 and 6.7. The often-repeated 'just keep it at 6.5' is an oversimplification. pH affects which nutrients are chemically available for uptake, and small drift in either direction can lock out iron, calcium, or phosphorus even if those nutrients are physically present. pH management matters because outside the required range, nutrients become less usable for plants even if they are present in the medium or solution pH affects which nutrients are chemically available for uptake. Some guidelines cite a tighter range of 5.9–6.5 for soil or soilless mixes, but for standard peat-based soil, 6.2–6.8 gives you sufficient buffering without risking lockout at the edges. Test your water input and runoff pH regularly, especially in the first few weeks.
| Property | Target Range | Why it Matters for Autos |
|---|---|---|
| Air porosity (after drainage) | 20–30% by volume | Prevents oxygen starvation that stunts root growth |
| Water retention | 50–60% by volume | Keeps moisture stable between waterings |
| Root-zone pH (peat/soil) | 6.2–6.8 | Keeps all major and minor nutrients chemically available |
| Nutrient charge (seedling stage) | Minimal to none | Avoids root burn during the most vulnerable growth phase |
| Perlite content (typical blend) | 20–30% of total volume | Creates and maintains macropore structure for oxygenation |
How to prepare soil before you plant
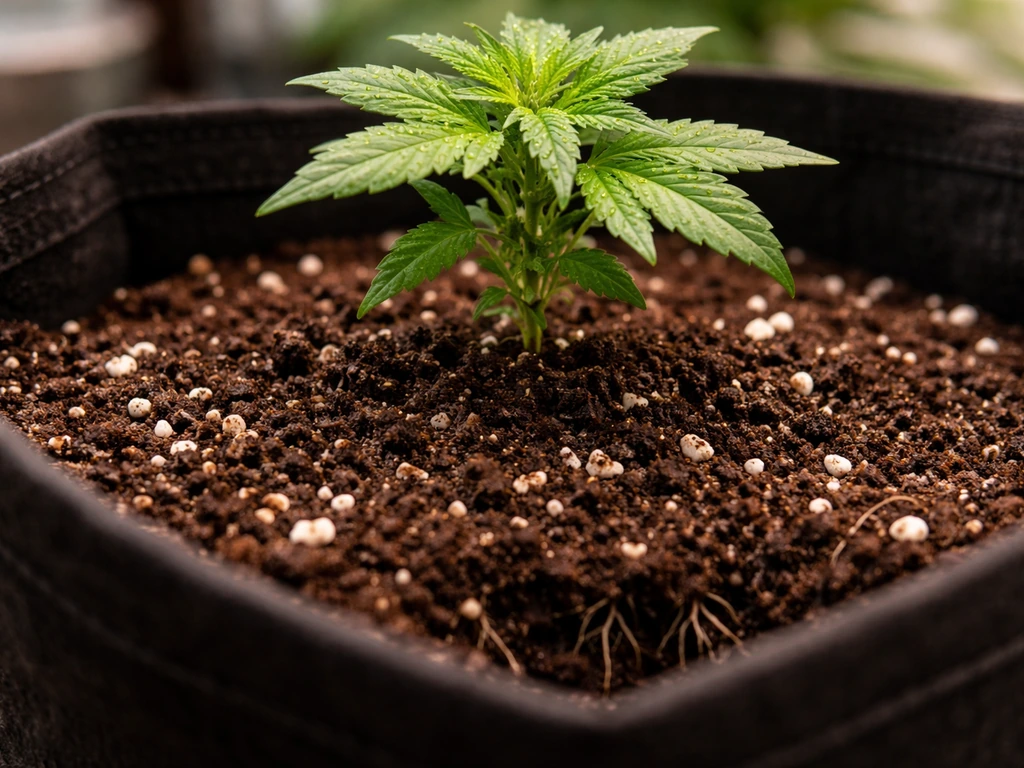
The biggest mistake growers make at this stage is planting autoflower seeds or seedlings directly into a hot commercial mix or an unamended living soil that hasn't stabilized. Young auto roots are delicate, and a high-salt nutrient environment in the first 1–2 weeks can cause tip burn, wilting, or outright seedling death. Even if the seedling survives, the stress translates into reduced final size because those early days of stunting never fully recover.
If you're starting in a pre-fertilized mix like FoxFarm Ocean Forest, either dilute it 50/50 with a lighter mix (plain peat, coco, or Happy Frog) for the seed/seedling phase, or germinate in a smaller cup of lighter soil and transplant into the full FFOF mix once the plant has a few sets of true leaves and a more developed root system. Most growers keep autos in their final container from day one specifically to avoid transplant shock, so if you go that route, use the diluted blend in the top few inches where the seedling sits, with the stronger mix below.
For living soil, allow the soil to 'cook' and stabilize before use if you're building your own. Pre-made living soil products are generally ready to use but benefit from being moistened and rested for a day or two before planting so the biology activates. Coco blends should be buffered (soaked in a calcium-and-magnesium solution) before first use to prevent early Cal-Mag deficiency. Buffering coco coir is widely recommended to pre-saturate the exchange sites with calcium and reduce or replace unwanted ions so nutrients are available more reliably from the start Coco blends should be buffered (soaked in a calcium-and-magnesium solution) before first use.
On transplanting: because autoflowers have such a compressed timeline, most growers start seeds directly in the final container (3–5 gallons is a widely used range for indoor autos) and skip transplanting entirely. Every time you move an auto, you risk even a few days of transplant stress that the plant's schedule won't forgive. If you must transplant, do it early, gently, and with minimal root disturbance.
Feeding your autoflower through each stage
Soil feeding with autos isn't static. If you want a shortcut, a good best autoflower grow book can help you line up medium choices with the right feeding and timing for each stage. What the medium provides and what the plant needs changes significantly from seedling to late flower. Getting this wrong in either direction is one of the most common reasons experienced growers still see underperforming autoflower runs. If you want to pick the best auto flower to grow, start with the medium that matches your setup and feeding comfort level autoflower runs.
Seedling stage (weeks 1–2)
At this stage, the plant is tiny, the root system is barely established, and nutrient demand is extremely low. If you're in a hot mix, do not add any supplemental nutrients during this period. If you're in a neutral or coco-based medium, use no more than quarter-strength nutrients, and only if you see signs the plant is struggling. The goal is to keep the medium moist but not wet, pH-stable, and chemistry-calm. Overwatering is just as damaging here as overfeeding because both restrict oxygen in the root zone.
Vegetative stage (weeks 3–5 roughly)
This is when autoflowers grow fastest and the plant's nitrogen demand peaks. That peak growth period is also when autoflowers typically grow the most, so getting your soil and feeding right in weeks 3, 5 matters most grow fastest. If you're in a pre-fertilized soil that's been feeding the plant for the first few weeks, this is when you'd typically start adding supplemental nitrogen at half to full-strength. In a coco or lighter mix, full-strength vegetative nutrients are appropriate by week 3–4 once the plant is actively growing multiple sets of leaves. Keep EC below about 2.0 during this phase. The very aggressive feeding schedules (EC above 2.8) are really only appropriate for large photoperiod plants or advanced growers running dialed-in recirculating systems.
Pre-flower and early flower (weeks 5–7)
Autoflowers typically show their first pistils around weeks 4–5 and are in full flower by week 6–7. At this transition, you shift nutrient ratios toward lower nitrogen and higher phosphorus and potassium. If you've been running a good peat or living soil, the buffered organic reserves often cover much of this transition naturally. In coco or lighter soils, be proactive about the switch. Continue checking runoff pH because the plant's chemistry changes during flower and pH drift is more common during this period.
Mid to late flower (weeks 7–10+)
Phosphorus and potassium dominate this phase. Nitrogen should be minimal. Many growers doing a full soil run will find their living soil or amended peat mix carries the plant through late flower with little to no supplemental feeding, which is part of the appeal of that method. Growers in coco or light mixes need to maintain their bloom nutrient program carefully through this phase. In the final 1–2 weeks before harvest, most approaches call for a flush or plain water-only period to let the medium clear out residual salts.
Quick setup recommendations
Best overall
A peat-based mid-strength mix like FoxFarm Happy Frog (lighter than Ocean Forest) amended with 25–30% extra perlite, started in a 3–5 gallon fabric pot, with supplemental liquid nutrients introduced at week 3. This setup is forgiving, widely available, and produces consistent results for both beginners and intermediate growers. If you want the easiest autoflower to grow, start with a forgiving, beginner-friendly setup like this and choose a strain known for consistent results. It hits the right balance of water retention, aeration, and nutrient buffering without the risk of hot soil burning seedlings from the start.
Best budget
A basic DIY blend: one part generic peat-based potting mix (store brand is fine), one part perlite, and a small addition of worm castings (about 10–15% of total volume). Total cost is usually well under $30 for enough soil to fill several 3-gallon containers. The worm castings provide a gentle, slow-release nutrient source that won't burn seedlings, and the perlite handles drainage. You'll need to feed more actively than with a pre-fertilized product, but you'll also have more control and spend less money.
Best for advanced growers
A properly built or sourced living soil in a 5-gallon container, watered with plain pH-adjusted water for most of the run. BuildASoil and Nature's Living Soil both produce ready-to-run products that support a no-till or minimal-input grow once you understand how living soil biology works. This approach requires knowing how to read the plant rather than following a nutrient chart, but the results in terms of terpene expression and overall plant health are genuinely different from a synthetic salt-based run. It rewards experience and observation over protocol-following.
Soil versus hydro: a quick note
Since this site covers both growing methods, it's worth briefly addressing where soil ends and hydro begins for auto growers considering both. Soil (and coco blends used with infrequent watering) provides passive buffering, biological activity, and forgiveness for inconsistent watering schedules. Hydroponics (DWC, recirculating coco, NFT) delivers nutrients directly to the root zone, allows faster growth rates, and gives you precise control, but it removes that buffer entirely. Any pH or nutrient error hits the plant within hours rather than being partially absorbed by the medium. For new growers, soil is the more forgiving starting point with autos. For growers who want maximum speed and are comfortable monitoring pH and EC daily, hydro can be excellent with autoflowers. The choice really comes down to how much active management you want to do and whether you're comfortable troubleshooting system-level problems in addition to plant-level ones.
Troubleshooting common soil problems with autos
Hot soil burning seedlings
Symptoms: yellowing or brown leaf tips in the first 1–2 weeks, seedling looks stunted or is barely growing despite adequate light. If you suspect hot soil, your immediate options are to flush the container gently with pH-adjusted plain water (flushing about 2–3x the container volume) to dilute soluble salt concentration, and hold off on any additional feeding until the plant recovers and shows new healthy growth. Going forward, dilute your starting mix or start seeds in a buffer zone of lighter medium.
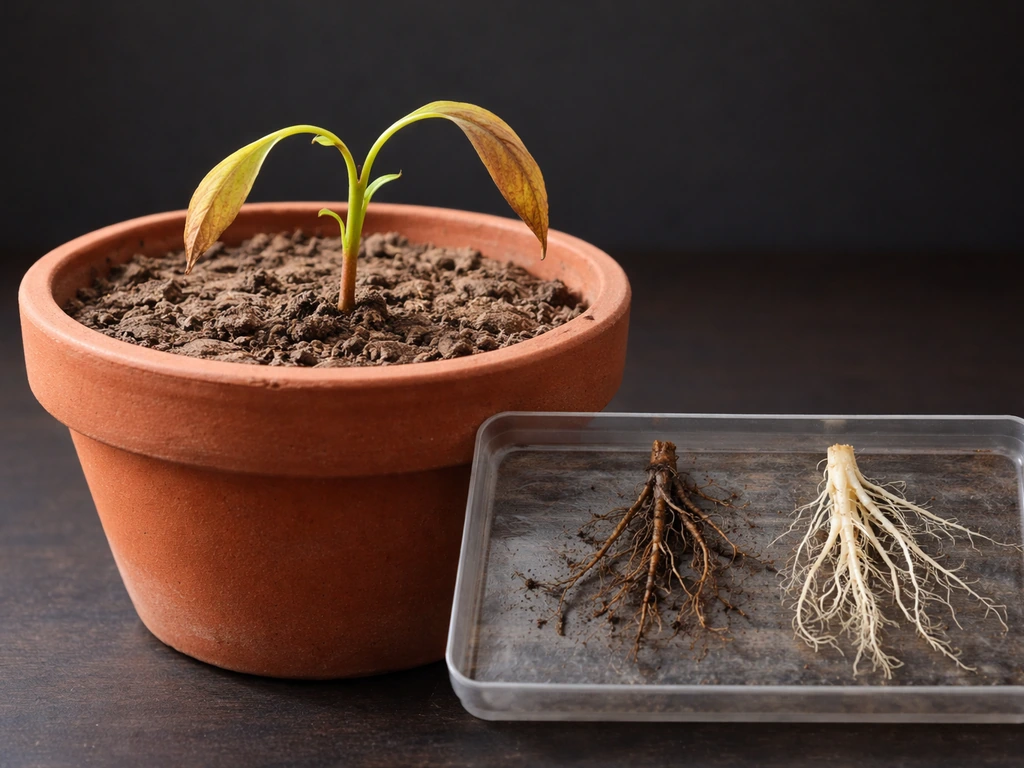
Root stress from poor drainage
Symptoms: wilting that doesn't respond to watering, dark or slimy roots if you can check them, yellowing that starts at the lower leaves and spreads. This is an oxygen problem in the root zone. The fix for a plant already in the ground is to let the medium dry out more between waterings and improve airflow around the container. Fabric pots help significantly because they air-prune roots and passively wick moisture from the outside. Prevention is the right answer here: build or choose a mix with adequate perlite from the start.
pH drift and nutrient lockout
Symptoms: discoloration, spotting, or curling that doesn't match a single deficiency, especially if it's affecting multiple nutrients at once (iron, calcium, and phosphorus deficiencies often appear together during pH problems). The critical rule here: fix pH before you add more nutrients. Throwing extra fertilizer at a pH lockout makes it worse by increasing salt concentration without solving the availability problem. Flush with properly pH-adjusted water (6.3–6.5 for soil), allow the medium to stabilize, retest runoff pH, and only resume feeding once pH is back in the correct window.
Overfeeding and nutrient toxicity
Symptoms: dark green leaves with a 'claw' curl (nitrogen toxicity), burnt tips that spread inward, or slow growth despite heavy feeding. This is common in autos because growers sometimes apply photoperiod-style feeding schedules. Flush with plain water to reduce salt load, then resume feeding at half-strength and work back up slowly. EC levels above 2.8 (roughly 1400 PPM) are really only appropriate for advanced setups; most autos do well at EC 1.0–2.0 through the mid-flower phase.
Deficiencies in light or inert media
Symptoms: pale yellowing starting at new growth (iron or sulfur), purple stems or slow flower development (phosphorus), or general paleness mid-run (nitrogen rundown). If you're in a coco or very light mix and the plant looks hungry, introduce a balanced nutrient solution at appropriate strength for the current growth stage, verify pH is in range, and consider adding a dedicated Cal-Mag supplement if you're in coco. In living soil, a light top-dress of worm castings or a kelp-based liquid amendment can reinforce the biology without disrupting it.
Because autoflowers move quickly from seed to harvest, getting strain selection and plant management right matters almost as much as the medium itself. Choosing a strain suited to your setup and understanding its typical timeline can help you anticipate which stage of soil nutrition you're in and react faster when something looks off. Knowing the typical indoor timeline also helps you estimate how long do autoflowers take to grow indoors from seed to harvest typical timeline.
FAQ
What’s the best way to mix perlite into peat so the soil stays airy instead of turning uneven or gritty?
Pre-wet the peat before adding perlite (lightly mist or mix with a little pH-adjusted water), then blend thoroughly in batches. If you dump dry perlite into dry peat and mix quickly, it often clumps into “zones” with poor drainage, which can cause oxygen-stress pockets in an auto’s root ball.
How do I know if my mix has too much peat for autoflowers, even if it drains “okay” at first?
Test after it fully drains, then wait 12 to 24 hours. A good auto medium usually has most of the water gone by the next day, but still feels lightly moist in the center. If it stays wet and heavy, or smells musty, it likely has insufficient air-filled porosity for the compressed auto timeline.
Should I reuse autoflower soil, or is it better to start fresh?
Reuse is possible, but only if you’re confident about pest and salt management. For hot peat mixes or coco-adjacent runs, salts often build up, and pH can drift. If you reuse, do a careful runoff pH and EC check, remove top buildup, and consider blending with fresh perlite or amending with a proven balanced approach rather than “adding a little more” fertilizer.
Do autos need fertilizer immediately if my mix is “not hot”?
Not usually. Even in neutral or coco blends, most autos do better with a short no-feeding period while roots establish. A practical rule is to start at quarter-strength only if the seedling is actively growing multiple new sets of leaves or you see clear hunger signs, not simply because time has passed.
What runoff pH should I use as my decision point, and how many times should I test early on?
Use runoff pH as a confirmation tool, not a one-off. In the first half of the run, test 2 to 3 times across different waterings, then adjust only if you see a consistent drift. If runoff swings widely day to day, the issue is often inconsistent watering rather than nutrient chemistry.
When I flush a hot soil seedling, how do I avoid drowning the roots while I dilute the salts?
Flush in smaller pulses, not one long soak. For example, apply pH-adjusted plain water until runoff begins, then allow partial drainage before continuing. Then hold feeding until you see new healthy growth. This reduces the risk of oxygen starvation, which can look similar to “nutrient burn” early on.
Is buffering coco with Cal-Mag enough, or do I still need to manage calcium and magnesium during the grow?
Buffering prevents the most common early Cal-Mag deficiency, but it doesn’t guarantee adequate levels throughout. Coco binds and releases differently than peat, so you still need to monitor plant response and maintain calcium and magnesium supply via your nutrient plan, especially during rapid growth and flower transitions.
How big does the container need to be for “living soil” autoflowers, and why does volume matter?
A common target is about 3 to 5 gallons for autos because it keeps conditions stable for microbial activity and nutrient conversion. In smaller volumes, biology can go through faster swings in moisture and oxygen, making nutrient release less predictable and increasing the chance of mid-run hunger or lockout.
What’s the difference between a “water-only flush” and simply overwatering at the end?
A real end-of-cycle flush means you keep watering with plain, correctly pH-adjusted water so salts leach out, then you let the medium drain properly and avoid keeping it constantly saturated. If you’re just adding more water without allowing full drainage cycles, you can worsen oxygen issues and delay cleanup rather than speeding it up.
Can pH problems make the plant look like a nutrient deficiency even when my fertilizer is correct?
Yes, pH lockout can mimic deficiencies. If you see symptoms that affect multiple nutrients at once (common with iron, phosphorus, and calcium-looking issues), correct pH first and retest runoff before adding more fertilizer. Otherwise, you increase total salts while nutrients remain unavailable.
How much EC should I target for autoflowers in soil, and what’s a safe way to adjust if I overshoot?
For most soil and coco-based auto grows, staying roughly in the EC 1.0 to 2.0 range through mid-flower is a safer approach than chasing high numbers. If you overshoot, reduce to half-strength immediately, then increase gradually only after you confirm new growth is healthy and runoff EC is moving back toward your target.
My autos grow fast, but the leaves look stable, then suddenly start yellowing mid-run. Could this be a soil issue?
It can be. Mid-run yellowing can be nutrient depletion, but it can also be a moisture and oxygen inconsistency that reduces uptake. Check whether the medium is drying too unevenly or staying saturated longer than before, then verify runoff pH and EC to distinguish between “chemistry not available” and “roots not functioning.”