Quality grow hydroponics means running a system where your plants have everything they need, in the right amounts, at the right time, with nothing fighting against them. Healthy white roots, stable pH and EC, consistent yields, clean-tasting harvests, and fewer crisis moments. That's the target. And unlike soil growing, hydroponics gives you direct control over almost every variable that affects plant quality. The catch is that same control works against you if you ignore it. This guide walks you through the whole picture, from system selection to harvest, so you're not just keeping plants alive but actually growing well.
Quality Grow Hydroponics: Step-by-Step for Better Harvests

Marcus Holloway
9 Apr 2026
What quality grow hydroponics actually means
When growers say they want "quality" results from hydroponics, they usually mean a few specific things: plants that grow fast and evenly, roots that look and smell clean, yields that are consistent from run to run, and a final product with the flavor, potency, or appearance they're aiming for. Those outcomes don't happen by accident. They're the result of hitting the right parameters consistently across the entire grow cycle.
The pillars of quality in a hydroponic system are: root zone health (dissolved oxygen, temperature, absence of pathogens), nutrient availability (correct EC/PPM and balanced formula), pH stability (so nutrients stay soluble and available), environmental control (light, VPD, CO2), and clean system hygiene. Miss any one of these consistently and you'll see it in the plant. Weak stems, yellowing leaves, stunted growth, off flavors, and low yields are almost always traceable back to one or more of these five areas drifting out of range.
It's also worth understanding what quality hydroponics is not. It's not just spending more money on equipment. Expensive systems with poor water quality management or sloppy pH routines will underperform a simple DWC bucket that's dialed in properly. Quality is a practice, not a price point. That said, having the right tools for your setup makes the practice much easier to stick to.
Pick the right system and layout for your space
The system type you choose sets the ceiling for how much control you have and how much daily attention you'll need to give. There's no single best hydroponic method. The best one is the one that fits your space, your crop, and your schedule. Here's how the main systems stack up:
| System | Best For | Space Needed | Complexity | Quality Ceiling |
|---|---|---|---|---|
| Deep Water Culture (DWC) | Fast-growing crops, beginners | Small to medium | Low | Very high with good oxygen management |
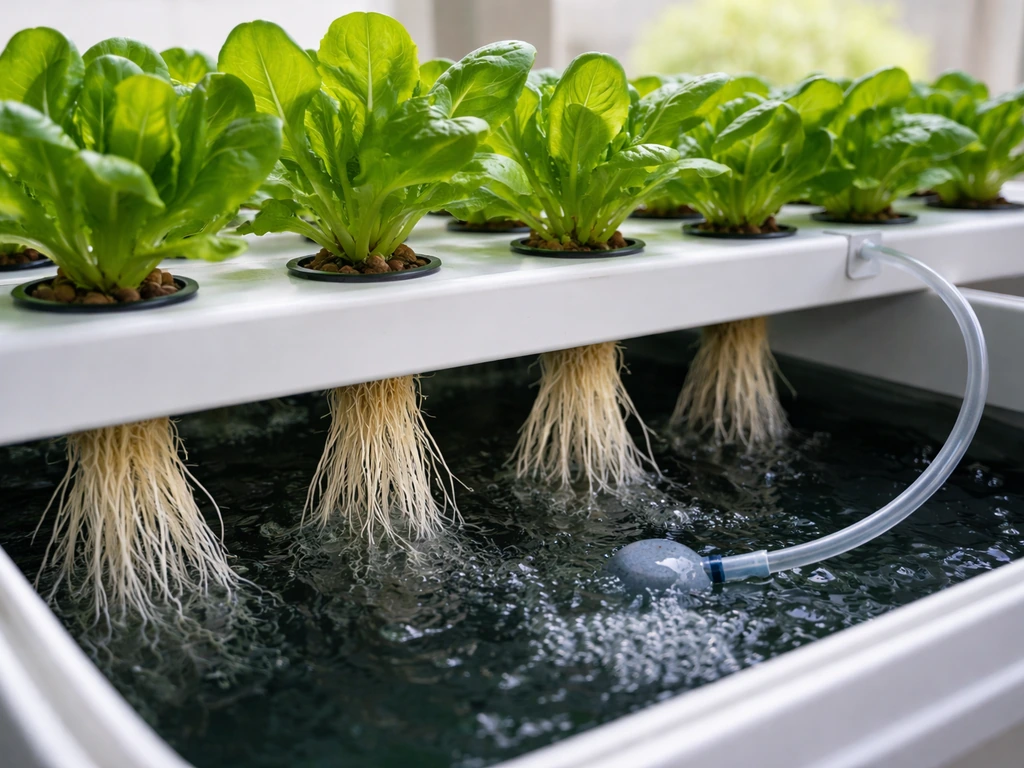
| Nutrient Film Technique (NFT) | Leafy greens, herbs | Compact horizontal | Medium | High, excellent for consistent quality |
| Ebb and Flow (Flood & Drain) | Versatile, multiple containers | Medium to large | Medium | High with proper timing |
| Drip Systems | Large plants, commercial-style | Medium to large | Medium-High | High, good for heavy feeders |
| Aeroponics | Maximum oxygenation, speed | Variable | High | Highest, most demanding to maintain |
| Kratky (Passive DWC) | Low-tech, no pumps | Small | Very Low | Moderate, best for small leafy crops |
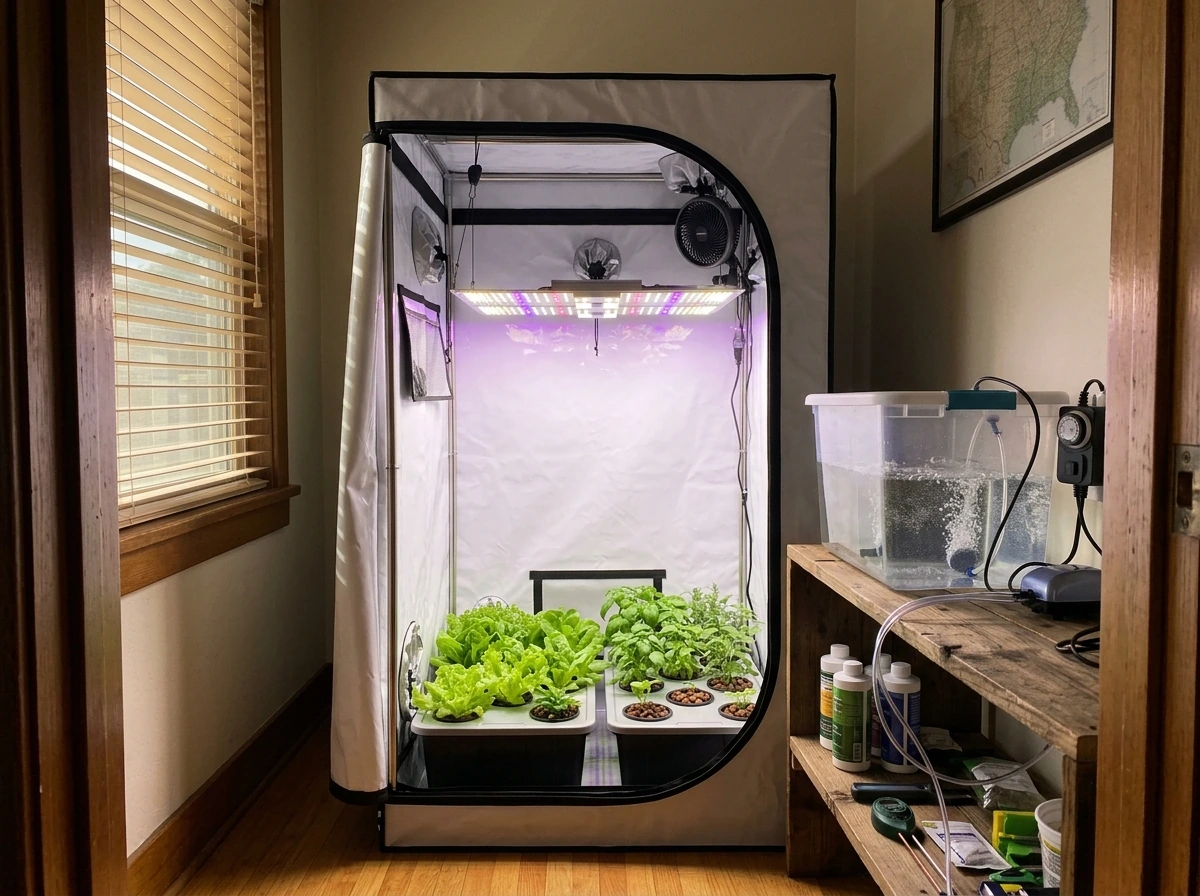
For most home growers starting out, DWC or NFT gives the best balance of simplicity and performance. A 5-gallon DWC bucket per plant is easy to manage, transparent enough that you can watch roots develop, and simple to flush or refill. NFT channels work beautifully for lettuce, basil, and other leafy crops where you want clean, consistent results at scale. If you're in an urban setting or a smaller indoor space, checking out what Better Grow Hydro in Pasadena stocks can give you a sense of which ready-built systems work in tighter footprints.
Layout planning matters as much as system type. Think about your canopy management from the start. Leave enough vertical clearance for your lights (at minimum 12–18 inches between the canopy and a standard LED panel), plan your reservoir access so you're not moving equipment to measure pH, and make sure air circulation can reach all sides of your plants. A crowded, poorly ventilated layout kills quality even in a well-configured system.
Essential equipment and environment setup
Getting the gear right upfront saves a lot of troubleshooting later. Here's what you actually need for a functional, quality-focused hydro setup:
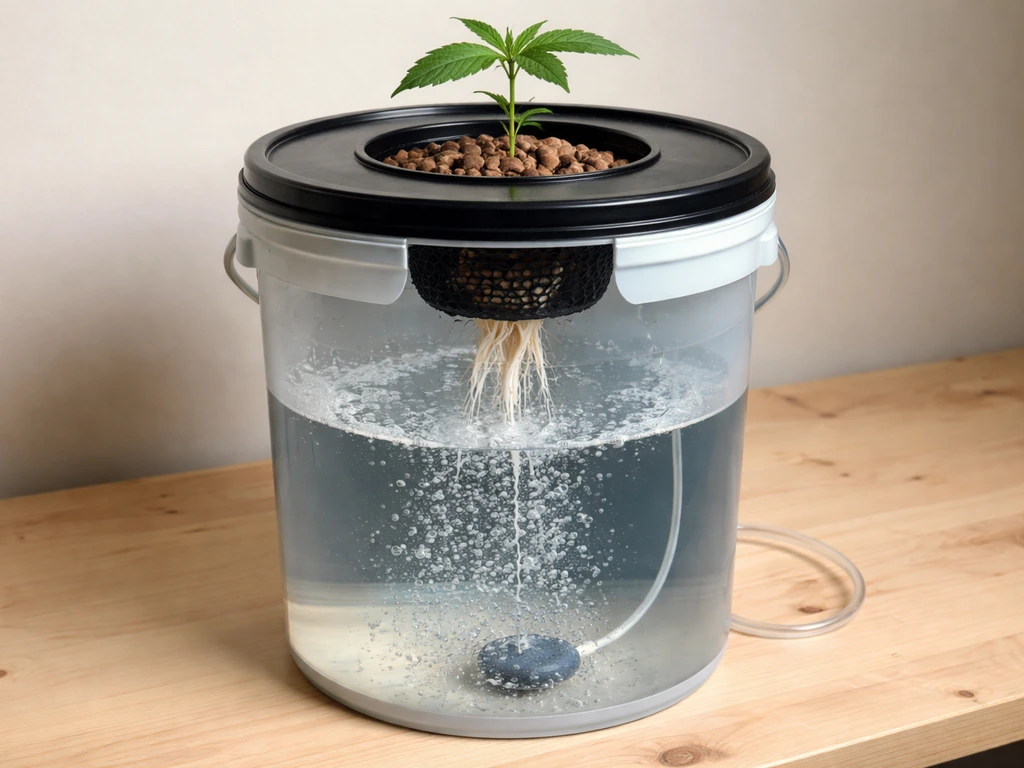
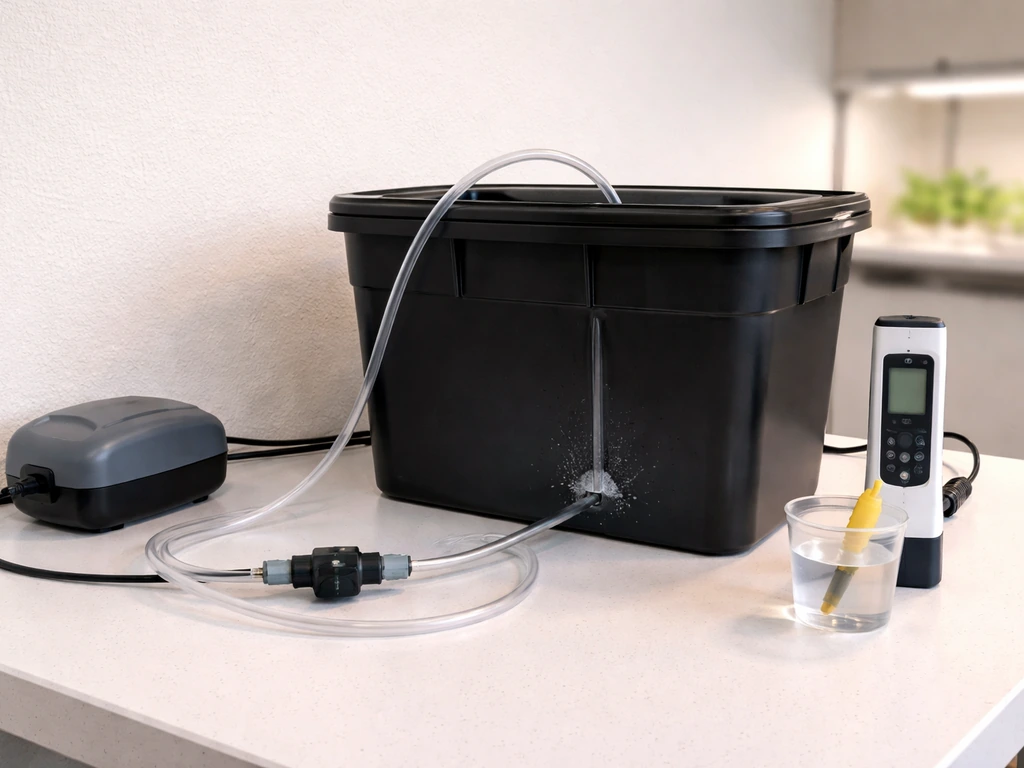
- Reservoir: At least 5 gallons per plant for DWC; dark-colored or opaque to block light and prevent algae
- Air pump and air stones: Sized to your reservoir volume; aim for dissolved oxygen above 6 ppm in the nutrient solution at all times
- Water pump (for recirculating systems): Match flow rate to your system's drain capacity and plant count
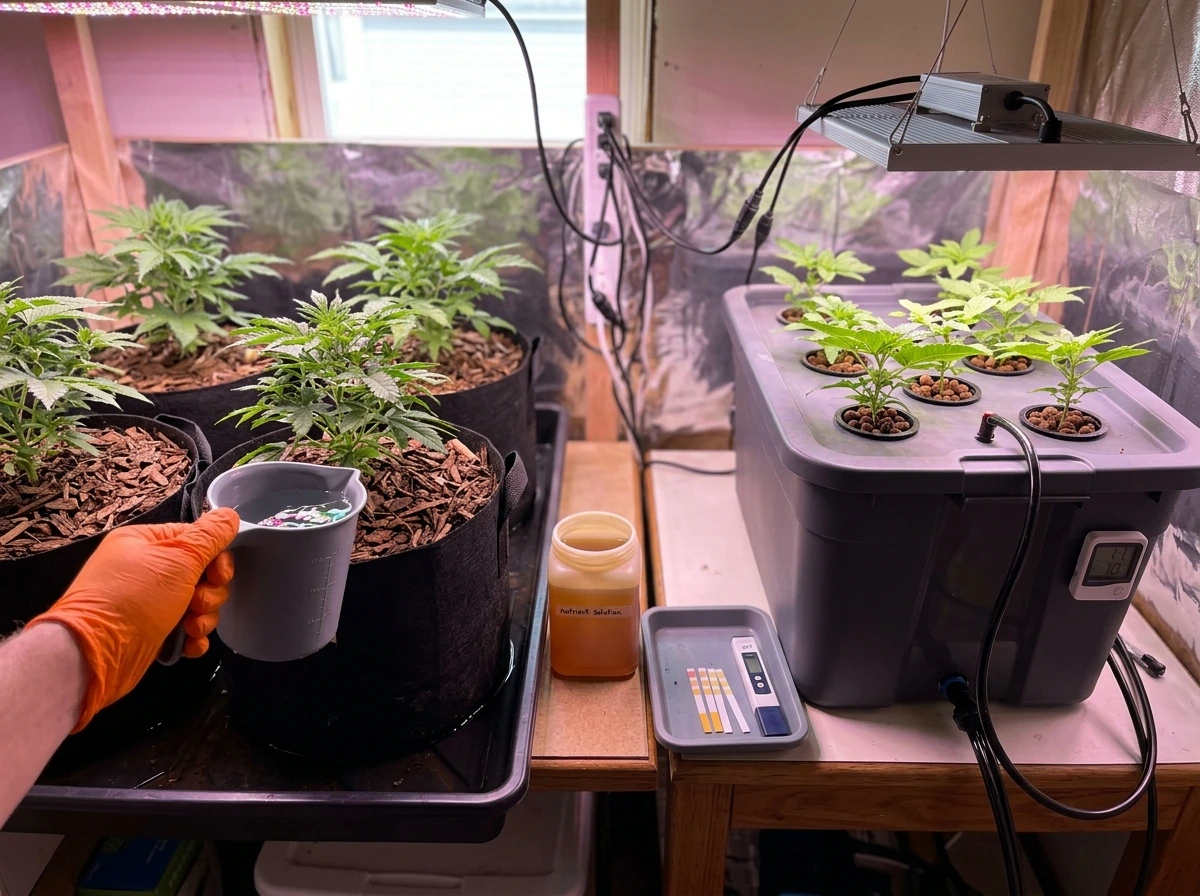
- pH and EC/TDS meters: Digital, calibrated regularly; non-negotiable for any quality-focused grow
- Nutrient reservoir thermometer: Solution temp should stay between 65–72°F (18–22°C) to prevent root pathogens and maintain oxygen solubility
- Grow lights: LED full-spectrum panels for most indoor setups; size to at least 30–50 watts actual draw per square foot of canopy
- Ventilation: Inline fan plus carbon filter for odor and air exchange; oscillating fans for stem strengthening and canopy airflow
- Net pots and growing medium: Match to your system type (more on medium below)
- Timer: For lights, pumps, and nutrient delivery cycles if using drip or ebb-and-flow
Environment setup is where a lot of growers cut corners and then wonder why their yields are mediocre. Aim for daytime temps of 70–80°F (21–27°C) and nighttime temps no lower than 60°F (15°C). Relative humidity should be around 60–70% during vegetative growth and dropped to 40–50% in late flowering or fruiting stages to reduce disease pressure. A digital thermometer-hygrometer combo unit costs under $20 and tells you immediately if your environment is in range.
Water quality is foundational and often overlooked. If your tap water is high in chlorine or chloramines, let it off-gas for 24 hours or use a carbon filter. Hard water (high in calcium and magnesium carbonates) will push your pH up and interfere with nutrient formulas designed for soft water. A baseline water test is worth doing once so you know what you're starting with before you add anything. The concept of watering what you want to grow applies directly here: your source water chemistry shapes everything downstream.
Nutrients, pH, and EC: mixing, targets, and monitoring
This is the core skill of quality hydroponics. Nutrient solutions change over time as plants absorb different elements at different rates, and as water evaporates and concentrates the remaining salts. University extension research confirms that pH and EC of nutrient solutions shift as fertilizers are added and as plants and microbes consume water and nutrients. That means you can't mix a reservoir once and ignore it for a week. Regular monitoring is what separates quality grows from mediocre ones.
For pH, the general target range for most crops is 5.5–6.5. Most vegetables and herbs thrive around 6.0–6.2. Lettuce is happy anywhere from 5.5 to 6.5, while fruiting plants like tomatoes prefer the lower end of that range, around 5.8–6.2. The key is that each nutrient element has an optimal pH window for uptake, and if you drift outside 5.5–6.5, you'll start locking out specific elements even if they're present in the solution. Check pH every day if you're in an active grow, and correct with pH Up or pH Down in small doses.
EC (electrical conductivity) measures the total dissolved salts in your solution, which is a proxy for nutrient concentration. For lettuce and leafy greens, a target EC of 0.8–1.2 mS/cm is appropriate. Heavier-feeding plants like tomatoes or peppers will want 2.0–3.5 mS/cm depending on growth stage. Seedlings and clones should start at the low end of any range and be stepped up gradually. Always mix your nutrients into water, never the reverse, and add each part separately to avoid precipitation.
A good monitoring routine looks like this: check pH and EC daily, top off with plain pH-adjusted water when levels drop more than 10%, and do a full reservoir change every 7–10 days in an active grow. If you're using a commercial nutrient line, the brand's feed chart gives you a starting point, but your actual plant behavior and meter readings should always override the chart. Pale new growth usually means nitrogen or iron deficiency (often a pH problem), while dark green, clawing leaves often point to nitrogen toxicity or overly high EC.
For those in a local growing community, getting advice on nutrient lines from a specialist retailer like Better Grow Hydro can help you match formula complexity to your actual experience level. Three-part base nutrients are flexible and educational. Pre-mixed one-part formulas are simpler for beginners and still produce excellent results.
Growing medium and root-zone management
The growing medium in hydroponics isn't feeding your plants the way soil does. Its job is to anchor roots, manage moisture retention and drainage, and support oxygenation around the root zone. Choosing the right one for your system has a real impact on consistency.
| Medium | Best System Pairing | Drainage | Reusability | Notes |
|---|---|---|---|---|
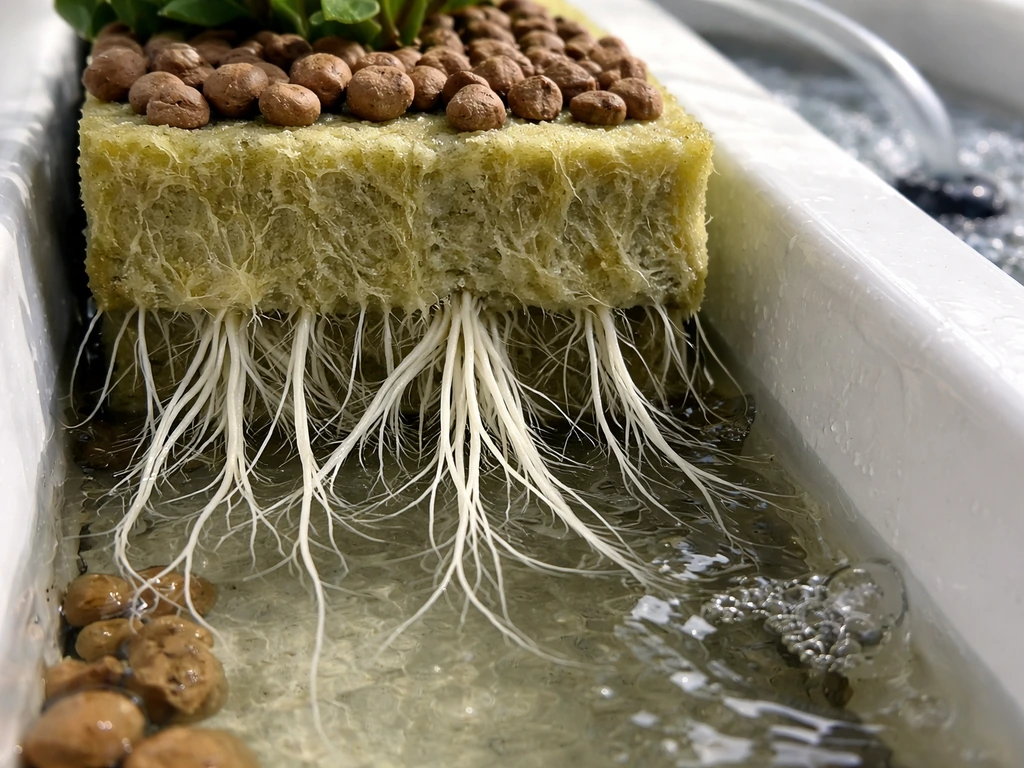
| Rockwool / Stonewool | NFT, Drip, Ebb & Flow | Excellent | Limited (can sterilize) | Industry standard for propagation and main stage; pH-neutral when pre-soaked |
| Hydroton / Clay Pebbles | DWC, Ebb & Flow, Drip | Very high | Yes, rinse and reuse | Great aeration, low moisture retention; needs more frequent watering in drip systems |
| Coco Coir | Drip, hand-watered hybrid | Good | Partially | Holds moisture well, excellent for heavy feeders; technically a hybrid medium |
| Perlite | Drip mixes, top-dressing | Very high | Limited | Usually blended with coco; used alone in some recirculating setups |
| Oasis / Phenolic Foam | NFT, propagation | Good | No | Mostly used for seedlings and cuttings |
| Growstones / Pumice | DWC, Ebb & Flow | High | Yes | Similar to clay pebbles; lighter weight |
Clay pebbles (Hydroton) paired with DWC is one of the most forgiving combinations for new growers. The pebbles provide excellent drainage and air exposure around roots, and they're easy to inspect and clean between runs. Rockwool is the professional standard for good reason: it's sterile, consistent, and gives you precise control over moisture levels. Pre-soak rockwool cubes in pH 5.5 water for at least 24 hours before use to neutralize its naturally alkaline chemistry.
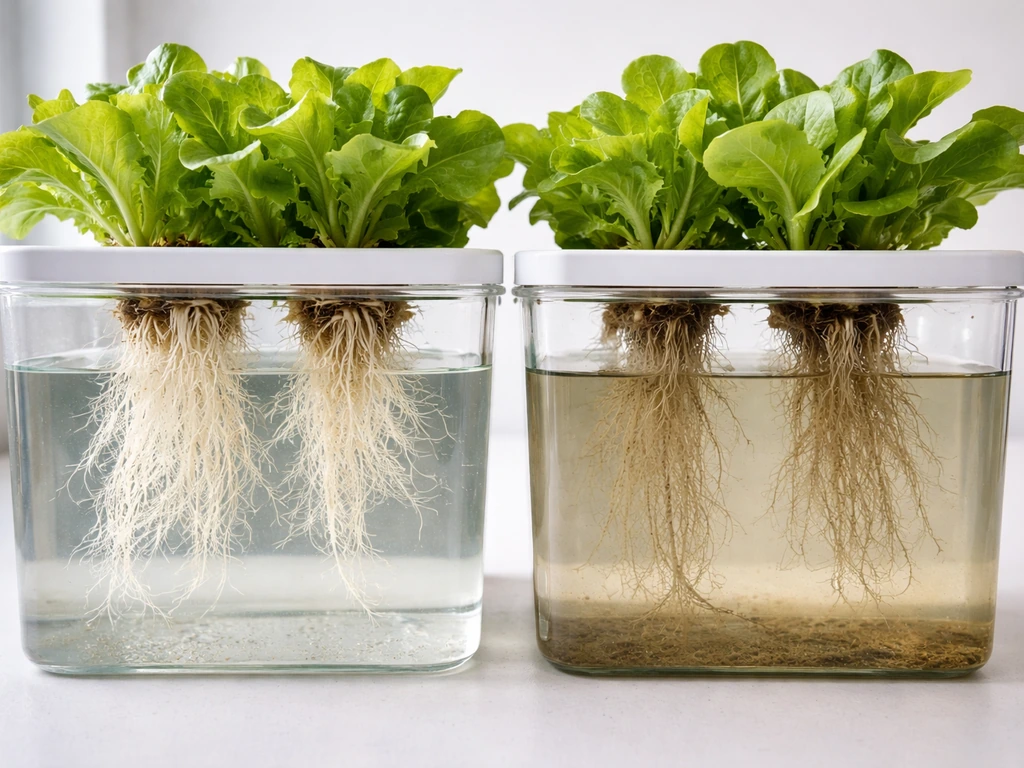
Root zone temperature is critical and often neglected. When nutrient solution gets above 72°F (22°C), dissolved oxygen drops and pythium (root rot) thrives. Keeping your reservoir cool is especially important in summer grows or in warm climates. Insulating your reservoir with foam board, using a water chiller, or simply keeping the res away from heat sources can be the difference between pristine white roots and brown, slimy ones. Dissolved oxygen in the solution should stay above 6 ppm for healthy root development, which is why air stones and good pump sizing matter so much.
Between runs, sterilize your medium. Clay pebbles can be rinsed, soaked in a diluted hydrogen peroxide solution (1–3%), and reused. Rockwool should generally be replaced. Any medium that held infected roots should not be recycled without thorough sterilization.
Day-to-day maintenance and preventing quality killers
Most quality problems in hydroponics are slow-moving. They build up over days, not hours, which means a consistent daily check catches them before they damage your grow. Here's a practical daily, weekly, and between-run routine:
- Daily: Check pH and EC with calibrated meters. Observe plants for leaf color changes, wilting, or unusual growth patterns. Top off reservoir with pH-adjusted plain water if levels are low.
- Every 2–3 days: Check reservoir temp and dissolved oxygen if you have a DO meter. Inspect roots through transparent reservoirs or by lifting net pots; healthy roots are white or light tan and smell clean.
- Weekly: Full reservoir change with fresh nutrient solution. Wipe down any salt buildup on reservoir edges or tubing. Calibrate pH meter using calibration solution.
- Every 2 weeks: Inspect pump and air stone function. Check for biofilm or algae in tubing. Flush lines with diluted hydrogen peroxide if recirculating.
- Between runs: Full system flush, sterilize reservoir and lines, replace worn air stones and check pump output, inspect root zone for any signs of previous infection before starting new seedlings.
Algae and biofilm are two of the most common silent quality killers. Algae grows wherever light hits nutrient solution. Keep reservoirs completely light-proof, cover any exposed solution surfaces, and use opaque tubing. Biofilm builds in lines and on reservoir walls, harboring bacteria that can stress roots. Regular reservoir changes and periodic line flushes prevent buildup before it becomes a contamination problem.
pH drift is the other persistent issue. Oklahoma State University Extension also recommends keeping hydroponic nutrient solution pH in the optimum range of about 5 to 6, usually around 5.
The OSU Extension fact sheet for electrical conductivity and pH in hydroponics also provides crop-specific EC guidance and stresses matching fertilizer solution EC and pH to target plant growth [Oklahoma State University Extension also recommends keeping hydroponic nutrient solution pH in the optimum range of about 5 to 6, usually around 5. ](https://extension. okstate. edu/fact-sheets/print-publications/hla/electrical-conductivity-and-ph-guide-for-hydroponics-hla-6722.
pdf). 5, because pH affects nutrient availability pH drift is the other persistent issue.
Plants acidify the root zone as they grow, and evaporation concentrates salts, which affects pH differently depending on your water hardness and nutrient formula. If you're correcting pH every day by a large margin (more than 0. 5 units), something structural is off: either your base water has too much buffering capacity, your nutrient formula has a poor pH stability, or you have a biological load in the reservoir.
Address the root cause, don't just keep chasing pH with Up/Down solutions. For more background on how water chemistry feeds into this, good water for growing is worth understanding as a foundational concept.
Pests, disease, and protecting your harvest quality
Indoor hydroponics has a lower pest pressure than outdoor soil growing, but it's not pest-free. The most common issues you'll face are fungus gnats (larvae damage roots in media that stays too wet), spider mites (thrive in low humidity and hot environments), aphids, and root pathogens like pythium. Prevention beats treatment every time in a closed hydro system.
For fungus gnats, the fix is usually environmental: reduce surface moisture in the medium, allow the top layer to dry slightly between watering cycles, and use yellow sticky traps to monitor population. Beneficial bacteria products like Bacillus subtilis added to the reservoir help compete against pythium and other root pathogens without harming your plants. Hydrogen peroxide diluted in the reservoir (1–3 ml of 3% H2O2 per gallon) as a preventive treatment can knock back early-stage root issues, but it will also disrupt beneficial biology, so use it strategically.
Spider mites are controlled primarily through humidity management. Keep RH at or above 50% during veg and consider neem oil or insecticidal soap sprays if you see early signs. Avoid foliar sprays during late flowering stages to protect harvest quality. Pyrethrin-based sprays are effective but should not be used close to harvest.
Harvest quality in hydroponics is directly tied to what you do in the final two weeks of the grow. A clean water flush (replacing nutrient solution with plain pH-adjusted water) for the last 5–14 days before harvest removes residual salts from the plant tissue, which affects flavor and finish quality. EC should drop to near-zero by harvest day. Monitor closely during the flush period because some plants show rapid color changes as stored nitrogen depletes. That's normal and often desirable.
If you're growing in an area with established hydroponic resources, connecting with a specialist retailer gives you access to current product knowledge that generic online advice can't match. For growers in the UK, for example, Better Grow Hydro in Cardiff is a resource worth knowing, particularly for equipment and nutrient sourcing decisions. Similarly, for growers in the American Midwest, the local knowledge available at Quality Grow Hydroponics in Kansas City can be helpful when you're dialing in a new setup and want hands-on guidance.
Putting it all together: your next steps
Quality grow hydroponics is repeatable once you understand which variables matter most and build habits around monitoring them. The growers who consistently get excellent results aren't necessarily running the most sophisticated systems. They're the ones who check their pH every day, change their reservoir on schedule, keep their root zone cool and oxygenated, and respond quickly when something looks off.
Start with one system type that fits your space, get your meters calibrated, and run one crop from seed to harvest following the parameters in this guide. Track your pH, EC, and reservoir temp in a simple notebook or spreadsheet. The patterns you see in that first run will teach you more than any guide can. Once you've nailed the fundamentals, scaling up or experimenting with more complex systems becomes much lower risk.
Good resources can accelerate that learning curve significantly. Whether you're browsing techniques on a specialist site or walking into a store to ask questions in person, places like Good to Grow Hydroponics are the kind of environment where you can get answers tuned to your specific setup rather than generic advice. The investment in understanding your system pays back in every run that doesn't end in a problem you couldn't diagnose.
FAQ
How often should I calibrate my pH and EC meters for quality-grow-hydroponics?
Calibrate them separately and on a schedule, pH meter first. If your pH reads 6.0 in the correct buffer, but the EC number jumps after you rinse and re-dip, you likely have dirty probes or water film on the EC sensor. A common mistake is to calibrate with expired standards or to store probes in dry conditions, which makes daily pH checks unreliable and causes “quality” problems you will chase for days.
What should I do if my pH keeps drifting even though I adjust daily?
Yes, but “fixing” pH every day with large corrections is a red flag. If you routinely adjust more than about 0.5 pH units, check three structural causes first: your source water buffering (alkalinity), nutrient formulation/pH stability, and whether there is excess biological load (biofilm or poor reservoir hygiene). The quality move is to correct the root cause, then do smaller targeted adjustments.
Can I run one EC target for the whole grow to simplify quality-grow-hydroponics?
Do not aim for the same EC number across all stages. Seedlings and clones generally need a lower starting EC, then you ramp up gradually as roots establish. A practical approach is to step your target EC up in small increments and watch leaf color, stem thickness, and tip burn risk, because a too-high EC early often looks like “dark green, stressed” growth.
How do I decide whether to change the reservoir every 7–10 days?
For most systems, a 7 to 10 day reservoir change is a solid baseline, but “quality” depends on your run conditions. If your temperature is higher, you have more evap concentration, or you see faster pH/EC swings, shorten the change interval. Conversely, very clean, well-aerated systems with stable conditions can sometimes stretch it, but only if your readings and root health stay consistent.
How exactly should I do the final flush without harming yield or taste?
A flush is not the same thing as a full reservoir reset. During the last 5 to 14 days, replace nutrient solution with plain pH-adjusted water, keep monitoring EC so it trends toward near-zero, and maintain root-zone oxygenation, especially in DWC or NFT. Also note some crops do not respond the same way, so rapid color changes can be normal but should be interpreted in context (stored nitrogen depletion versus nutrient deficiency).
Is letting tap water sit 24 hours enough to protect root health?
Yes. If you use tap water with chloramines or chlorine, letting it sit can help with chlorine but not always chloramines. That matters for root-zone biology and pathogen pressure. If you are unsure, use a carbon filter or treat based on your local water type, then verify with water test results so your nutrient stability and pH routine do not become inconsistent.
If my roots look okay but growth slows, what oxygen-related checks should I do?
Keep dissolved oxygen high, and avoid letting the reservoir warm up, but also check pump performance and airflow distribution. If the bubbles look “fine” yet roots stall, you may have insufficient circulation dead zones, undersized airline tubing, or pump flow reduced by biofilm buildup in the line. Quality grows usually include a quick weekly check that water is moving evenly and DO is not dropping overnight.
Why do algae and biofilm keep coming back even when I change the reservoir?
Yes, and it is more common than people think. If you see consistent pH corrections plus algae/biofilm signs, you may be allowing light into the reservoir or using translucent tubing somewhere. The quality fix is total light-proofing (opaque tubing, covered reservoirs, and no splashed nutrient surfaces) plus routine line flushes so biofilm cannot become a constant source of contamination and nutrient demand.
Can I reuse clay pebbles or rockwool after a disease problem?
Don’t reuse infected medium by default. If you suspect root pathogens like pythium (brown slimy roots, fast collapse, persistent smell or recurring issues), treat the run as contaminated. Clay pebbles can be rinsed and sterilized, but only after thorough inspection, and anything that held heavily infected roots needs strong sterilization and careful reconditioning before reuse.
What’s the best way to prevent spider mites and aphids in an indoor hydro setup?
Even in indoor hydroponics, pests can get in via ventilation, clothing, or plants you bring in. For “quality-grow-hydroponics,” the edge is early detection and a prevention-first routine, not aggressive sprays late in flowering. If you use foliar treatments, plan around harvest timing because residual effects can impact harvest quality, especially on sensitive crops.
Can I combine beneficial bacteria products with hydrogen peroxide, and what should I watch for?
If you are using Bacillus or similar products, treat them like biology, not instant disinfectant. Ensure water pH and temperature are within the product’s operating window, and avoid frequent peroxide dosing at the same time, since oxidizers can reduce beneficial bacteria populations. The practical approach is to decide your strategy (prevention with bio-products versus short-term peroxide knockback) and keep it consistent so you can actually interpret your results.