You can grow real, harvestable plants hydroponically starting this week, even if you've never done it before. Hydroponics simply means growing plants in nutrient-rich water instead of soil. The roots sit in or flow through a solution that delivers everything the plant needs directly, so the plant spends less energy searching for food and more energy growing. That's why hydroponic plants often grow 30 to 50 percent faster than their soil-grown counterparts. But speed comes with responsibility: you're replacing what soil does naturally, so pH drift, oxygen levels, and nutrient balance all become your job. This guide walks you through exactly how to do that job well.
Learn How to Grow Hydroponics: Setup, Care, and Troubleshooting

Marcus Holloway
14 Apr 2026
Hydroponics basics and what you'll need to start
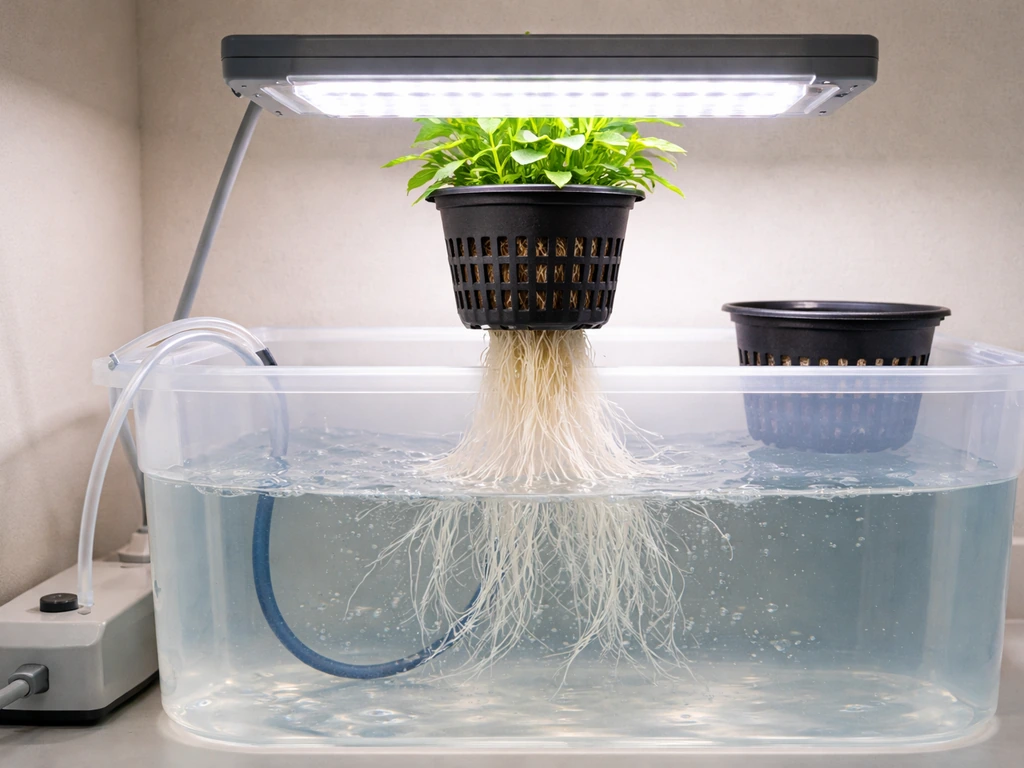
In a soil-free system, plant roots get oxygen directly from the air or from dissolved oxygen in the water, not from soil pores. That's a critical difference. When everything is dialed in, roots thrive and plant growth is explosive. When oxygen delivery or solution management slips, problems like root rot appear fast. Understanding this from day one saves you from the most common beginner failures.
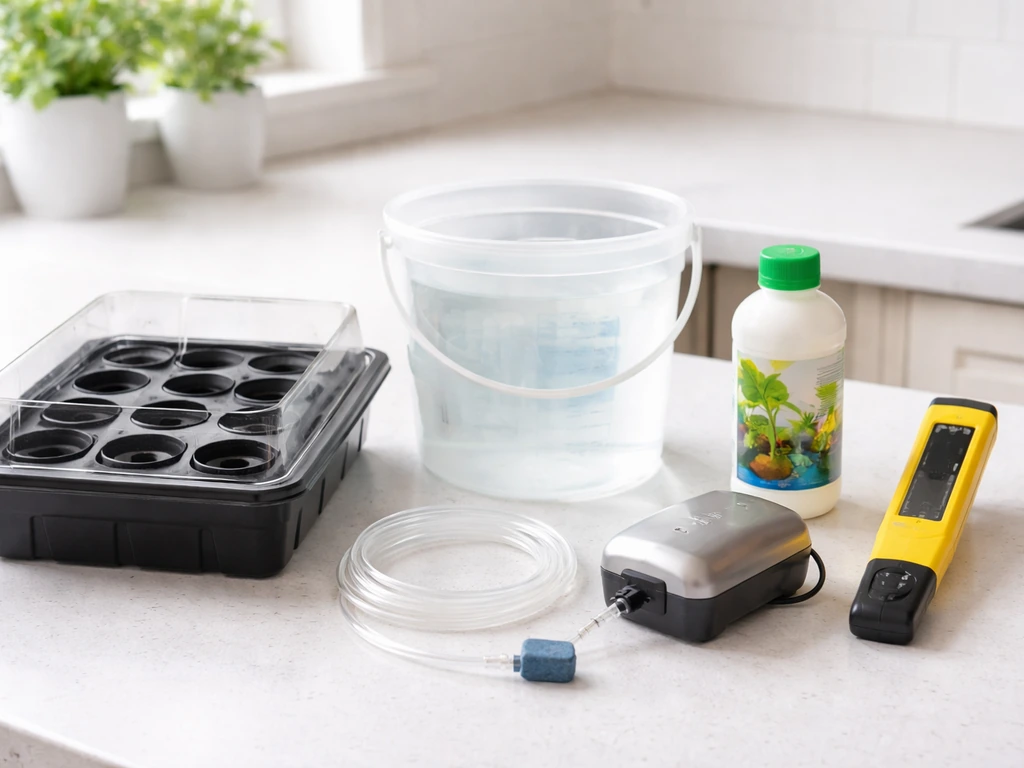
Before you buy anything, decide on your available space, budget, and how much daily attention you can realistically give. A 2x2 foot tent or closet corner is enough for a small system. A 4x4 space opens up more options. Budget-wise, a functional beginner setup runs anywhere from $100 to $400 depending on system type and lighting choice. Here's a core shopping list that applies to almost every hydroponic setup:
- Reservoir or growing container (5 to 20 gallons depending on plant count)
- Net pots (2-inch for seedlings, 3- to 4-inch for most plants)
- Growing medium: hydroton clay pebbles, rockwool, or coco coir
- Water pump and/or air pump with air stones
- pH meter and EC/TDS meter (both are non-negotiable)
- pH Up and pH Down solutions
- A quality two- or three-part hydroponic nutrient solution
- Timer for lights and pumps
- Grow light appropriate for your space
- Thermometer and hygrometer (temperature and humidity)
If you want deeper reading alongside this guide, the best hydroponic grow book recommendations on this site can help you build a solid foundational library. That said, this guide alone is enough to get your first crop growing.
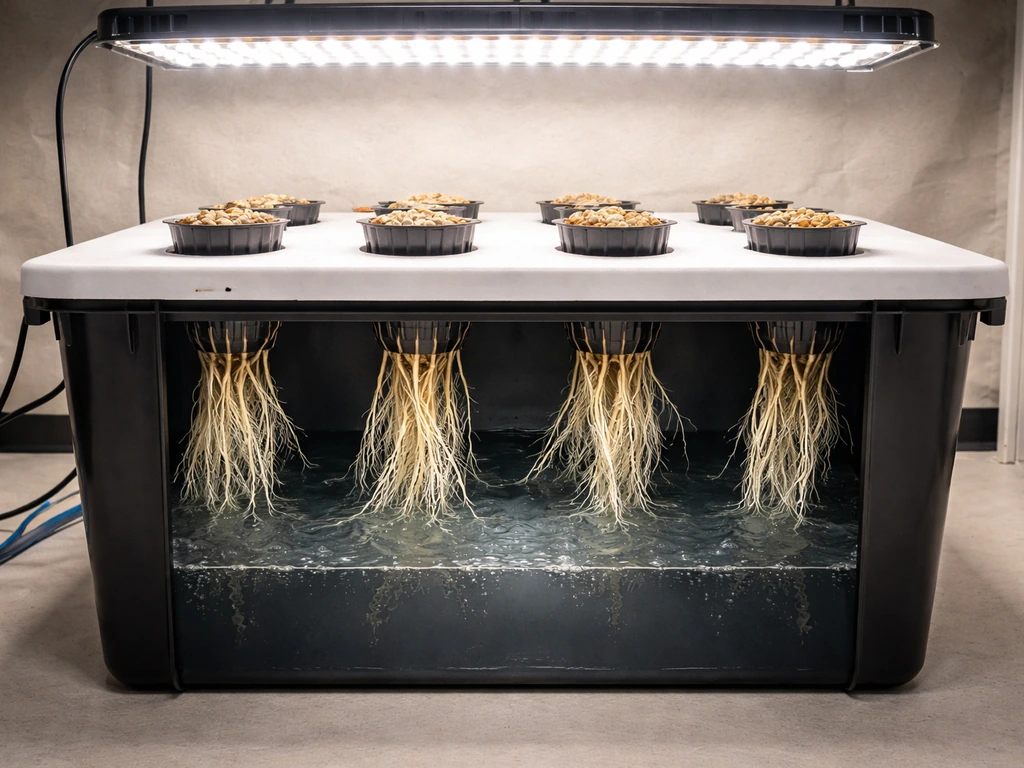
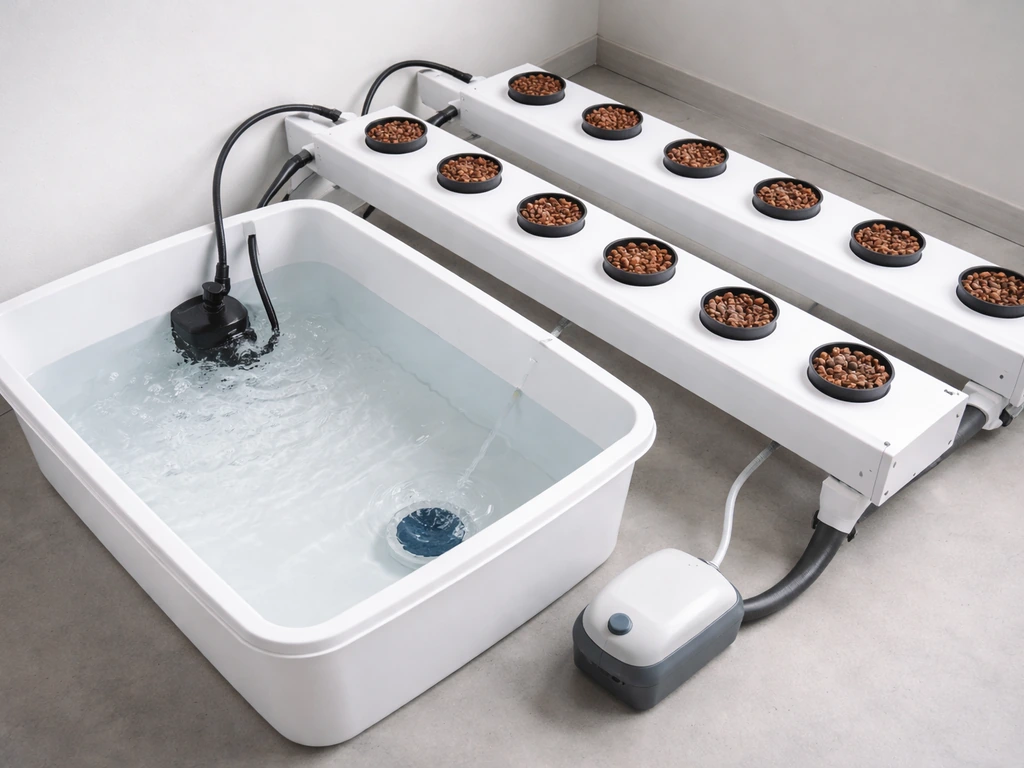
Choosing a hydroponic system: DWC, NFT, drip, and ebb-and-flow compared
There are four beginner-relevant system types worth knowing. Each has real trade-offs in cost, complexity, and forgiveness. Here's an honest comparison:
| System | How It Works | Best For | Complexity | Approx. Starter Cost |
|---|---|---|---|---|
| Deep Water Culture (DWC) | Roots hang in oxygenated nutrient solution continuously | Beginners, leafy greens, cannabis | Low | $50–$150 |
| Nutrient Film Technique (NFT) | Thin film of nutrient solution flows through sloped channels over roots | Leafy greens, herbs, intermediate growers | Medium | $100–$250 |
| Drip System | Nutrient solution dripped onto growing medium on a timer | Larger plants, tomatoes, peppers | Medium | $100–$300 |
| Ebb-and-Flow (Flood & Drain) | Tray floods with solution on a timer, then drains back to reservoir | Versatile crops, intermediate growers | Medium-High | $150–$350 |
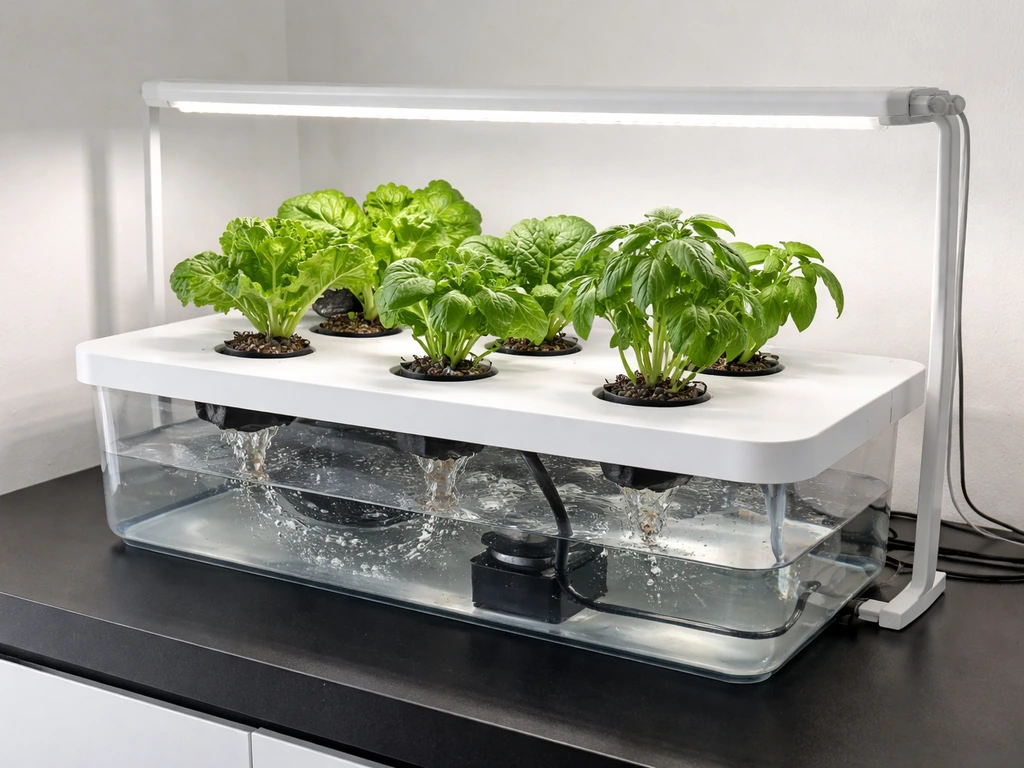
For most people reading this today, Deep Water Culture is the right starting point. It has the fewest moving parts, is cheap to build or buy, and teaches you every core concept you need. You grow in a bucket or tote, suspend net pots in the lid, and an air stone keeps the solution oxygenated. That's it. Once you've run one DWC cycle successfully, moving to NFT or drip is a small step up. For a broader look at what's available before you commit, the article on hydroponics grow systems for beginners breaks down entry-level kit options in more detail.
NFT systems are excellent for herbs and leafy greens if you want a clean, scalable setup. The weakness is that pump failure means immediate root dry-out, so they're less forgiving. Drip systems handle larger, heavier-feeding plants well but require more attention to clogged emitters and timer calibration. Ebb-and-flow gives you flexibility to grow many plant types in one tray but involves the most components and most potential failure points.
Plants and varieties that actually do well in hydro
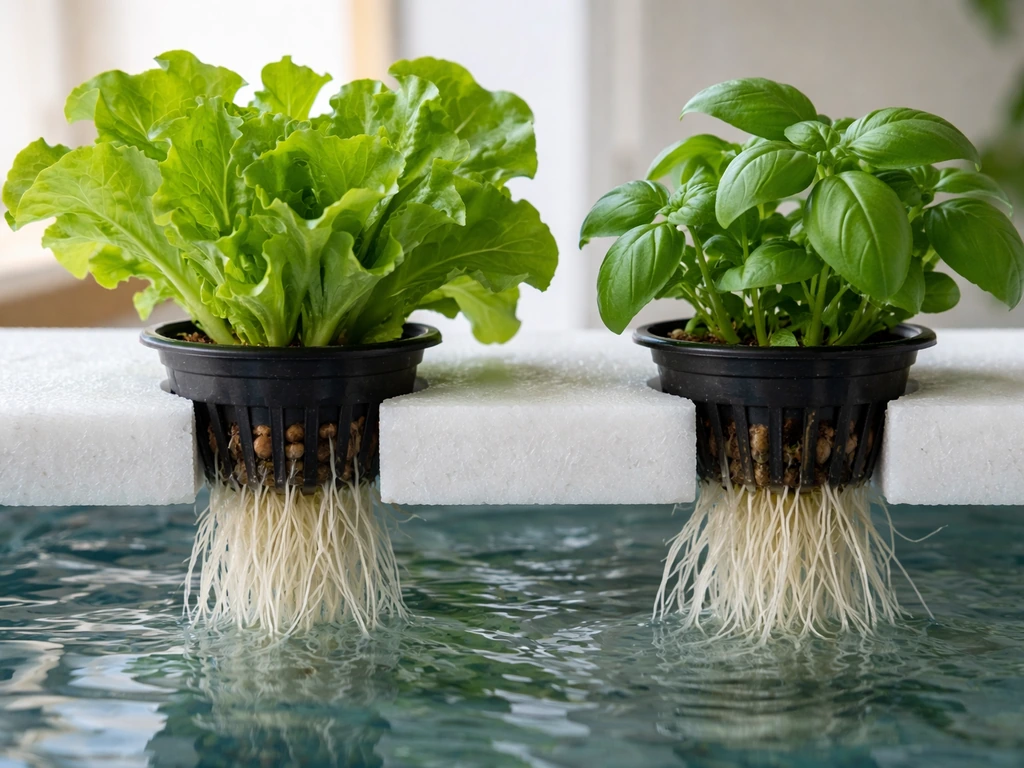
Not every plant loves hydroponics equally. Fast-growing, relatively shallow-rooted plants are your best bet as a beginner. Lettuce is practically foolproof: it's forgiving of minor pH swings, grows to harvest in 4 to 6 weeks, and thrives in DWC or NFT. Basil, spinach, kale, chard, and other leafy herbs follow the same logic. If you want fruiting plants, cherry tomatoes and peppers are achievable but require more nutrient management and a longer commitment.
For growers on this site looking to grow cannabis hydroponically, variety selection matters a lot for system compatibility. Autoflowering strains work particularly well in DWC because their compact root systems and faster cycles align naturally with reservoir-based management. If that's your goal, the best hydroponic grow system for weed guide goes deep on matching strain type to system design. The core principle remains the same regardless of plant: start with varieties known to perform well in a controlled, soil-free environment before experimenting with demanding or finicky genetics.
- Best beginner crops: lettuce, basil, spinach, kale, mint, cilantro
- Intermediate crops: tomatoes (especially cherry types), peppers, cucumbers, strawberries
- Advanced crops: root vegetables (not ideal for most hydro systems), large fruiting vines
Nutrients, pH, and water quality: your core success checklist
This is where most beginners either succeed or fail. Get this section right and your plants will almost certainly thrive. Get it wrong and no amount of expensive equipment saves you.
Nutrients
Use a hydroponic-specific nutrient formula, not general garden fertilizer. Hydroponic nutrients are formulated to dissolve fully and deliver precise ratios of nitrogen, phosphorus, potassium, calcium, magnesium, and micronutrients. A quality two-part or three-part liquid system (like General Hydroponics Flora Series or similar) gives you control over vegetative and flowering stage ratios. Always mix nutrients into water before checking and adjusting pH, since nutrient addition changes pH. Start at half the recommended dose for your first week to avoid nutrient burn in young plants.
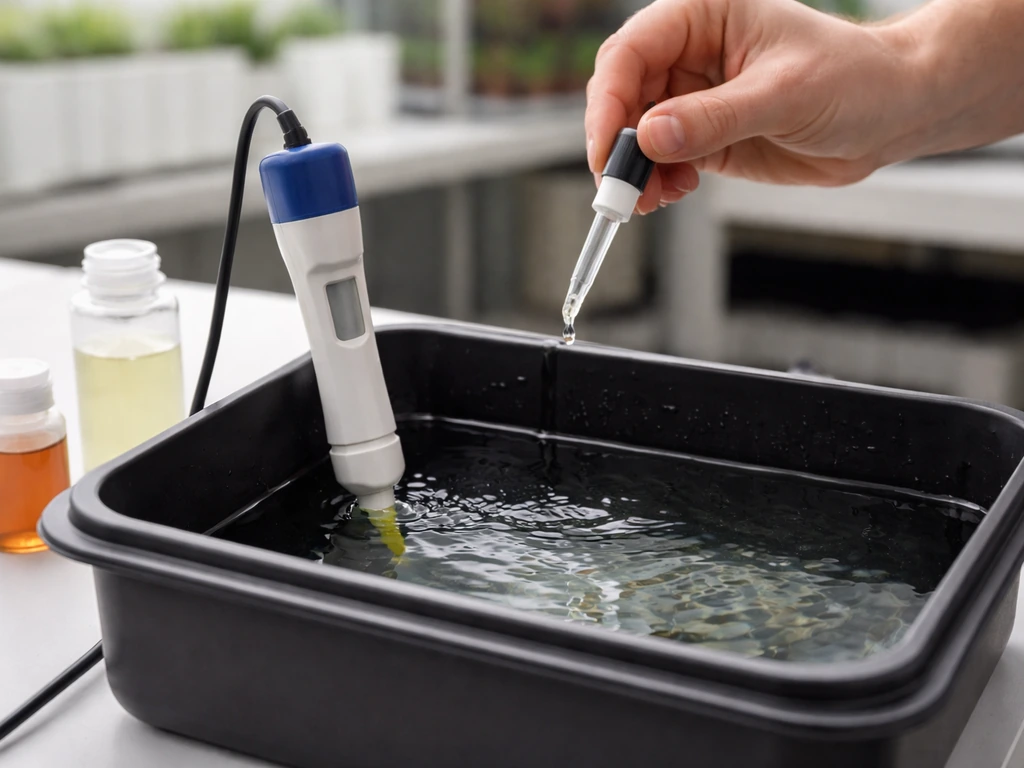
EC (electrical conductivity) tells you how concentrated your nutrient solution is. For seedlings and young plants, target 0.8 to 1.2 mS/cm. For established vegetative growth, 1.2 to 2.0 mS/cm. Flowering or fruiting plants often want 2.0 to 2.5 mS/cm. TDS (total dissolved solids) meters measure the same thing in different units: multiply EC by 500 to get approximate ppm. Keep a log. As plants drink and nutrients are absorbed, both EC and pH drift over time, so monitoring and adjusting are ongoing tasks, not one-time setups.
pH
pH determines whether plant roots can actually absorb the nutrients dissolved in your water. The ideal range for most hydroponic crops is 5.
5 to 6. 5, with 5. 8 to 6. 2 being the sweet spot for most plants.
Outside that range, certain nutrients become chemically unavailable, which looks like deficiency even when your solution is fully loaded. Check pH daily when starting out. Use pH Up (potassium hydroxide-based) or pH Down (phosphoric or citric acid-based) to adjust in small increments. Add the adjuster, stir, and wait two minutes before re-reading.
It's worth noting that pH and EC values in your reservoir shift over time as plants consume water and nutrients and as microbial activity occurs, so a reading that was perfect Monday may need correction by Wednesday.
Water quality and meter calibration
Start with reverse osmosis (RO) water if your tap water has an EC above 0.4 or contains high chloramine levels. RO water gives you a clean baseline so your nutrient ratios stay accurate. If tap water is your only option, let it sit uncovered for 24 hours to off-gas chlorine, or use a small amount of dechlorinator. Calibrate your pH meter weekly using two-point calibration with pH 4.0 and 7.0 buffer solutions. A poorly calibrated meter is worse than no meter because it gives you false confidence. Your meter choice matters too: budget pH pens can drift quickly, so spending $30 to $60 on a mid-range model with automatic temperature compensation (ATC) is worth it.
Lighting, temperature, humidity, and airflow for indoor grows
Light is your biggest lever for plant growth and your biggest potential energy cost. For leafy greens and herbs, a T5 fluorescent or full-spectrum LED panel in the 2000 to 4000 lumen range per square foot is sufficient. For fruiting plants or cannabis, you want at least 400 to 600 true watts of LED (or equivalent HPS/CMH) per 4x4 area. LED is the right default choice today: lower heat output, better efficiency, and long bulb life. Look for LEDs with a full spectrum (3000K to 5000K) rather than blurple (red/blue only) boards, which are outdated.
Light schedules depend on plant type. Leafy greens do well on 16 hours on / 8 hours off. Vegetative cannabis and most fruiting plants also use 18 hours on / 6 hours off during veg. Flip to 12/12 to trigger flowering in photoperiod plants. Use a mechanical or digital timer. Hand-switching lights is a recipe for inconsistency.
Temperature targets: keep the air temperature at 70 to 78°F (21 to 26°C) during lights-on, and no lower than 60°F (15°C) during lights-off. Root zone temperature matters just as much: keep your nutrient solution between 65 and 72°F (18 to 22°C). Warmer water holds less dissolved oxygen and is a breeding ground for root pathogens. A small aquarium chiller or frozen water bottles can help in warm climates.
Humidity should sit at 50 to 70% during vegetative growth and drop to 40 to 50% during flowering to reduce mold risk. A basic clip fan pointed at the canopy and an oscillating floor fan for the room give you the airflow needed to strengthen stems and manage humidity. In a sealed tent, pair that with an exhaust fan and carbon filter.
Setup, transplanting, and your first-week workflow
Here's how to go from unboxed equipment to living plants in your first week. Follow this sequence and you'll avoid the most common setup mistakes.
- Assemble your system and fill the reservoir with RO or tap water (pH and EC not yet adjusted). Run the pump and air stone for 30 minutes to confirm everything works before nutrients go in.
- Mix nutrients into the water at half the recommended dose for your plant stage. Stir thoroughly.
- Check EC. Adjust nutrient concentration if needed until you hit your target range (0.8 to 1.2 mS/cm for seedlings).
- Check pH after nutrient addition. Adjust to 5.8 to 6.2 using pH Up or pH Down in small increments.
- Germinate seeds in rockwool cubes or rapid rooter plugs kept moist (not soaking) at 70 to 78°F. Seeds typically sprout in 3 to 7 days.
- Once seedlings have a visible root emerging from the plug (usually day 5 to 10), transplant into net pots filled with rinsed clay pebbles or coco coir.
- Lower the net pot so the bottom just touches the nutrient solution, or position so roots can reach it within a day or two. In DWC, keep the water level about 1 inch below the bottom of the net pot and let the air stone splashing and root growth close the gap.
- Set your light timer. Start with 18 hours on for most plants.
- Check pH and EC every day for the first week. Make small adjustments. Do not over-correct.
- Top off with plain pH-adjusted water when the reservoir drops 10 to 20%, and do a full reservoir change every 7 to 14 days.
The first week is mostly observation. You're learning what your system's natural pH drift looks like, how fast your plants drink, and whether your environment is stable. Keep a simple daily log: date, pH, EC, temperature, and any observations. It takes less than five minutes and will be invaluable when something goes wrong later.
Maintenance, troubleshooting, and wrapping up your grow
Ongoing maintenance routine
Daily: check pH and EC, top off with pH-adjusted water as needed, visually inspect roots and leaves. Weekly: full reservoir change with fresh nutrients, clean any mineral buildup from reservoir walls, check pump and air stone function. Every two weeks: calibrate pH meter with fresh buffer solution. Monthly or between cycles: full system flush and sanitization.
Common problems and how to fix them
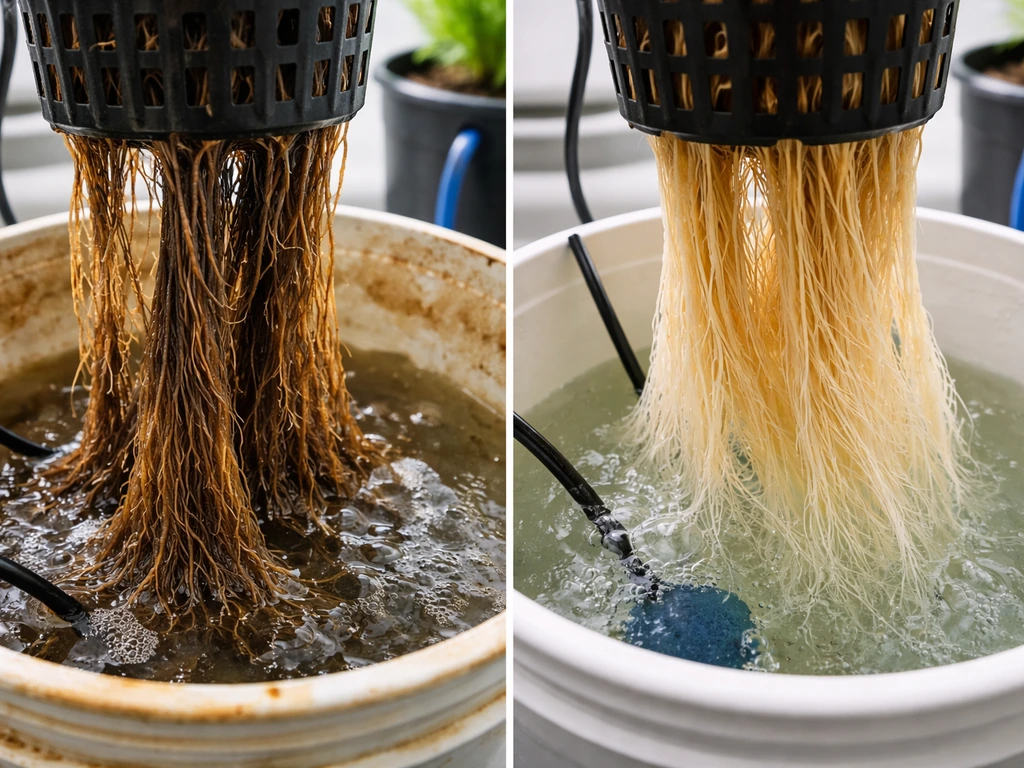
Root rot is the most common serious problem in hydro. Roots turn brown and slimy and the reservoir smells bad. Causes: water temperature too high (above 72°F), insufficient dissolved oxygen, or light leaking into the reservoir. Fixes: lower reservoir temp, add more air stones, cover all light leaks, add a beneficial bacteria product like Hydroguard (Bacillus amyloliquefaciens) to out-compete pathogens. Replace the full reservoir solution immediately.
Nutrient deficiencies show up as yellowing, browning, or discoloration in specific patterns. Yellow lower leaves often mean nitrogen deficiency. Purple stems can mean phosphorus lockout (usually a pH problem, not a nutrient shortage). Brown leaf tips suggest nutrient burn from EC that's too high. Always check pH before assuming you need more nutrients. A locked-out plant looks deficient even when your solution is fully loaded. Bring pH into range first and watch the plant recover over a few days before adding more nutrients.
Algae grow on any surface with light and nutrient exposure. Green slime in your reservoir or on net pots means light is getting in. Wrap your reservoir in black and white poly film or use opaque containers. Never use clear tubing if you can avoid it. Algae competes with your plants for oxygen and nutrients and is a sign your light management needs tightening.
pH drift that won't stabilize usually means your buffer capacity is low (common with RO water) or that roots are releasing acidic compounds as they grow. Add a small amount of calcium-magnesium supplement, which also acts as a pH buffer, or consider a commercially formulated pH stabilizer. Checking twice daily instead of once during problem periods helps you catch and correct drift before it causes visible plant stress.
Harvest and end-of-cycle cleanup
Leafy greens can be harvested by the cut-and-come-again method: remove outer leaves and let the plant keep producing for weeks. For a full harvest, cut at the stem base when the plant reaches your desired size. Fruiting plants are ready when fruit reaches full color and firmness. After harvest, drain and discard the reservoir solution (don't reuse it for the next cycle). Disassemble net pots, clean clay pebbles by soaking in a mild hydrogen peroxide solution (3% at a 1:10 ratio with water), rinse thoroughly, and let dry. Scrub the reservoir with the same solution, rinse, and let air out before refilling. This prevents pathogen carryover between grows.
If you want to compare what you've set up against how a soil grow would have gone, the breakdown in hydroponic vs soil grow is worth reading after your first cycle. You'll have real data from your own grow to reference, which makes the comparison much more meaningful.
Where to go from your first grow
After one successful cycle, you'll have a solid feel for pH management, nutrient dosing, and your specific environment's quirks. That's when scaling up or trying a more advanced system makes sense. If you're ready to look at more capable setups, the roundup of best hydroponics grow systems covers options from compact personal units to multi-site commercial-style rigs with honest assessments of each. For a more detailed, crop-specific breakdown of technique as your skills develop, the grow guide hydroponic resource on this site goes plant by plant through environmental targets and nutrient schedules. Start simple, dial in your fundamentals, and scale with confidence once you've got one clean harvest behind you.
FAQ
What’s the fastest hydroponic setup I can build if I want my first harvest as soon as possible?
Choose a small Deep Water Culture (DWC) bucket setup with an opaque container, an air stone, and a grow light sized to your tent or closet. Plan for the first 7 to 10 days to focus on getting stable pH and EC, then you’ll get meaningful growth and transplant-less “learning” time, which is often what determines how quickly beginners see results.
Can I reuse nutrient solution between crops or after harvesting?
Generally, no. Reuse raises the risk of nutrient imbalance and pathogen buildup, especially if you had any root disease, algae growth, or persistent pH/EC drift. The safer approach is to drain and replace the reservoir after each cycle, then sanitize the reservoir and components before starting fresh.
How do I prevent nutrient lockout when my pH keeps “creeping” even though I adjust daily?
First verify your meter calibration, then reduce variables. Check that you mix nutrients into water before adjusting pH, and avoid overshooting by making small corrections and waiting a couple minutes. If drift persists, you may need better buffering (for example, calcium-magnesium), and you should also check temperature because warm water reduces dissolved oxygen and can worsen root stress.
Should I add nutrients every day, or can I just top off with water?
Most beginners top off with pH-adjusted water to replace what the plant drinks, while nutrients are refreshed on a schedule (often weekly full change in small setups). If you only top off without replenishing nutrients, EC usually drops and plants can shift toward deficiency. Keep an EC log so you know whether to refresh nutrients versus just adding water.
What EC and pH numbers should I watch if I’m growing leafy greens in DWC but using different seedling ages?
Use the range by plant stage, not by species alone. Seedlings and young plants generally need lower EC (around 0.8 to 1.2 mS/cm), while older vegetative plants tolerate higher concentrations. Also check pH more frequently during the first week because the root system is still establishing and can influence readings.
Do I really need RO water, or can I use tap water with some adjustments?
You don’t always need RO, but you do need a baseline you can trust. If your tap water has a high EC, contains chloramine, or your pH behaves unpredictably, RO or a consistent dechlorination approach plus frequent EC/pH tracking becomes important. If tap is workable, still calibrate your strategy around what your measurements show in your first week.
How can I tell whether a problem is pH, overfeeding, or a real deficiency?
Check pH before adding nutrients and use EC as the second indicator. If pH is out of range, plants can show deficiency symptoms even with “full” nutrient levels. If pH is correct but EC is rising and leaf tips brown, that’s more consistent with burn from concentration. If both look stable and symptoms match a pattern, then you can consider targeted correction.
What causes algae in a reservoir even when I’m checking pH and EC regularly?
Algae usually comes from light getting into the reservoir or near the water line, not from your nutrient numbers alone. Use opaque reservoirs, cover net pots if they’re exposed, and avoid clear tubing where possible. Once algae starts, it can consume oxygen, so you’ll often need both lightproofing and a reservoir sanitation step.
Why do my seedlings sometimes crash right after I transplant into hydro?
Most often it’s a mismatch in EC and temperature stability. Seedlings are sensitive to concentration and dissolved oxygen changes, so keep root-zone temperature in the recommended band and start nutrients at about half strength. Also make sure the system is already running and stable before transplanting, not just assembled the day you move plants.
Is a pump and air stone failure really that dangerous in NFT systems?
Yes, because NFT relies on a consistent flow and thin film of solution around roots. If the pump stops, roots can dry out quickly. Use alerts if you can (even simple timers plus a visual check), keep spare parts available, and consider redundancy only after you’ve run your baseline cycle successfully.
How do I size lighting and avoid overdriving my plants?
Start with correct coverage for your space and avoid buying a powerful light without matching it to canopy area and plant type. Overpowering or placing lights too close can cause stress and faster nutrient uptake, which makes pH and EC drift harder to manage. Measure your setup during the first week and adjust height based on plant response.
What’s the simplest way to keep my pH meter reliable?
Calibrate on a schedule (for example, weekly) using fresh buffer solutions and store the probe properly between uses (do not let it dry out). Also recheck after long measurement sessions, because low-quality pens and probes can drift quickly and produce false confidence, which leads to repeated “wrong” corrections.
When should I use beneficial bacteria products, and are they safe to add routinely?
They’re most useful when you’re addressing root-zone instability, avoiding pathogen outbreaks, or after sanitizing so beneficial populations can establish. If you introduce them, follow the product directions and keep your sanitation and reservoir change schedule consistent. Don’t add large doses repeatedly, because you still need to control temperature, oxygen, and light leaks.
How do I store and reuse cleaning solutions like hydrogen peroxide between grows?
Use the concentration specified in your procedure, rinse thoroughly after contact time, and let components air-dry completely before refilling. In small systems, residues can affect roots and can also alter pH behavior. Keep a separate container for diluted solution, label it, and replace it if it sits too long.
What should I do differently if I want to scale up after my first harvest?
Scaling usually means more volume and more time lag, so drift corrections become slower. Increase your monitoring frequency around the transition, consider larger reservoirs to smooth pH and EC changes, and pre-plan how you’ll manage temperature and airflow. The best upgrade after success is often improved stability, not more complicated equipment.