Yes, you can use your own seeds in a Click & Grow system. The official route is to buy Click & Grow's "Grow Anything" pods, which come pre-filled with Smart Soil but no seeds. You drop your chosen seeds in, click the pod into the garden, and grow from there. Click & Grow does warn that it can't guarantee results with third-party seeds, but the system is designed to support it, and with the right seed selection and a few practical adjustments, it works well.
Can You Use Your Own Seeds in Click and Grow

Marcus Holloway
14 May 2026

What Click & Grow actually accepts

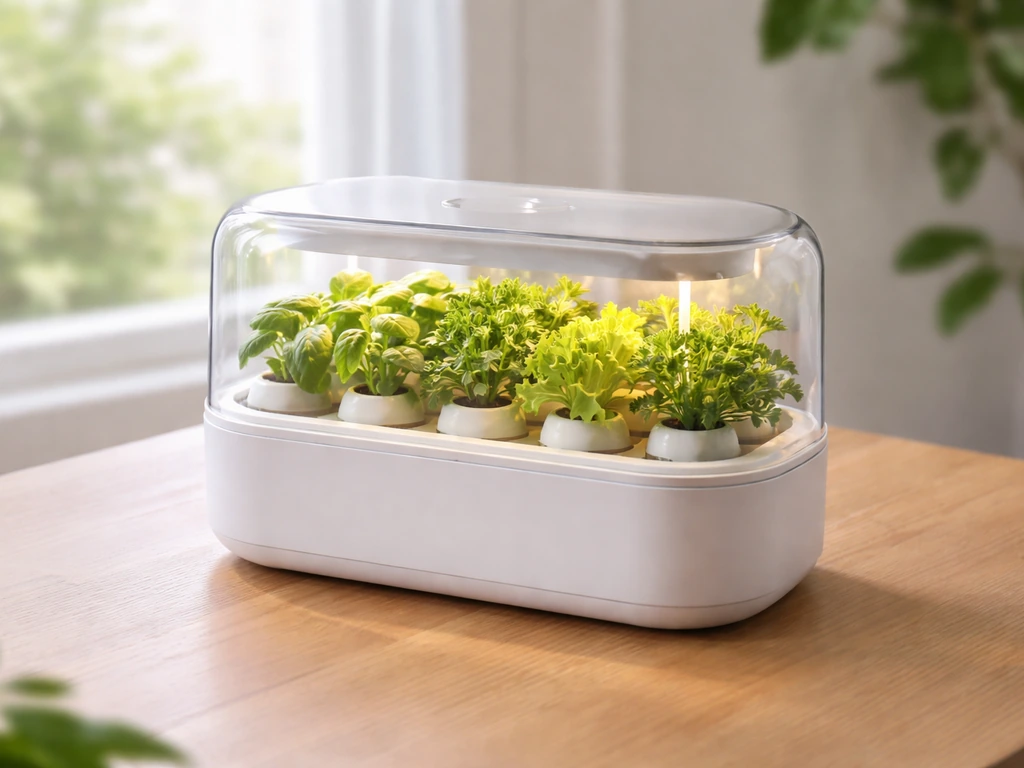
Click & Grow is built around proprietary seed pods. Each pod is a self-contained unit: a plastic cup holding a compressed puck of Smart Soil, already seeded with whatever plant is printed on the label. The Smart Soil itself is a blend of coco-coir and peat, plus embedded slow-release nutrient balls that deliver nitrogen, phosphorus, potassium, magnesium, calcium, and microelements over the course of up to 18 weeks (about 4 months). That nutrient delivery is baked into the medium, not dosed from a separate reservoir, which makes it fundamentally different from a traditional hydroponic setup.
The system is designed so pods just click into the garden's plastic cups, the wicks draw water up from the reservoir below, and the built-in LED light runs on a 16-hours-on, 8-hours-off timer automatically. Everything is pre-calibrated for the company's own seed varieties. Third-party seeds aren't blocked outright, but the system wasn't originally tuned for them, which is why Click & Grow created the Grow Anything pod as a specific workaround.
Can you use your own seeds? Quick compatibility answer
The short practical answer is yes, with one important caveat: use the Grow Anything pods rather than cracking open a standard pre-seeded pod and stuffing your own seeds in. The Grow Anything pods contain the same Smart Soil with the same nutrient balls, but they're sold seedless specifically so you can add your own.
Click & Grow states you can use your own seeds by planting them in the smart soil and clicking the cartridge into the garden plant your own seeds in the smart soil.
Click & Grow describes them as an "experimental" pod designed to "boost sprouting and growth" for any seeds you add. You still get the Smart Soil germination advantage, you still click the pod in the same way, and the system runs exactly as normal. The only thing missing is Click & Grow's guarantee on your results.
If you're wondering whether you could skip the Grow Anything pods entirely and just drop loose seeds into an old, already-used pod, the answer is also yes but with more risk. Click & Grow actually has an official process for reusing unsprouted pods with new seeds, which means the option is acknowledged. But for a fresh start with your own seeds, buying Grow Anything pods gives you the cleanest setup.
How to plant your own seeds: step-by-step
- Buy Grow Anything pods from Click & Grow (available in standard and "for fruiting plants" versions). The fruiting-plant variant is formulated for higher nutrient demand and longer growth cycles.
- Check your seed count guidance before planting. The recommended amounts per pod are: greens 3 to 5 seeds; herbs 10 to 20 seeds; flowers 3 to 5 seeds; fruiting plants 1 to 3 seeds (thinned to 1 plant later). Don't overcrowd, as competition for resources inside a small pod is real.
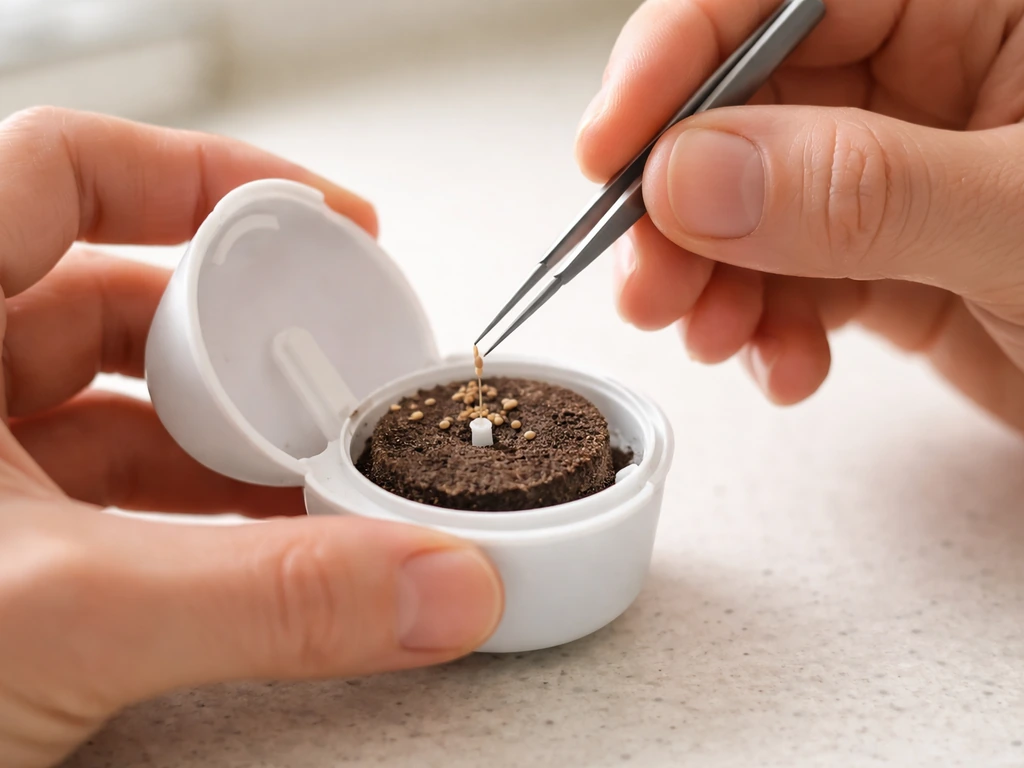
- Make a small indentation in the center of the Smart Soil surface with a pencil tip or skewer, drop your seeds in, and lightly press the soil over them. Don't bury seeds deep, most small herb and leafy green seeds germinate best within the top 3 to 5 mm.
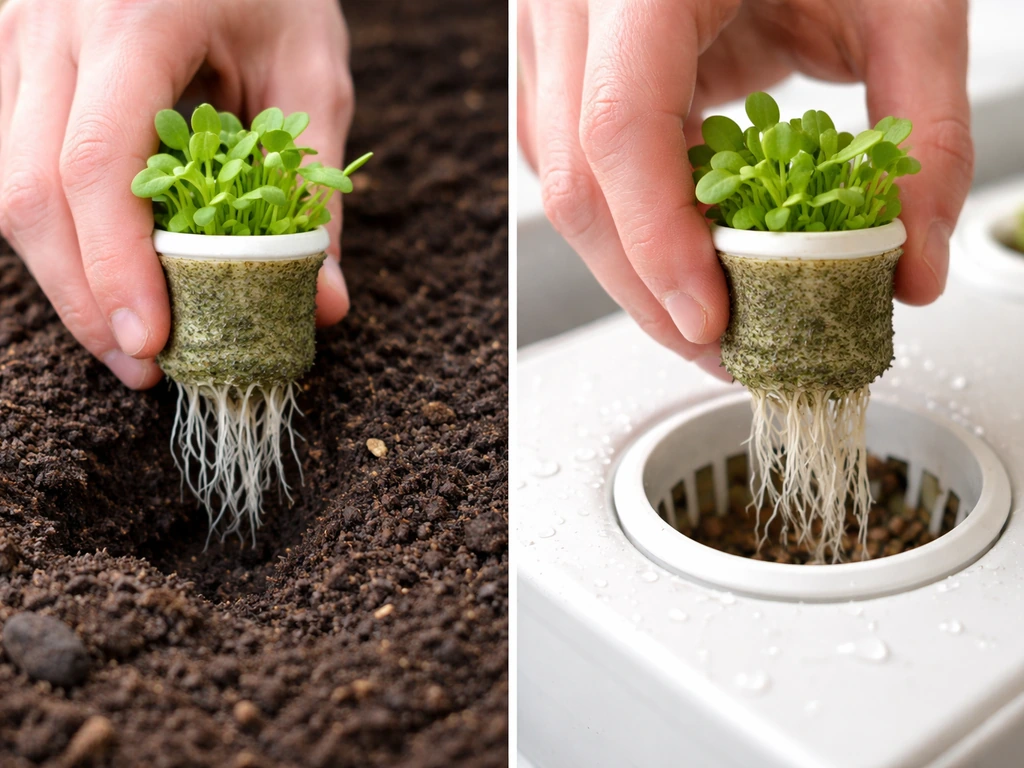
- Orient the pod correctly. The tapered end of the Smart Soil puck goes down inside the plastic cup. If you flip it, wicking won't work properly.
- Place the dome (germination cover) on top. This holds humidity around the seed and speeds germination. Remove it once seedlings reach the dome height.
- Leave the U-shaped lid in place as well. It reduces airspace where mold can colonize and should stay on until the plant needs the room.
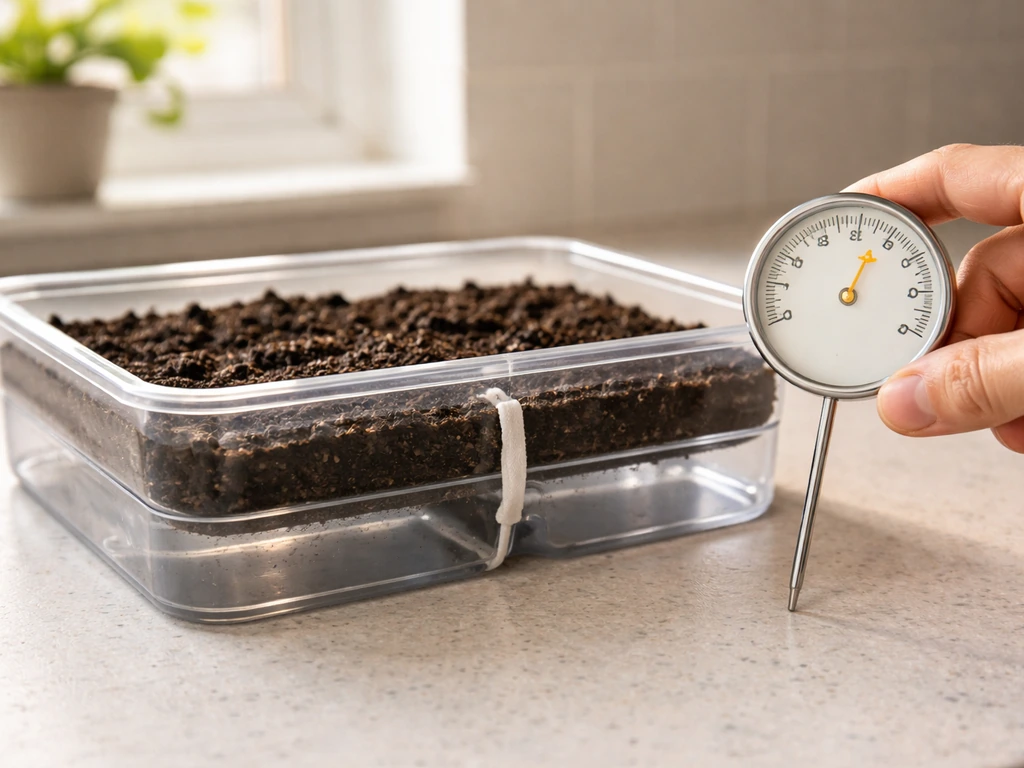
- Fill the reservoir to the max line, click the pod in, and let the system run. Keep room temperature between 64°F and 95°F for best results. The 16-on/8-off light cycle runs automatically.
- For fruiting plants with longer growth cycles, consider using Click & Grow's Pro Plant Cup alongside your Grow Anything pod. Just be careful: if the cup's perforations sit below the waterline, the soil gets waterlogged and seeds can rot. Check the water level.
- Once plants are established and outgrow the pod, you can transplant them to soil or larger containers to extend their life and boost yield.
Best candidates: what grows well (and what might not)
The Click & Grow environment is compact, the light is fixed overhead at a set height, and the pods are small. That shapes what works. Compact herbs and leafy greens tend to do the best because they have shallow roots, fast germination, and modest nutrient demands that match what Smart Soil delivers over 18 weeks.
| Plant Type | Suitability | Notes |
|---|---|---|
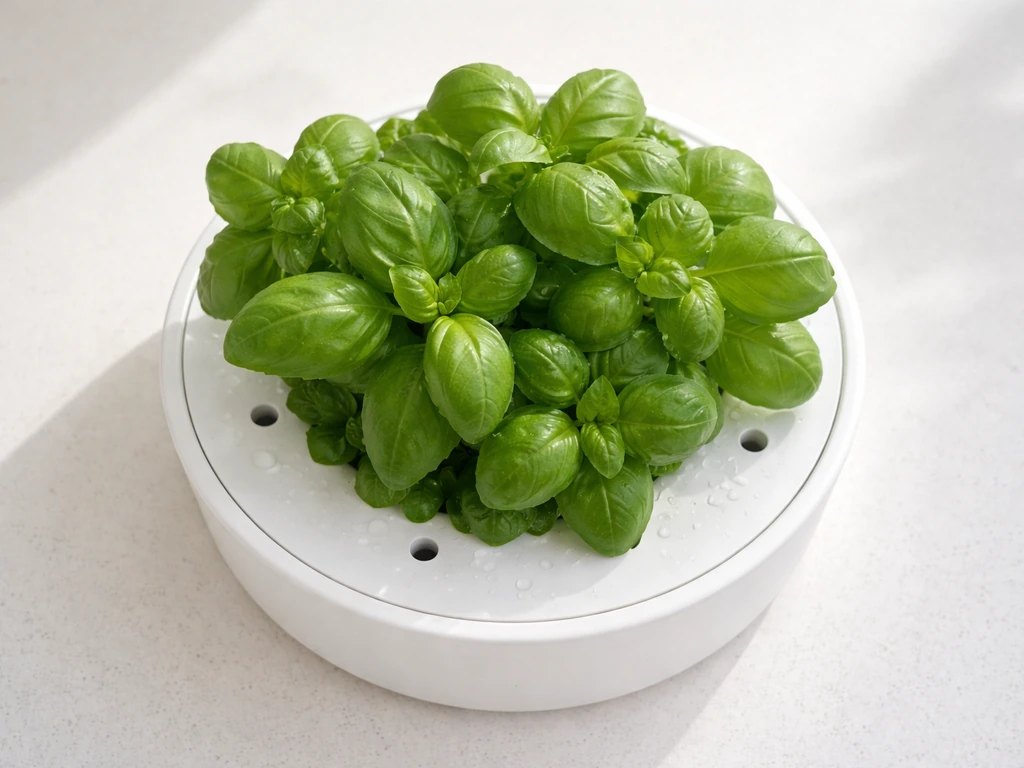
| Basil, cilantro, parsley, chives | Excellent | Fast germinators, compact size, high success rate |
| Lettuce, spinach, arugula, kale | Excellent | Low light tolerance works well with the built-in LEDs |
| Dwarf/compact flowering plants (pansies, marigolds) | Good | Use 3 to 5 seeds per pod, expect variability |
| Compact chili peppers, cherry tomatoes | Moderate | Use the fruiting-plant Grow Anything pod; Pro Cups help; takes longer |
| Large vining plants (cucumbers, squash) | Poor | Root zone too small, growth will stall |
| Tall or bushy plants (large tomato varieties, peppers) | Poor | Outgrow the system quickly, lighting distance becomes an issue |
For anything fruiting or slow-growing, you're working against the pod's natural cycle. The nutrients last about 4 months, which covers a lettuce harvest twice over, but a tomato plant may just be hitting its stride at that point. On average, Click & Grow plants last about as long as the Smart Soil's nutrient window, roughly 4 months, before yields typically taper off how long do Click & Grow plants last. Transplanting to soil after the pod's nutrient window is a realistic strategy, and Click & Grow specifically mentions transplanting as a way to extend life and boost yield.
What to expect compared to official pods
Official Click & Grow pods are pre-tested, pre-selected varieties chosen to work well in the Smart Soil and lighting conditions. When you use your own seeds, you're adding a variable the system wasn't calibrated for. The soil and nutrients are the same, but seed quality, seed age, and variety differences all affect your results.
Most seeds in a Click & Grow Grow Anything pod will germinate within 2 weeks, and Click & Grow sets a 21-day window as the outer boundary before you should start troubleshooting. With fresh, quality seeds from a reputable supplier, you should see similar germination timing to official pods. Where you'll notice the biggest difference is growth consistency: official pods are optimized varieties, so your third-party seeds may grow slower, bushier, leggier, or differently shaped even if germination goes fine.
Nutrient-wise, the Smart Soil delivers what it delivers regardless of what seeds you add. If you're growing a plant with unusually high or low nutrient needs, the fixed nutrient profile may not be ideal. Plants with modest needs (leafy greens, herbs) tend to use the Smart Soil well. Plants with high fruiting demands may exhaust available nutrients or find the balance off, which is why the fruiting-plant version of the Grow Anything pod exists.
Troubleshooting if seeds won't sprout or plants stall
Seeds not sprouting after 2 to 3 weeks
- Check room temperature first. Smart Soil performs best between 64°F and 95°F. Cold rooms significantly slow or halt germination.
- Make sure the reservoir is filled and the wick is actually drawing water. If the pod feels dry despite a full reservoir, pull out the wick, reinsert it, or replace it entirely. Dry Smart Soil won't germinate anything.
- Verify the pod is oriented correctly: tapered end down. An upside-down pod won't wick properly.
- Confirm your seeds are viable. Old seeds or seeds stored poorly (heat, humidity) have low germination rates. Test a few seeds on a damp paper towel first if you're unsure.
- Check that the dome is in place. Without it, the surface dries out too fast for small seeds to establish.
Seeds sprouted but growth has stalled
- If multiple seedlings are competing in one pod, thin to the recommended count (1 plant for fruiting types, 2 to 3 for herbs). Overcrowding stunts everything.
- For fruiting plants past 12 weeks, the pod nutrients may be getting depleted. Transplanting to a container with fresh growing medium is the right next move here.
- If the plant is getting leggy or pale, check light distance. The Smart Garden light adjusts in height, make sure it's close enough to the canopy.
- Check for mold on the soil surface. Surface mold doesn't always kill plants but competes for oxygen and can signal overwatering or stagnant air. If you see white fuzz, remove it with a dry paper towel and improve airflow slightly.
Reusing an unsprouted pod with new seeds
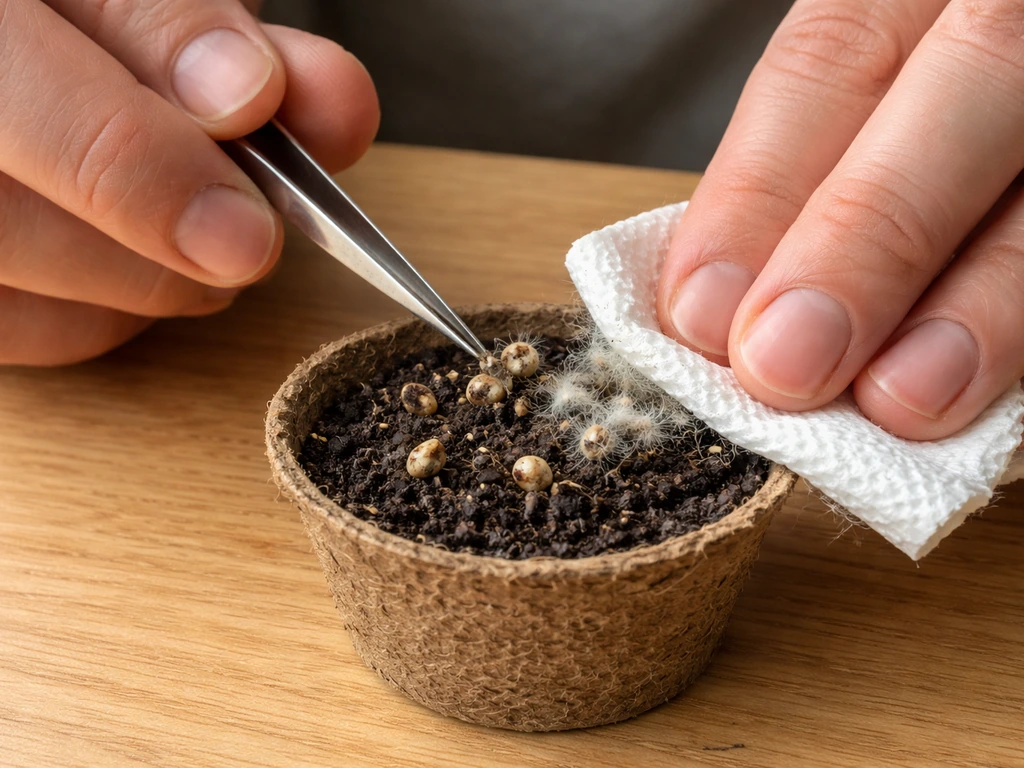
If your first attempt didn't sprout, you can reuse the pod. Remove any visible mold with a dry paper towel, use tweezers to pull out the failed seeds, and replant with fresh seeds. The Smart Soil still has nutrients remaining if the pod is relatively new. This is Click & Grow's own recommended process for failed germination, so you're not improvising here.
Next steps and alternatives if it still won't work
If you've done everything right and a specific plant type just isn't thriving in the Click & Grow system, the honest answer is that some plants don't fit the pod-based format. That's not a failure of your technique, it's a mismatch between the plant's root zone, light, and nutrient needs and what a compact indoor smart garden can deliver.
For plants that outgrow the system, transplanting is the most practical next step. Click & Grow explicitly recommends this to extend plant life and boost yield. Move established seedlings from the pod into a container with a quality coco-coir or peat-based mix and supplement with a balanced slow-release or liquid nutrient program suited to your plant's growth stage. That's actually a clean handoff: the Smart Soil gets your seedling established, then you take it from there in a more flexible growing setup.
If you want to experiment more broadly with seed starting indoors, a small propagation tray with a humidity dome and grow light gives you more control over medium choice, seed depth, and nutrient timing than any pod-based system can. For growers interested in a more hands-on approach to hydroponics, the Click & Grow system's irrigation principles connect closely to other self-watering and wicking setups worth exploring. If you're researching whether it functions like hydroponics, the answer depends on how you define hydroponic growing versus wicking with a reservoir Click & Grow system's irrigation principles. And if you're curious whether the Click & Grow platform itself qualifies as hydroponic or how the plants hold up long-term, those are related questions worth diving into depending on what you're trying to grow next.
FAQ
What types of seeds work best if I use my own in Click & Grow?
Yes, but only if the seed is intended for pod-style germination. Pick varieties that are naturally suited to compact growth (leafy greens, herbs, dwarf cultivars). Avoid very large seeds or plants that need a long warm period or deep rooting, since the fixed pod size and 4 month nutrient window can limit harvest.
Do seed age or freshness affect results when using your own seeds?
Try to use seeds that are recently harvested and stored properly, ideally within about 1 to 2 years for most herb and lettuce types. Older seeds often germinate later or fail, and because the pod is small there is less room to “trial and error” than in traditional seed-starting trays.
How should I seed a Grow Anything pod, and does depth matter?
If you’re using Grow Anything pods, it generally works better when you plant at a shallow depth or just below the surface, then keep the pod undisturbed. Inconsistent seed depth can reduce uniform sprouting, even though the Smart Soil wicks moisture well.
What should I do if I reuse an unsprouted pod that previously failed?
If you reuse a previously used pod, do not expect the same germination rate. Even with leftover nutrients, the medium may have changed slightly after a failed attempt. Also remove any visible mold carefully and fully let the area dry before replanting to avoid spreading spores.
Can I mix different plant seeds in the same pod or garden area?
You can, but you can’t rely on Click & Grow to compensate for mismatched plant needs. If your seeds include both fast greens and slow varieties in the same cycle, the faster plants will likely be ready earlier while the slower ones may still look small when nutrients taper off, so separate pods by plant type is usually better.
Can I crack open a normal Click & Grow pod and put my own seeds inside?
The most common mistake is using third-party seeds in a standard pre-seeded pod intended for a specific variety, by cracking it open and stuffing seeds inside. The system’s grow-out timing and growth pattern are calibrated for its label variety, so use Grow Anything pods for third-party seeds.
What if only a few seeds germinate, or nothing germinates by day 21?
Yes, after the 21-day troubleshooting window you should pause before re-seeding. If nothing sprouts, remove failed seeds and replant with fresh seed in the same pod (or start a new Grow Anything pod). If there is partial sprouting, continue the cycle instead of repeatedly opening the pod, since disruption can slow growth.
Will fruiting plants like tomatoes or peppers work well with your own seeds?
For fruiting plants, plan around the nutrient window. Even if flowering happens, pod space and the fixed LED height can limit pollination, fruit set, and final size. Transplanting to a larger container when seedlings are established is the most realistic way to get meaningful yields.
How should I transplant Click & Grow seedlings if my plant outgrows the pod?
When you transplant, acclimate the seedling to brighter or more direct conditions gradually if you can. Move it to a breathable, coco-coir or peat-based mix and continue with nutrients appropriate to the growth stage, since the pod’s nutrient schedule ends roughly after 4 months.
How do I troubleshoot poor growth when using third-party seeds?
Watch for legginess, pale leaves, or slow growth, since those are usually signs the variety is not thriving under the fixed light height and compact root environment. If you see those issues early, switch seed variety rather than changing multiple variables at once, because the pod is a controlled system.