Click & Grow pods are not directly compatible with AeroGarden systems. The two brands use fundamentally different pod geometries, growing media, and water-delivery mechanics, and neither company documents cross-compatibility. That said, you have real, workable options: you can extract seeds from Click & Grow pods and start them in AeroGarden sponges, transplant Click & Grow seedlings into AeroGarden net cups, or simply use AeroGarden's own pods and move on. This guide walks you through exactly what to check, what to try, and what to do when things don't work.
Are Click and Grow Pods Compatible With Aerogarden?

Marcus Holloway
4 May 2026
Quick compatibility verdict
No, Click & Grow pods will not drop into an AeroGarden grow deck and work the way a native AeroGarden seed pod would. The pod shapes, collar diameters, and media types are designed for each brand's own hardware. Click & Grow pods are meant to click into the Smart Garden's specific cavity geometry, and AeroGarden's grow deck openings are sized for AeroGarden's own sponge-based pods. There is no documented adapter or official workaround from either manufacturer, and the Reddit AeroGarden community has confirmed that even minor size mismatches cause pods to sit loose, tip over, or fail to wick properly. So the answer is a clear no for out-of-the-box swap, but there are smart workarounds that do work.
What 'compatibility' actually means here
When growers ask about pod compatibility, they usually mean one thing: can I put Pod A into System B and expect it to grow? But there are actually three separate compatibility questions bundled into that, and all three need to pass for a crossover to work.
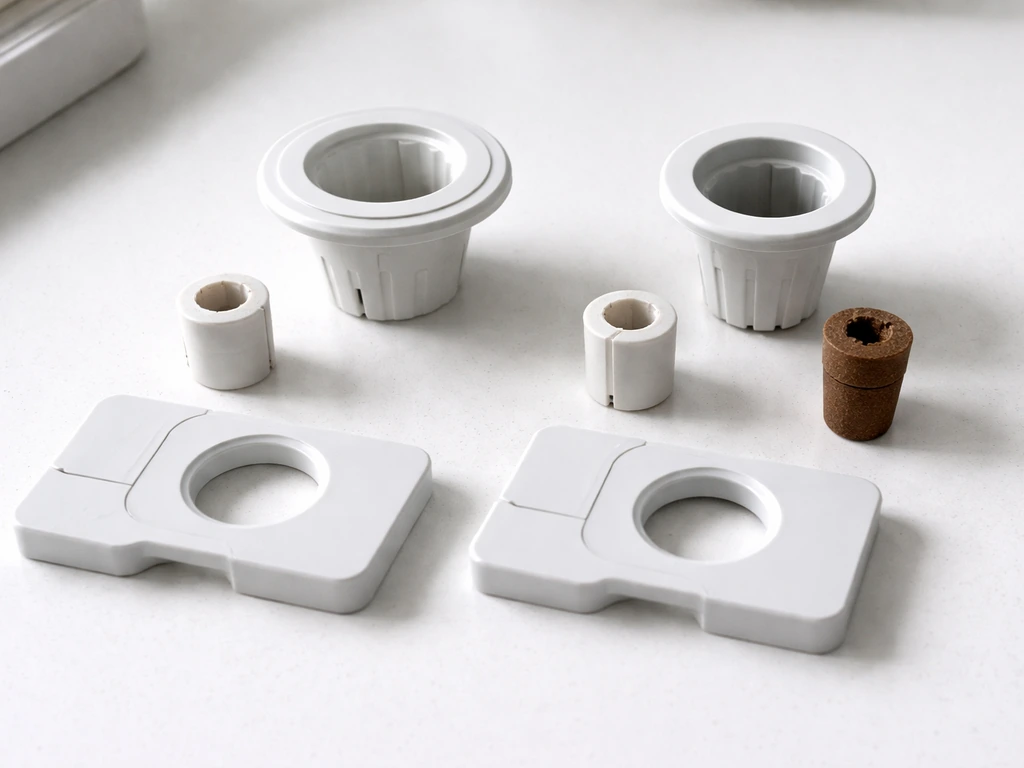
Physical fit
AeroGarden grow decks have circular openings with a specific diameter, and pods seat into them with a collar or basket that holds the pod at the right height above the water reservoir. Click & Grow pods use a different cup-and-lid system designed to click into the Smart Garden's cavity. If the collar diameter is wrong by even a few millimeters, the pod sits too high (no water contact) or too low (submerged soil, which causes rot).
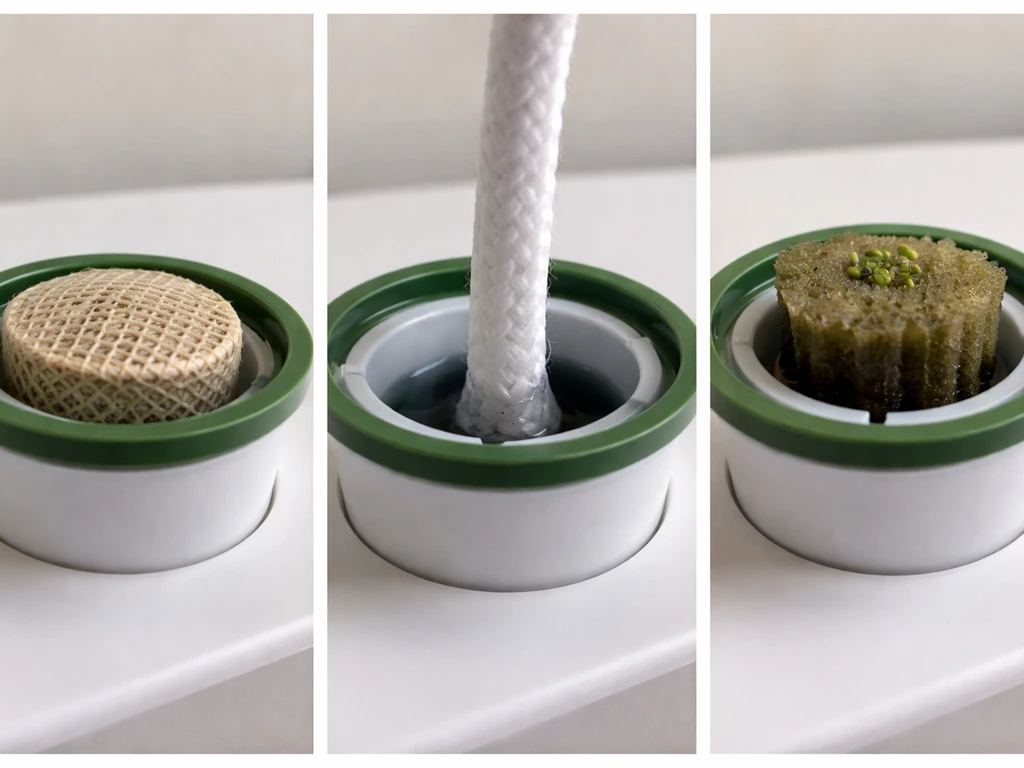
Water and moisture delivery

AeroGarden is a hydroponic system. It delivers a liquid nutrient solution directly to the bottom of its grow sponges via a pump and reservoir. The sponge wicks moisture upward to the seed. Click & Grow uses what it calls 'Smart Soil,' a peat-based pre-charged substrate with a wick that draws water from a separate reservoir through a specific tube-and-wick geometry. The two systems deliver water in completely different ways. Click & Grow's own documentation is explicit that wick placement is critical: if the wick sits too high it won't reach the water, and if too low the soil may become oversaturated. Drop a Click & Grow pod into an AeroGarden reservoir without the correct wick setup and you'll likely get either a dry pod or a drowned one.
System mechanics and nutrients
Click & Grow pods come pre-charged with nutrients in the Smart Soil itself. AeroGarden adds liquid nutrients to the reservoir on a timer, and the machine prompts you to dose every two weeks. These are opposite approaches. If you somehow got a Click & Grow pod seated in an AeroGarden, the pre-charged soil would be flooded with liquid nutrients it was never designed to absorb, creating nutrient burn or pH chaos in short order.
How to check pod compatibility before you try anything
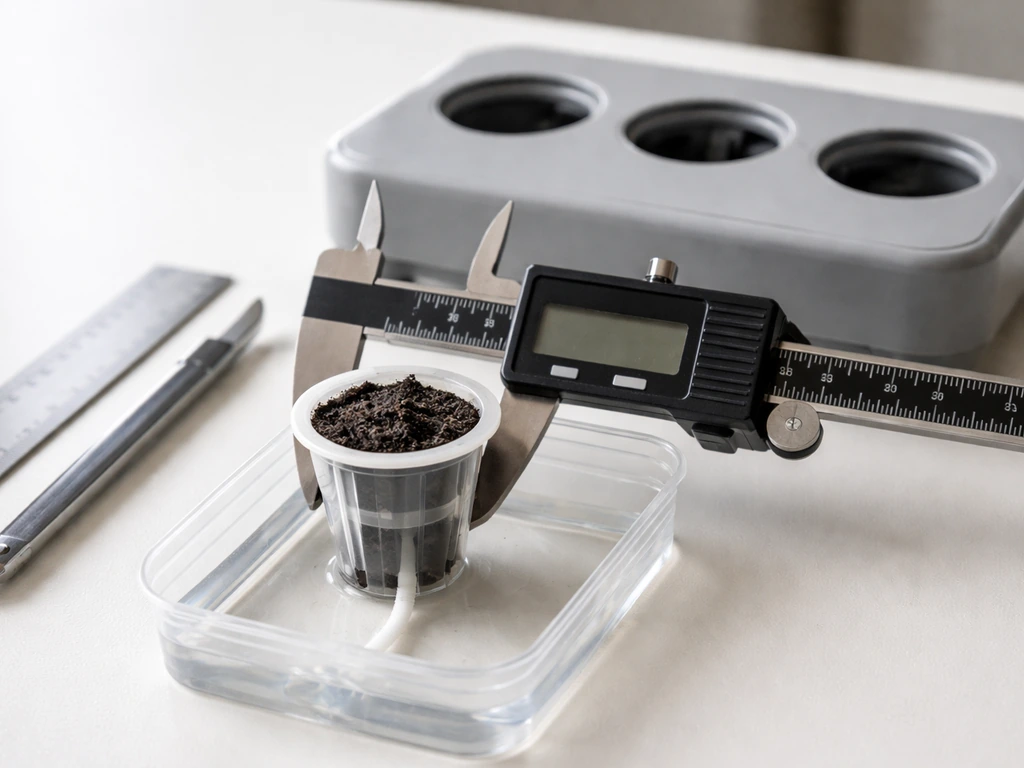
Before you attempt any kind of crossover experiment, measure first. Grab a caliper or a basic ruler and check these four things:
- Grow deck opening diameter on your specific AeroGarden model: AeroGarden Harvest, Harvest Elite, Slim, and 360 models all have slightly different deck specs. Measure the inner diameter of each opening in millimeters.
- Click & Grow pod outer collar diameter: Measure the widest part of the pod cup, not the body — you want the part that would need to seat in the opening.
- Pod height vs. intended water-contact depth: In your AeroGarden, measure from the top of the grow deck down to the water line at the 'Fill To Here' level. The bottom of any pod sitting in that opening needs to make contact with or sit just above the water, not submerged.
- Wick length on the Click & Grow pod: If you're attempting a wick-based modification, the wick needs to reach from the bottom of the pod down to the water surface. If it's too short, the pod dries out.
If the collar diameter doesn't match the grow deck opening within about 1–2mm, the pod won't seat correctly and you should skip to the alternatives section below. If the diameters are close, you can attempt a fit trial, but monitor it daily for the first week.
If the fit is close enough: running a germination-to-harvest trial
If your measurements suggest the pod might seat and wick correctly, here is how to run a controlled trial without wrecking your whole grow.
- Start with just one pod slot, not all of them. Leave the rest of your AeroGarden running with native pods so you have a comparison baseline.
- Fill the AeroGarden reservoir to the 'Fill To Here' line and add nutrients at half the normal dose for the first two weeks, since the Click & Grow Smart Soil already carries some pre-charged nutrients. This matches the AeroGarden seed-starting guide recommendation for reduced early feeding.
- Seat the Click & Grow pod in the opening. If it sits loose, use a small piece of food-safe foam or a hydroton clay pebble ring to snug it in place without blocking the wick.
- Check the wick on day one, day three, and day seven. Lift the pod gently and look at whether the bottom of the wick shows moisture. If the wick is dry after 48 hours, the pod is not wicking from the AeroGarden reservoir and you need to move to the alternatives.
- Watch for mold on the Smart Soil surface in the first 10 days. Because AeroGarden's pump circulates humid, nutrient-rich water, the soil surface can develop surface mold faster than it would in the Smart Garden's drier air environment. If you see white fuzz, increase airflow over the pods and consider backing off on nutrient concentration.
- If germination happens (typically days 5–14 depending on species), continue monitoring pH in the reservoir. Target 5.5–6.5, which is standard for AeroGarden nutrient solution. Smart Soil may leach material that nudges pH up, so test weekly with a basic pH meter.
- Run the trial through the first true-leaf stage before declaring success. Many pods will germinate but stall at the seedling stage if the moisture/nutrient balance is off.
When it doesn't fit or won't wick: your best alternatives
If the pod doesn't seat or the wick test fails, don't force it. You have three clean options, and each one works reliably. If you want to start with the best click and grow pods, focus on fresh, high-viability seed sources and match the pod approach to your AeroGarden setup.
Option 1: Extract the seed and use an AeroGarden sponge
Click & Grow's 'Grow Anything' pods are designed for you to insert your own seeds into the Smart Soil. If you have those pods, the seed is either loose or lightly pressed into the soil surface. You can extract it and drop it directly into an AeroGarden grow sponge the way AeroGarden's seed-starting guide recommends: soak the sponge, press the seed into the sponge's opening, cover with a grow dome, and let the AeroGarden's pump do its job. Home Depot-hosted AeroGarden documentation in a PDF also describes soaking the grow sponge and then inserting the seeds into the sponge for seed-starting soak the sponge, press the seed into the sponge's opening, cover with a grow dome. This is the cleanest workaround and gives you the best germination results because you're using the AeroGarden hardware as designed.
Option 2: Germinate in the Smart Garden, then transplant
Start your Click & Grow pod in the Smart Garden where it's designed to work. Once the seedling has two to four true leaves (usually weeks two to three depending on species), carefully remove it from the Smart Soil, rinse the roots gently under room-temperature water to remove soil, and transplant the bare-root seedling into an AeroGarden net cup filled with hydroton or rockwool. This works especially well for herbs like basil, mint, and lettuce. The transplant shock is minimal at the young seedling stage if you keep roots wet during the transfer and drop nutrients to half-strength for the first week post-transplant.
Option 3: Just use AeroGarden's own pods
This sounds obvious, but it's genuinely the easiest path if your goal is reliable results rather than a compatibility experiment. AeroGarden's pod library is broad, herbs, greens, tomatoes, peppers, flowers, and the pods are engineered for the exact water level, light schedule, and nutrient dosing of AeroGarden machines. If you're curious about what Click & Grow offers that AeroGarden doesn't, that's worth exploring as a separate question about which species or seed varieties are exclusive to one platform.
Nutrients, lights, and the most common problems you'll hit
Nutrient differences
AeroGarden delivers liquid nutrients every two weeks via a reminder system built into the machine. Click & Grow Smart Soil comes pre-charged and slowly releases nutrients into the root zone without additional liquid feeding. If you mix these approaches, you risk double-dosing. The safest rule: if any Click & Grow Smart Soil is present in the AeroGarden system, cut your liquid nutrient dose in half for the first month, then increase to normal once the pre-charge in the soil is depleted (you'll notice slightly slower growth signaling when it's time to increase).
Light schedules
AeroGarden's LED lights run on an automatic timer calibrated to the pod type you select in the machine's menu. Click & Grow Smart Gardens also use LED panels but with their own light schedule. If you're transplanting Click & Grow seedlings into an AeroGarden, just run whatever light program the AeroGarden recommends for that plant category (herb, salad, tomato, etc.) and ignore what the Smart Garden was doing. The AeroGarden's light intensity and spectrum are well-matched to the plants Click & Grow typically sells, so this isn't a significant issue.
Slow germination
If seeds from extracted Click & Grow pods are germinating slowly in AeroGarden sponges, check water temperature first. AeroGarden reservoirs can run slightly cool in a cold room, which slows germination significantly. Most herbs and greens want 65–75°F (18–24°C) at the root zone. Also verify the grow dome is in place for the first two weeks, humidity at the seed level makes a major difference in germination speed.
Poor germination or seeds not sprouting
If seeds from Click & Grow pods simply don't germinate in AeroGarden sponges, check seed viability first. Click & Grow pods have a shelf life, and old pods (especially pre-seeded ones stored for more than a year) may have seeds with declining germination rates. The topic of how long Click & Grow pods last is worth understanding if you're working with pods that have been sitting on a shelf for a while.
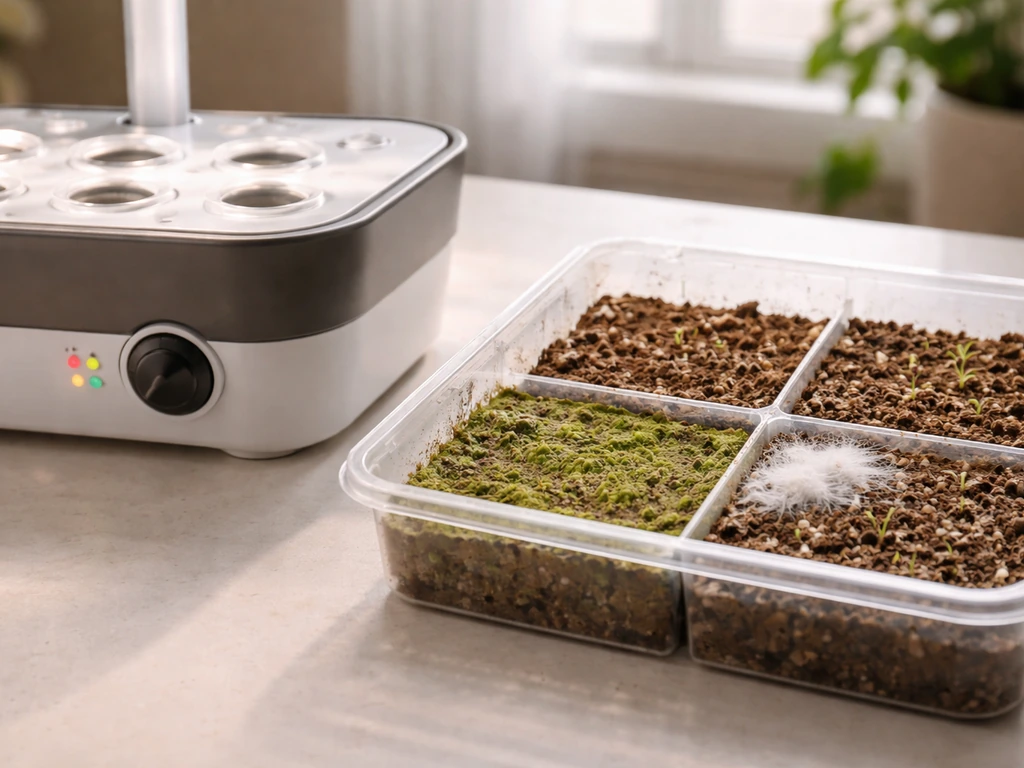
Mold on the growing medium
Mold is the most common problem when mixing soil-based media into a hydroponic environment. AeroGarden's humid, warm reservoir air is ideal for mold on any soil surface. Prevention: keep the grow dome on only until germination (remove it as soon as the sprout emerges), ensure there's some air movement over the pods, and avoid letting the soil surface stay visibly wet. If mold appears, wipe it off with a clean cloth, reduce reservoir water level slightly, and increase ventilation. Don't add fungicide to the AeroGarden reservoir.
pH drift
Keep reservoir pH between 5.5 and 6.5. Smart Soil can leach organic material into the water and push pH upward over time. Test weekly with a basic pH meter (not just test strips, they're not accurate enough for hydro). If pH climbs above 6.5, do a partial reservoir change with fresh water and nutrients mixed to the correct pH before topping up.
What to do today: your action plan
Here's a concrete, prioritized list of steps you can take right now depending on your situation:
| Your situation | Best action | What to get/prepare |
|---|---|---|
| You have Click & Grow 'Grow Anything' pods and want to use AeroGarden | Extract seeds, plant in AeroGarden sponges | AeroGarden grow sponges, grow domes, AeroGarden liquid nutrients |
| You want to grow Click & Grow plant varieties in your AeroGarden | Start in Smart Garden, transplant seedling at 2–4 true leaves | Small net cups, hydroton or rockwool, pH meter |
| You want to test direct pod compatibility | Measure collar diameter vs. grow deck opening, run a 1-pod trial | Calipers, pH meter, half-dose nutrients, food-safe foam for seating |
| You just want reliable results without experimenting | Use AeroGarden's own pods | AeroGarden seed pod kit for your model |
| Your AeroGarden pods failed previously | Check water level, pH, and light schedule before trying any crossover | pH meter, AeroGarden model manual |
If you're going the seed-extraction route, the process is the same as AeroGarden's own seed-starting system, soak the sponge, insert one or two seeds per sponge, add nutrients at half-strength, cover with grow dome, and wait. You can also look into AeroGarden grow sponge alternatives if you want to expand your options beyond the branded sponges. If you are searching for an aerogarden grow sponge alternative, choose a medium that can wick moisture consistently and stay clean in the reservoir environment AeroGarden grow sponge alternatives. The core takeaway is that the pods themselves are not cross-compatible, but the seeds inside them absolutely are, and getting them into the right growing medium for your system is straightforward once you know the steps.
One last thing worth knowing: if you decide to stock up on Click & Grow pods to use as seed sources, understand their shelf life and storage requirements before buying in bulk. If your main goal is to buy Click & Grow pods as a seed source, make sure you also compare their shelf life and storage requirements before ordering, since poorly stored pods lose viability faster. If you want the most consistent results with seeds, using the best buy click and grow pods as your seed source and then moving those seeds into AeroGarden sponges or net cups is usually the way to go Click & Grow pods. Pods stored incorrectly lose viability faster than the packaging suggests, which matters a lot when you're counting on germination in a hydroponic setup where you can't just re-sow as easily as you can in soil.
FAQ
If the pod fits loosely, will it still work in an AeroGarden?
Not exactly. Aerogarden systems only work as designed when the pod mates with the grow deck and wick/sponge system. With Click & Grow, even a small collar or seat height mismatch can leave the seed too high for water uptake or too low for proper oxygenation, which is why adapters and “just make it fit” approaches usually fail.
Can I use any Click & Grow pod type, or only certain ones, for starting seeds in AeroGarden?
It depends on the Click & Grow product type. If it is a pre-seeded “Smart Soil” pod, you can often extract the seed and start it in AeroGarden sponges. If it is designed to be planted as an intact unit, keep in mind the Smart Soil wick geometry will not match AeroGarden’s reservoir wicking path, so the intact pod won’t behave reliably.
After extracting a seedling from Smart Soil, how should I adjust nutrients so it does not get overfed?
Yes, but do it in a way that prevents nutrient overlap. If you transplant Click & Grow seedlings out of Smart Soil, rinse off as much soil as you safely can and then run AeroGarden nutrients at half-strength for about a week, then resume normal dosing. This reduces the risk of leftover pre-charge interacting with AeroGarden’s liquid schedule.
When using extracted Click & Grow seeds or seedlings, when should I remove the grow dome to avoid mold?
You should avoid relying on the same grow dome timing used for intact Click & Grow pods. In AeroGarden, keep the dome on for germination, then remove it as soon as the sprout emerges to prevent mold on exposed soil fragments or residue.
How can I tell whether the Click & Grow wick will actually reach the AeroGarden reservoir before planting a bunch of seeds?
Run a quick “wick reach” check before committing. If you are able to seat the pod, confirm the wick path actually contacts the reservoir water line and does not remain above it. If you cannot confirm contact visually or by measuring insertion height, do not proceed, because a dry wick commonly leads to stalled germination.
What are common mistakes that slow or stop germination when extracted Click & Grow seeds are put into AeroGarden sponges?
For sponges, the practical method is to use clean, consistent sponge wells and place seeds at the correct depth (enough to be covered, not buried). Also, avoid topping up water to the point where the seed zone is submerged, because that can reduce oxygen around the seeds and slow germination.
Why do I get algae or slimy growth when mixing Click & Grow material with AeroGarden?
If you see algae or slimy growth, it is usually light exposure plus excess moisture on the media surface. Use the AeroGarden light schedule for the plant category, keep the dome off after emergence, and avoid letting any soil surface remain visibly wet.
Does Smart Soil change the pH management strategy in an AeroGarden even after I extract seeds or remove seedlings?
Yes. If you are using extracted Click & Grow seeds in AeroGarden sponges, pH can still drift based on water chemistry and reservoir dosing. Follow AeroGarden’s pH targets, and if you used any Smart Soil fragments, check pH more frequently for the first couple weeks.
What are the three main types of compatibility I should evaluate when trying Click & Grow in an AeroGarden?
It is safer to treat “compatibility” as three separate checks: physical fit (deck opening and collar height), moisture delivery (wick contact and wicking behavior), and nutrition matching (pre-charged soil versus liquid-only dosing). If any one of those fails, growth is unlikely to be stable.
How should I run a small test so I do not waste an entire tray of seeds if the crossover fails?
Start with one pod or one plant, and monitor daily for the first week. The fastest indicators are whether sprouts emerge on time, whether the seed zone stays evenly moist without drying, and whether you see odor or mold around any remaining soil. If you see persistent dryness or persistent oversaturation, stop the crossover and switch to seed-in-sponge or transplanting.