To grow hemp indoors in soil, you need a grow tent or dedicated space, pots, a quality grow light, a ventilation setup (fan, carbon filter, ducting), a thermometer/hygrometer, a pH meter, nutrients, and your growing medium. For hydroponics, swap the soil and pots for a reservoir, net pots, an air pump with air stones, and a hydroponic nutrient formula. Outdoor growers can strip the list down to containers or ground space, basic hand tools, and water/nutrient management gear. What you actually spend depends on scale and method, but this guide breaks down every piece of equipment by scenario so you know exactly what to buy, what to skip, and in what order to set things up.
What Equipment Is Needed to Grow Hemp: Indoor and Outdoor Setup

Marcus Holloway
13 May 2026
Before you buy: legality, sourcing, and choosing a growing setup
Hemp is federally legal under the 2018 Farm Bill, which defines it as Cannabis sativa L. with a total THC concentration of no more than 0.3% on a dry-weight basis (7 U.S.C. § 1639o). But federal legality does not mean you can just start growing anywhere. The USDA's Domestic Hemp Production Program (7 CFR Part 990) requires growers to operate under a USDA-approved state or tribal plan, which typically means obtaining a license or registration, maintaining land records, and submitting to THC testing during the growing season. Michigan, Pennsylvania, Virginia, and most other states each have their own registration processes layered on top of the federal framework. Before you spend a dollar on equipment, confirm your state's current licensing requirements. Growing unlicensed hemp is not a technicality risk, it is a compliance violation with disposal and remediation consequences built into the rules.
Once you are clear on legality, pick your strain and sourcing. You want certified seed or clones from a supplier that documents THC compliance, because the genetics you start with largely determine whether your finished plants stay under 0.3% total THC (including THCA conversion). Fiber and grain hemp varieties stay well below the threshold with less management stress. CBD-rich flower varieties push closer to the limit and require tighter environmental and harvest-timing discipline. Choose your variety before finalizing your equipment list because fiber crops grown at scale outdoors and CBD flower crops grown indoors have meaningfully different gear requirements.
Your three realistic setup paths are: indoor soil, indoor hydroponics, and outdoor/greenhouse soil. Indoor gives you full environmental control and year-round production but costs more upfront. Outdoor is cheaper to start but ties you to seasons, weather, and more pest pressure. Hydroponics accelerates growth and maximizes yield per square foot but adds system complexity. The equipment sections below are organized around all three paths, with clear notes on where they overlap.
Core grow space essentials: containers, space planning, and mounting
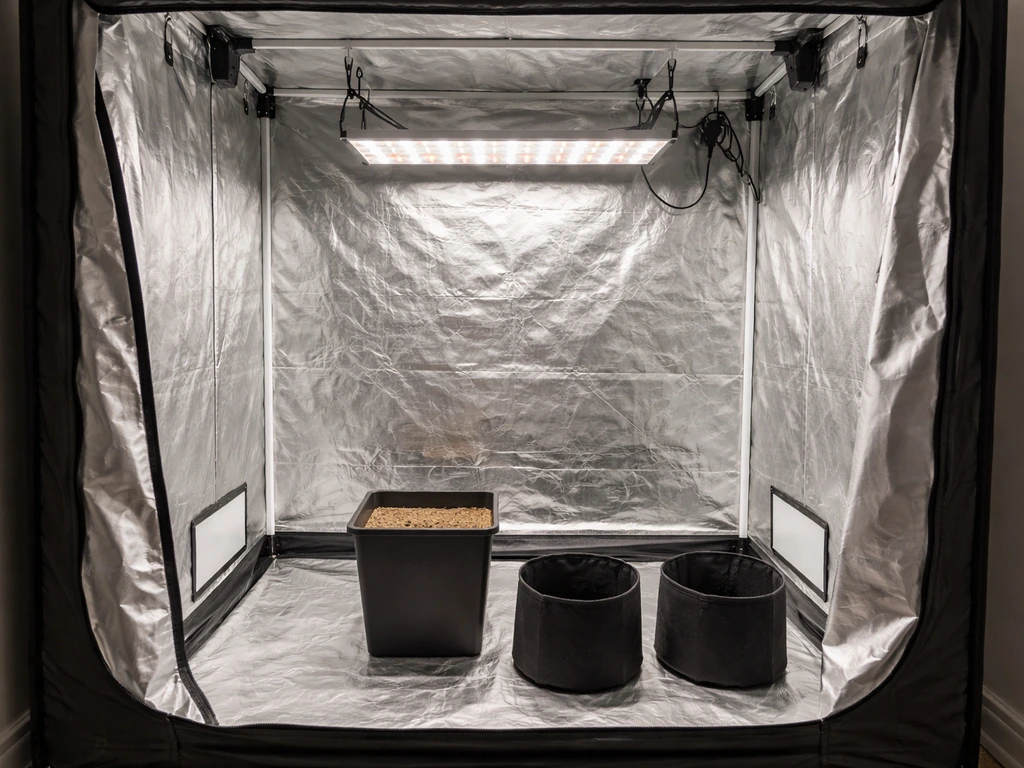
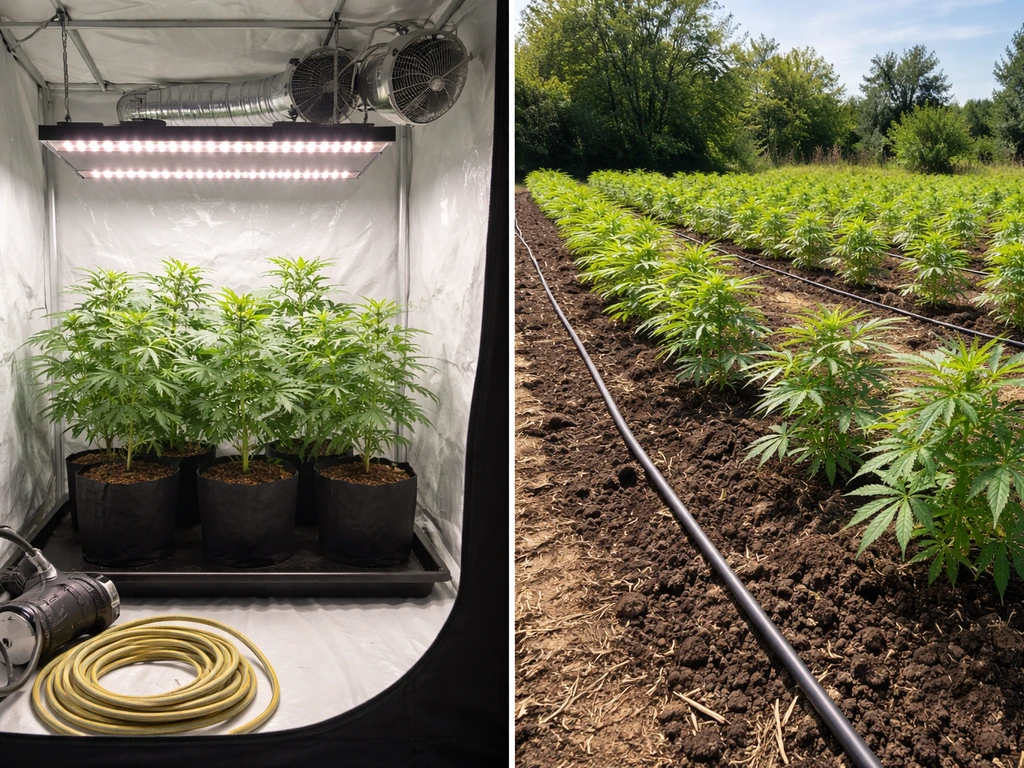
For indoor growing, a reflective grow tent is the single smartest first purchase. Tents contain light, heat, and smell, and give you a clean, controllable environment without building a dedicated room. A 4x4 foot tent (roughly 1.2x1.2m) is the sweet spot for a first indoor setup, supporting four to six hemp plants comfortably in the vegetative stage and producing a meaningful harvest. Go 5x5 or 4x8 if you plan to scale. Make sure your tent has multiple ports for ducting and cables, sturdy crossbars rated for at least 50 lbs (grow lights are heavier than they look), and a floor tray.
Container choice matters for root health and drainage. For soil grows, 3-gallon fabric pots work for compact or auto-flowering hemp varieties. Taller, photoperiod fiber varieties benefit from 5- to 7-gallon fabric pots. Fabric pots air-prune roots naturally, which prevents rootbound plants and encourages branching. Plastic pots cost less but require more drainage attention. For hydroponic setups, net pots (2-inch to 3-inch diameter) sit in reservoir lids or grow trays and hold the growing medium that anchors plant roots.
Plan your vertical space before buying. Hemp grows tall, especially sativa-dominant varieties. A standard 80-inch (2m) tent gives you room for a large light fixture, a carbon filter mounted at the top, and still leaves 48 to 60 inches of plant canopy height. If you are working with a low ceiling, top and train your plants aggressively (LST, topping, or a trellis net) to keep them horizontal and manageable. Adjustable rope ratchets for mounting lights and filters are inexpensive and essential.
Lighting and plant support equipment
Light is the biggest cost and the biggest driver of your results indoors. Hemp in the vegetative stage needs roughly 300 to 500 PPFD (photosynthetic photon flux density, measured in micromoles per square meter per second). In flower, you want to push 600 to 1,000 PPFD at canopy level. A quality full-spectrum LED in the 300W to 600W draw range covers a 4x4 to 5x5 tent adequately. Look for LEDs with a published PPFD map for your tent size, not just wattage claims. Quality LED brands publish actual PAR data. HPS lights still work but generate significant heat that complicates your climate management, especially in smaller tents.
Hemp is a photoperiod plant in its natural state, meaning it flowers when daylight drops to around 12 hours. Most indoor hemp cultivars are grown on an 18/6 light schedule (18 hours on, 6 hours off) during veg and then flipped to 12/12 to trigger and maintain flower. Autoflowering hemp varieties flower based on age rather than light schedule, which simplifies timer management. Get a reliable digital outlet timer so your light cycle stays consistent. A one-hour drift in photoperiod can stress plants or cause re-vegging. Plug your light into the timer, set it, and check it weekly.
A handheld PAR/PPFD light meter is not strictly mandatory for beginners, but it is the only way to know whether your plants are actually receiving the light intensity they need versus what the manufacturer claims. For hydroponics, you can skip many add-ons, but you should not skip the basics like proper nutrients and water testing not strictly mandatory. Even a basic Apogee or PPFD-capable app on a calibrated phone sensor gives you a usable reading for confirming your light height and positioning. For plant support, a trellis net (ScrOG net) stretched across the canopy at 12 to 18 inches above the pot tops keeps plants horizontal during the stretch phase of flowering and dramatically improves light penetration and bud site development.
Climate control and ventilation gear
Hemp prefers daytime temperatures between 70 and 85 degrees Fahrenheit during veg and slightly cooler nights, around 65 to 75°F, during flower. Humidity should sit at 50 to 70% RH during vegetative growth and drop to 40 to 50% RH during flowering to reduce mold risk, particularly for dense CBD flower varieties. You control all of this with a proper ventilation and climate setup.
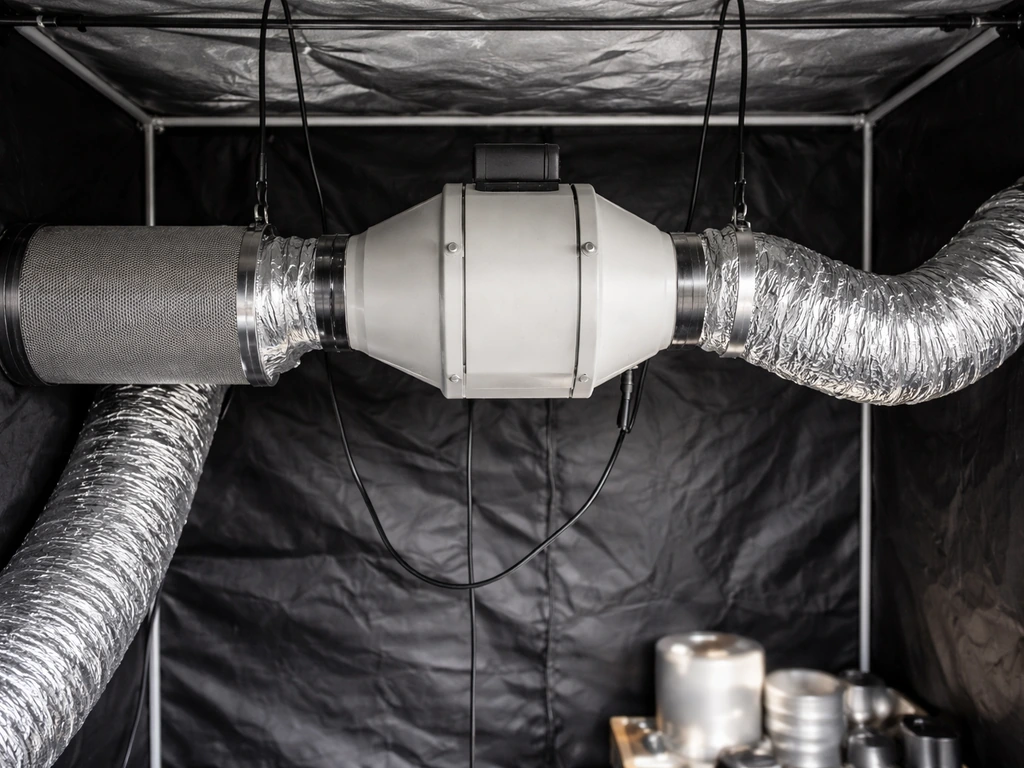
For a 4x4 tent, the core ventilation kit is: an inline duct fan (4-inch to 6-inch diameter rated at 200 to 400 CFM), a carbon filter of matching diameter, and 4 to 6 feet of flexible aluminum ducting connecting them. Mount the carbon filter inside the tent at the top (where heat collects), run ducting from it through the inline fan, and exhaust out the tent through a port or out of the room entirely. This negative pressure setup pulls hot, humid, odor-laden air through the filter and out of the space continuously. A fan speed controller lets you dial back the airflow when temps drop in winter.
Inside the tent, at least one oscillating clip fan creates direct airflow across plant stems and foliage. Moving air strengthens stalks (which matters for heavy hemp colas) and prevents the stagnant humid pockets that invite powdery mildew and botrytis. A digital thermometer/hygrometer with a data-logging feature tells you the real daily high and low readings, not just the current snapshot. Place a probe at canopy level. If your room runs cool in winter, a small space heater with a thermostat on an outlet controller keeps your tent temps stable overnight. In summer or warm climates, a portable air conditioner or mini-split pointed at the tent intake solves heat buildup from high-wattage lighting.
| Item | Size/Spec for 4x4 Tent | Why You Need It |
|---|---|---|
| Inline duct fan | 4-inch or 6-inch, 200-400 CFM | Exhausts heat and humidity, creates negative pressure |
| Carbon filter | Matching diameter to fan | Eliminates odor before exhaust leaves the space |
| Flexible ducting | 4-6 feet, matching diameter | Connects filter to fan and fan to exit port |
| Fan speed controller | Compatible with inline fan | Lets you reduce airflow when ambient temps are low |
| Oscillating clip fan(s) | 6-inch to 8-inch | Creates stem-strengthening airflow across canopy |
| Digital thermometer/hygrometer | Data-logging type preferred | Tracks actual daily high/low temp and RH at canopy |
| Outlet timer or controller | Smart plug or temp/RH controller | Automates heater, humidifier, or dehumidifier |
Soil grow equipment checklist
Growing medium and containers
A quality pre-amended cannabis/hemp-specific potting mix, or a high-quality general potting mix blended with 20 to 30% perlite for drainage, gives you a reliable starting medium. Hemp roots are sensitive to waterlogged conditions, so that perlite addition is not optional. Avoid cheap potting soils with heavy peat content and slow-release synthetic fertilizers, which make pH management harder and limit your nutrient control. If you want to go the living soil route, a no-till raised bed or fabric pot packed with a well-amended super soil can reduce your nutrient management workload after the first feeding.
Watering tools and drainage
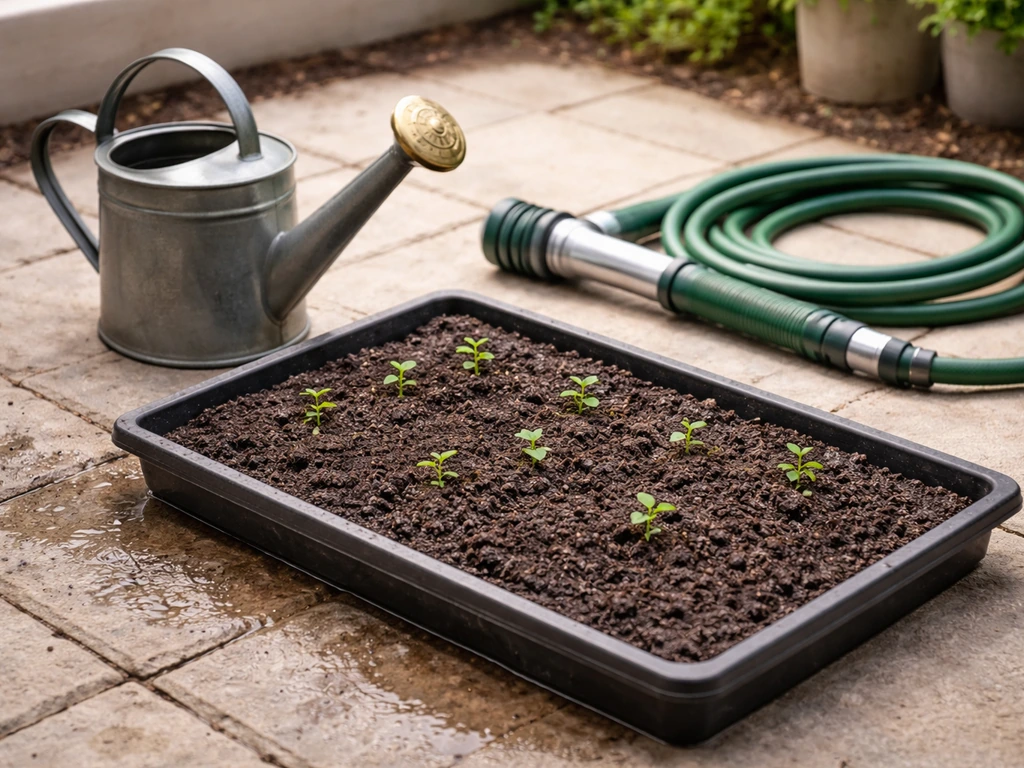
A simple watering can with a fine rose head is fine for small soil setups. A hose with a gentle flow wand works better at scale. The key habit is watering to runoff (about 10 to 20% of what you pour should drain out the bottom) and letting the top inch of medium dry out between waterings. Overwatering is the most common beginner kill. To check moisture, lift the pot (dry pots feel noticeably lighter) or use a cheap moisture probe. Saucers under pots collect runoff. Empty them after each watering so roots are not sitting in pooled water.
Essential hand tools
- Pruning shears or cannabis scissors (for topping, defoliation, and harvest trimming)
- Plant ties or soft twist ties for LST (low-stress training)
- A small hand trowel for transplanting
- Measuring cups and syringes for mixing liquid nutrients precisely
- A plastic mixing pitcher or bucket (2 to 5 gallons) for preparing nutrient water
- pH meter (essential, covered in the nutrients section below)
- pH Up and pH Down solutions for adjusting water before feeding
- Latex or nitrile gloves for sanitation and handling plant material
Hydroponic grow equipment checklist
Hydroponics removes soil from the equation entirely and feeds plant roots directly with an oxygenated, pH-balanced nutrient solution. Hemp responds well to hydroponics, often growing faster and producing heavier yields per plant than soil when the system is dialed in. The trade-off is that there is less buffer for mistakes. A pH swing that would stress a soil plant over a few days can damage hydroponic roots within hours. If you are comfortable with slightly more hands-on management and monitoring, hydro is worth it.
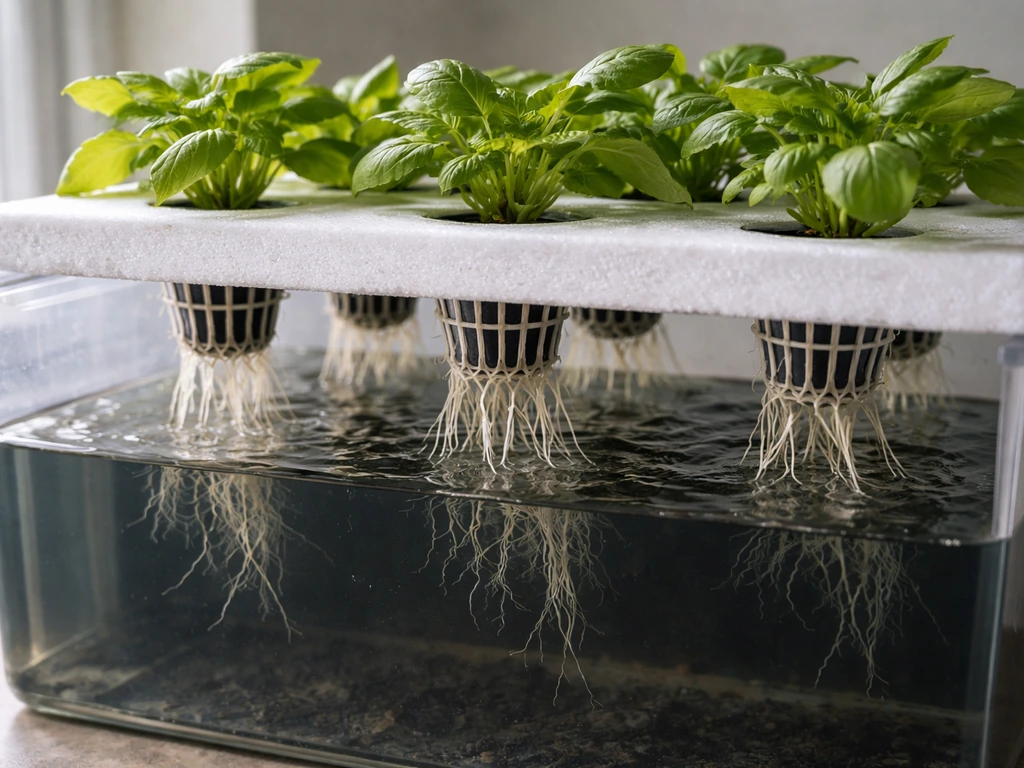
Deep Water Culture (DWC) system
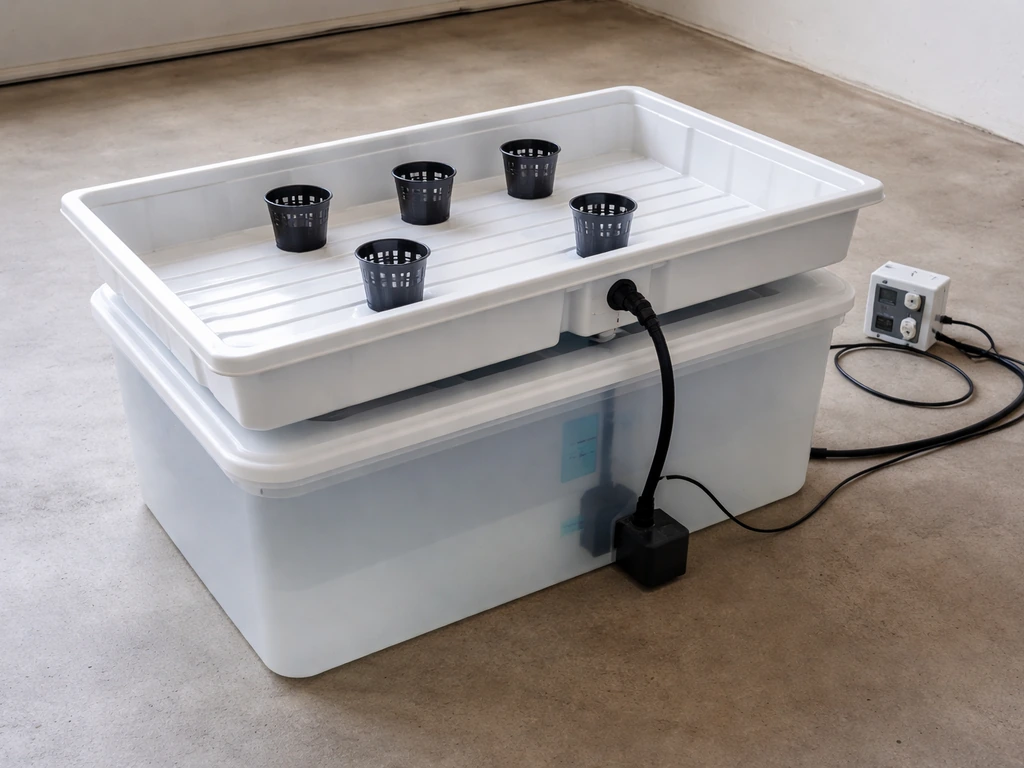
DWC is the simplest and most beginner-friendly hydroponic method for hemp. Each plant sits in a net pot filled with a small amount of clay pebbles (hydroton) or rockwool. The net pot rests in a lid over a reservoir (a 5-gallon bucket per plant, or a larger shared tank), and the roots hang down into oxygenated nutrient solution. An air pump with air stones runs 24/7 to keep oxygen levels in the solution high enough for root health. You need: a food-grade reservoir, net pot lids, net pots (2 to 3-inch), an air pump rated for your reservoir volume, air stones, airline tubing, and hydroton or rockwool starter cubes for germination.
Ebb-and-flow (flood-and-drain) system
For a slightly more scalable approach, an ebb-and-flow system uses a grow tray (where plants sit in containers filled with medium), a nutrient reservoir below the tray, a submersible pump with a timer, and an overflow/drain tube. The pump floods the tray at set intervals and then drains back to the reservoir by gravity. The four core components are: grow tray, nutrient reservoir, pump with timer, and drainage/overflow mechanism. This setup works well for multiple plants and lets you use various growing media (clay pebbles, coco coir, rockwool slabs).
Shared hydro equipment needs
- Food-grade reservoir or buckets (5-gallon per plant for DWC; 10 to 30-gallon shared tank for ebb-and-flow)
- Submersible or inline water pump (for ebb-and-flow or recirculating systems)
- Air pump(s) with air stones and airline tubing (for DWC oxygenation)
- Digital outlet timer for flood cycles
- Net pots and hydroton (clay pebbles) or rockwool cubes
- Hydroponic-specific nutrient formula (3-part or purpose-formulated for hemp/cannabis)
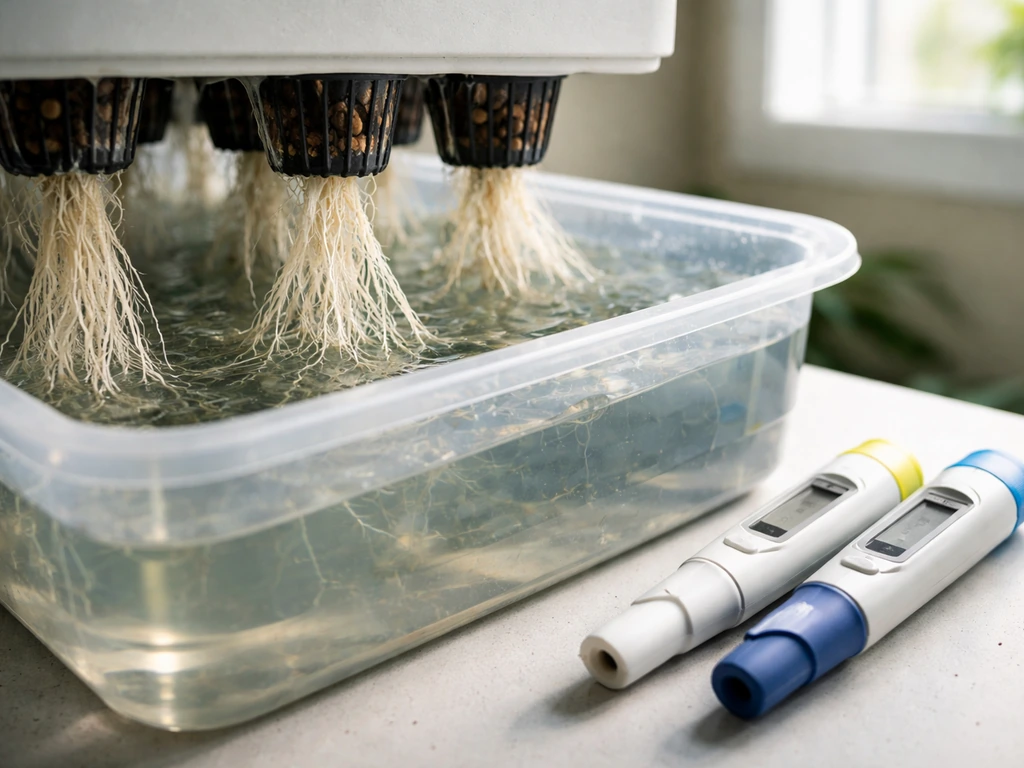
- pH meter, EC/TDS meter, pH Up, and pH Down solutions
- Reservoir thermometer (nutrient solution should stay between 65 and 72°F to prevent root rot)
- Opaque covers or paint for reservoir to block light and prevent algae growth
Nutrients, water testing, and measurement tools
pH management is non-negotiable in both soil and hydroponics. In soil, aim for a root-zone pH of 6.0 to 7.0, with 6.3 to 6.8 being the sweet spot for hemp. FAO explains that water or nutrient solution properties such as electrical conductivity and pH can affect irrigation suitability and plant uptake, with examples of pH outside normal ranges occurring due to buffering effects water or solution properties such as EC and pH can affect plant or irrigation suitability. In hydroponics, target 5.5 to 6.0, which is slightly more acidic to keep nutrients soluble. Go outside these ranges and your plants cannot absorb specific nutrients even when they are present in the solution, a condition called nutrient lockout. A digital pH pen calibrated with pH 4 and pH 7 buffer solutions gives you accurate readings. Calibrate it every one to two weeks or any time readings seem off. A quality pH pen costs $20 to $80 and is worth every dollar compared to cheap strips.
An EC (electrical conductivity) or TDS (total dissolved solids) meter measures how much dissolved nutrient is actually in your water or solution. For hydroponic hemp, target an EC between 1.0 and 2.5 dS/m depending on growth stage, starting lower in seedling and pushing higher in flower. EC calibration uses a buffer solution specific to your meter's probe. Check your tap water EC first because water above 0.3 to 0.5 dS/m starts with a built-in nutrient load that affects your mixing. Some municipal water also has pH swings worth knowing before you start.
For nutrients, soil-grown hemp in a pre-amended medium may need minimal supplemental feeding for the first three to four weeks. After that, a basic three-part liquid nutrient system (grow, bloom, micro) or an all-in-one formula gives you control across the full growth cycle. For hydroponics, use a formula specifically designed for soilless or hydroponic production because it includes micronutrients that soil-based products often omit. Always measure nutrients by weight or calibrated syringe, not rough pours. Precise dosing prevents overfeeding, which is one of the most common causes of yellowing, tip burn, and stunted growth.
| Tool | What It Measures | Target Range (Hydro) | Target Range (Soil) |
|---|---|---|---|
| pH meter | Acidity/alkalinity of water or solution | 5.5 to 6.0 | 6.3 to 6.8 |
| EC/TDS meter | Dissolved nutrient concentration | 1.0 to 2.5 dS/m (stage-dependent) | Check runoff: 1.0 to 2.0 dS/m |
| Reservoir thermometer | Nutrient solution temperature | 65 to 72°F (root zone) | N/A (soil temp less critical) |
| Infrared or digital room thermometer | Air temperature at canopy | 70 to 85°F (day), 65 to 75°F (night) | Same |
| Digital hygrometer | Relative humidity | 40 to 50% (flower), 50 to 70% (veg) | Same |
Soil vs. hydro: which setup is right for you
Soil is more forgiving, lower in upfront cost, and closer to a natural growing process. If you are growing your first hemp crop or want a lower-stress setup, start in soil. The medium buffers pH swings, holds nutrients between waterings, and gives you more recovery time when something goes wrong. The trade-off is slower growth compared to hydroponics and less precise control over what the plant is eating at any given moment.
Hydroponics accelerates growth, allows precise nutrient dosing, and can produce heavier yields in the same square footage, but it demands more consistent monitoring. A pump failure, a missed pH check, or a temperature spike in the reservoir can damage roots within 24 hours. That said, once the system is dialed in and you have a monitoring routine, hydro becomes almost self-regulating. Growing hemp hydroponically without the right nutrient formula is a common beginner mistake, and it is worth noting that some of the same principles that apply to other hydroponic crops apply here too. If you are aiming to can you grow grains hydroponically, focus on stable pH, consistent nutrient strength, and enough light intensity for seedlings to establish. If you are wondering whether you can grow hydroponics without nutrients, the short answer is that most systems require some form of mineral feed, even if you use an alternative source hydroponics without the right nutrient formula.
| Factor | Soil | Hydroponics |
|---|---|---|
| Upfront cost | Lower ($100 to $300 for medium/pots) | Higher ($150 to $500+ for system components) |
| Growth speed | Standard | 15 to 30% faster in optimized systems |
| Error tolerance | High (medium buffers mistakes) | Low (rapid impact from pH/EC drift) |
| Nutrient control | Moderate (medium holds reserves) | Precise (direct delivery to roots) |
| Monitoring frequency | Every 2 to 3 days (soil moisture check) | Daily (pH, EC, reservoir level) |
| Best for | Beginners, lower-maintenance grows | Experienced growers, yield-focused setups |
Maintenance and monitoring supplies
Hemp is not particularly pest-prone compared to other crops, but it is not immune. Fungus gnats thrive in overwatered soil. Spider mites and aphids show up on stressed or crowded plants. Powdery mildew is the most serious threat for dense CBD flower grows in humid conditions. Your prevention kit should be simple: yellow sticky traps hung at canopy level catch flying pests early. Diatomaceous earth dusted on the top inch of soil deters fungus gnat larvae. A clean grow space, regular defoliation of lower fan leaves, and proper airflow do more to prevent disease than any spray.
For sanitation, wipe down grow tent walls and tools with diluted hydrogen peroxide (3% solution is fine) between grows. Keep a spray bottle of diluted neem oil or insecticidal soap on hand for early-stage pest response. Do not spray anything in flower that you would not want on a finished product. Growers often switch to physical controls only after week two of flowering to keep the crop clean.
Record-keeping is not just a legal compliance requirement under USDA hemp rules, it is practical growing data you will actually use. A simple grow journal, even just a notebook or a free spreadsheet, should track: seed/clone source and genetics, planting date, transplant dates, feeding schedule and nutrient doses, weekly pH and EC readings, environmental high/low readings, any pest observations, and harvest date with estimated wet and dry weights. Within two to three grows you will have a dataset that tells you exactly what works in your specific setup.
Starter equipment lists by budget and level
Budget beginner: indoor soil, 4x4 tent
- 4x4 grow tent ($60 to $120)
- Full-spectrum LED, 300W to 400W draw ($120 to $250)
- 4-inch inline fan and carbon filter combo kit ($60 to $100)
- Digital outlet timer for lights ($10 to $20)
- Digital thermometer/hygrometer ($15 to $30)
- Fabric pots, 5-gallon, 4-pack ($15 to $25)
- Quality potting mix plus perlite (enough for 4 pots, $25 to $50)
- 3-part liquid nutrients ($30 to $60 for a starter set)
- pH meter plus pH Up and pH Down solutions ($25 to $60)
- Pruning shears, plant ties, measuring syringes ($20 to $35)
Total estimated range for a functional beginner soil setup: $380 to $750 depending on brand choices and where you shop.
Intermediate: indoor DWC hydroponics, 4x4 tent
- All items from the beginner soil list except pots, potting mix, and perlite
- 5-gallon DWC buckets with net pot lids, 4-pack ($40 to $80)
- Air pump rated for 4 buckets, plus air stones and tubing ($25 to $50)
- Hydroton clay pebbles or rockwool starter cubes ($20 to $40)
- Hydroponic 3-part nutrient formula ($40 to $80)
- EC/TDS meter ($20 to $50)
- Reservoir thermometer ($10 to $20)
- pH and EC buffer calibration solutions ($10 to $20)
Total estimated range for a functional beginner hydro setup: $480 to $900. The additional cost buys you faster growth and better yield potential, not ease of use.
How to set up before your seeds or cuttings arrive
- Confirm your state hemp license or registration is in place before germinating
- Assemble and test your tent, light, and ventilation for 48 hours before plants go in
- Calibrate your pH meter with fresh buffer solution and record your baseline tap water pH and EC
- Set your light timer and confirm the photoperiod cycle is running correctly
- Pre-mix a small batch of nutrient solution at your target dilution rate and check pH and EC to confirm your process works
- Place your thermometer/hygrometer at canopy height and log your ambient temp and RH over 24 hours before any plants enter the space
- Hang yellow sticky traps now as a baseline for catching any existing pest pressure in the grow space
- Start your grow journal with the setup date, equipment list, and environmental baseline readings
Getting your environment dialed in before seeds go in removes a huge variable. If you do not set up your light, temperature, humidity, and watering routine correctly, you will quickly run into problems with plant growth your environment dialed in. Any issue you discover in an empty tent is easy to fix. The same issue discovered when plants are two weeks into veg costs you time and often plants. Give yourself a full week of empty-tent testing, make adjustments, and then bring your genetics in. If you are using a hydro setup or want cleaner watering control, you can also consider whether you can reuse hemp grow mats between runs after proper cleaning and inspection.
FAQ
Do I need CO2 equipment to grow hemp indoors?
Usually, no. Most indoor hemp setups rely on light intensity, airflow, and the correct photoperiod. CO2 tanks or burners are optional add-ons for growers trying to push yield beyond baseline, but they also require monitoring and safety controls (and can complicate compliance records).
What extra equipment do I need for drying and curing hemp after harvest?
You typically need drying space and airflow control, like a drying tent or room with a fan and humidity management (dehumidifier or humidifier depending on your climate). Most growers also use hanging lines, breathable racks, and hygrometer monitoring in the drying zone so buds do not mold or overdry.
Can I reuse the same soil or nutrients for another hemp grow?
You can reuse containers and even partially reuse soil, but you must refresh nutrients and manage salts buildup. In hydro, you should not simply reuse reservoir liquid, you need thorough cleaning and replacement because residues can cause pH and EC drift. The safest approach is full reservoir cleaning between runs and fresh nutrient solution during the next cycle.
What kind of water should I use (tap, well, RO), and do I need a filter?
Use whichever source you can test reliably. Many tap systems have dissolved mineral load that affects starting EC and can force lower nutrient dosing. If your water varies or has high sediment, a simple sediment filter helps prevent clogs, especially in hydro systems with pumps.
How do I size an exhaust fan and carbon filter correctly for a tent?
Do not match by tent square footage alone. Size by duct diameter, expected CFM, and your worst-case heat (higher in summer, lower in winter). The goal is to maintain negative pressure while still keeping temperatures in range. If your fan is undersized, you will struggle with humidity and odor even with a carbon filter.
Is an inline fan controller required, and what happens if I run full speed all the time?
It is not mandatory, but it helps prevent temperature swings. Running at full speed can overshoot humidity targets (air dries too fast) and increase stress during early veg. In winter, controllers are especially useful to keep stable canopy conditions.
What’s the minimum climate monitoring equipment I should buy first?
At least one thermometer/hygrometer with the sensor at canopy height, plus a way to control airflow and heat (fan speed control and either heater or AC as needed). For hydroponics, include reservoir temperature awareness, because warm reservoirs reduce dissolved oxygen and increase root stress.
Do I need to buy a dehumidifier or humidifier?
Often, yes in at least one part of the year. A fan alone usually cannot hold humidity in the tight flowering range, especially for dense CBD flower. Start by measuring your ambient humidity, then plan capacity accordingly so you are not guessing once plants are already in flower.
What equipment is needed to prevent light leaks and keep a photoperiod schedule stable?
A sealed tent and reliable timers are the baseline. Avoid opening the tent during the dark period, and use a tent that minimizes external light. For reliability, plug the lights into a timer you trust and check it weekly, because timer or outlet drift can cause re-vegging or unstable flowering.
Do I need trellis or plant training gear for indoor hemp?
Not always, but it can be a major quality-of-life improvement. If you are using a smaller tent or taller varieties, training tools like trellis netting, soft plant ties, and a way to manage canopy height help keep light even and reduce hotspots and uneven bud development.
What’s the most common equipment-related mistake in hydroponics?
Skipping baseline calibration and monitoring. Many issues come from uncoupled measurements, for example dosing nutrients without checking pH and EC, or not accounting for temperature effects in the reservoir. Build a routine around calibrating meters, checking pH at least a few times per week, and watching reservoir temperature.
Can I run hemp in a hydro system without an air pump?
In most setups, no. Oxygenation is critical for root health, especially in DWC where roots are submerged. If you lose aeration, stress can escalate quickly. If you want a less failure-prone approach, consider redundancy like an air pump backup for longer dark or weekend gaps.
Do I need EC and pH meters if I’m using a pre-amended soil mix?
You do not need them as early, but you should still plan on monitoring. Even pre-amended mixes change over time as they break down and as you water. Having a pH pen lets you catch problems before lockout symptoms appear, and checking pH also helps if you switch water sources.
What sanitation and safety equipment should I have beyond cleaning wipes?
In addition to diluted hydrogen peroxide, keep gloves, eye protection when mixing, and a dedicated cleaning cloth or spray bottle so you do not cross-contaminate. If you use electrical devices around water, use GFCI outlets and keep power connections elevated to reduce shock risk.
How do I decide what equipment to buy first if I’m on a tight budget?
Start with the items that determine plant survival and compliance, reflective tent, proper light, ventilation with odor control, and at least one canopy-height climate sensor. After that, add pH and EC testing and the correct nutrient regimen. Buying extras like higher-end grow media or automation before basic environmental control often wastes money.