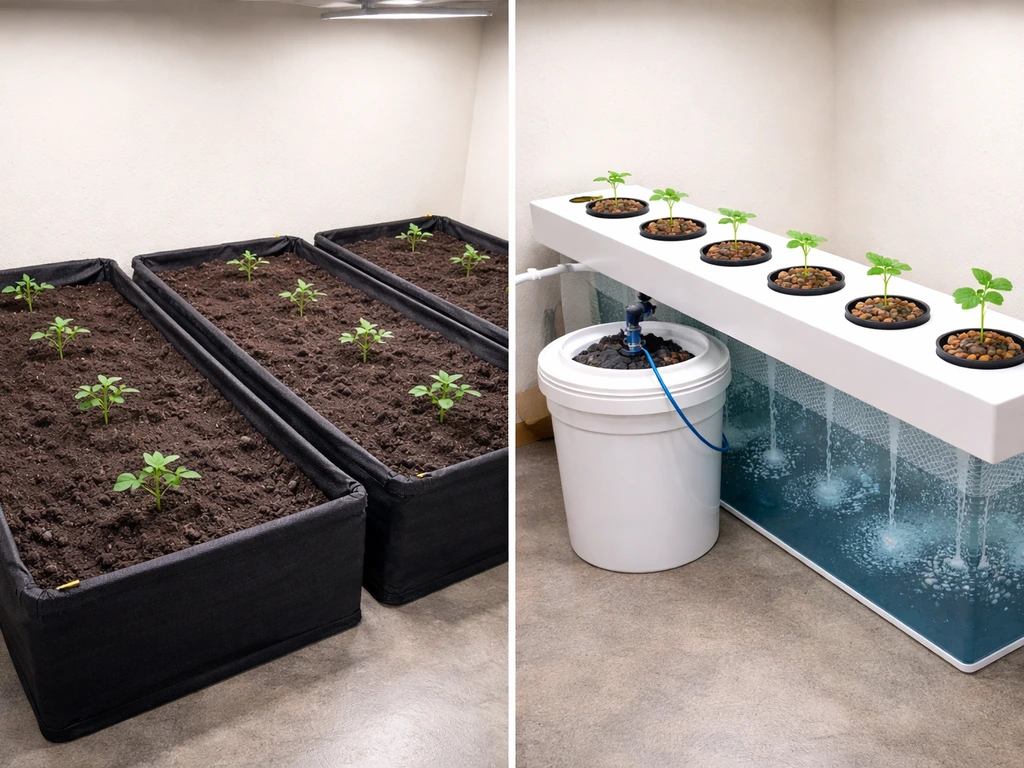
Deep water culture (DWC) is the best hydroponic system for growing weed at home for most people. If you want the step-by-step basics before choosing a bucket, learn how to grow hydroponics with a beginner-focused overview that matches DWC’s learning curve. It delivers fast growth, big yields, and straightforward maintenance without requiring expensive equipment or advanced skills. If you want a single recommendation you can act on today, grab a 5-gallon DWC bucket kit, a quality grow tent, and an LED light rated for your space. That combination outperforms soil in speed and potency for cannabis, and it scales up cleanly when you're ready for more plants. For a deeper dive into the top setup choices, including what makes each option perform well, review our guide to the best hydroponics grow systems.
Best Hydroponic Grow System for Weed: Pick and Set Up

What 'best' actually means for a hydro weed grow
The word 'best' does a lot of heavy lifting in this question. A system that's perfect for a seasoned grower running a 4x8 tent is a nightmare for someone setting up their first grow in a 2x2 closet. When I evaluate a hydroponic system for cannabis specifically, I look at six things: how forgiving it is when something goes wrong, how much hands-on time it demands each week, the ceiling on yield and quality it can realistically hit, how easy it is to control and adjust nutrient levels, whether it fits your space and legal plant count, and how much it costs to run safely over multiple cycles.
Cannabis is a heavy feeder with distinct nutritional needs across vegetative and flowering stages, and it is extremely sensitive to root zone problems. A system that keeps roots consistently oxygenated, maintains stable pH between 5.5 and 6.2, and lets you adjust EC (electrical conductivity) quickly is going to serve you far better than one that simply delivers water. Those are the real criteria, not marketing claims about 'turbo growth' or proprietary reservoir designs.
How the main system types stack up for cannabis
There are five systems you'll seriously consider. Each has a legitimate case for certain grower profiles, but they behave very differently in practice.
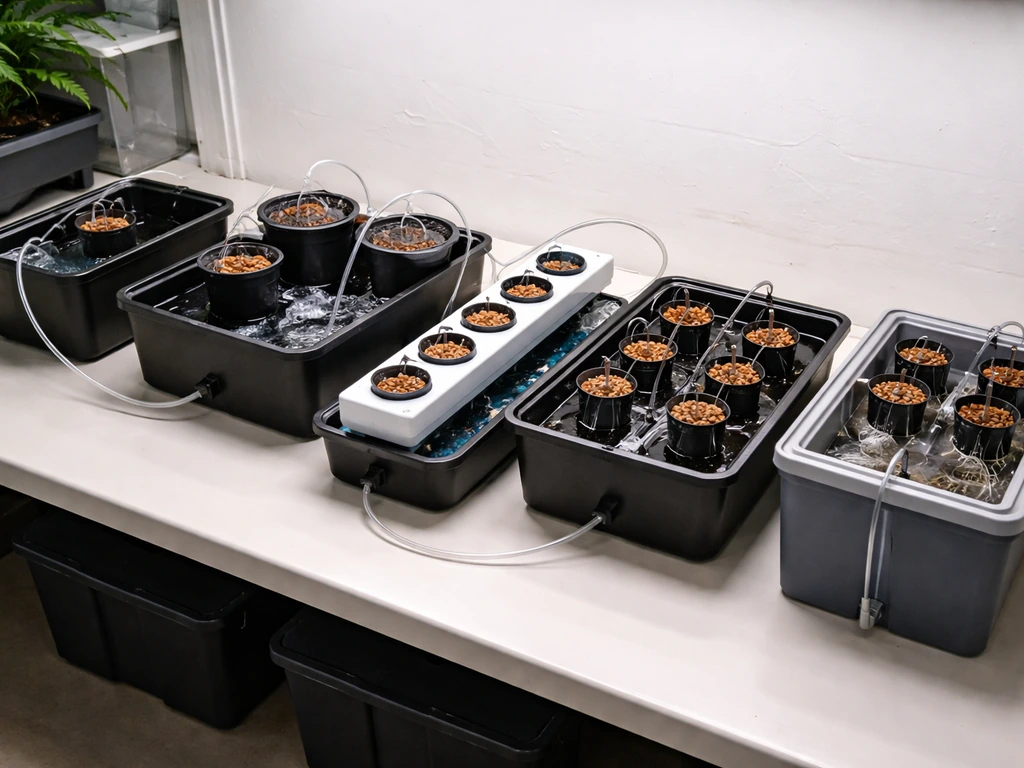
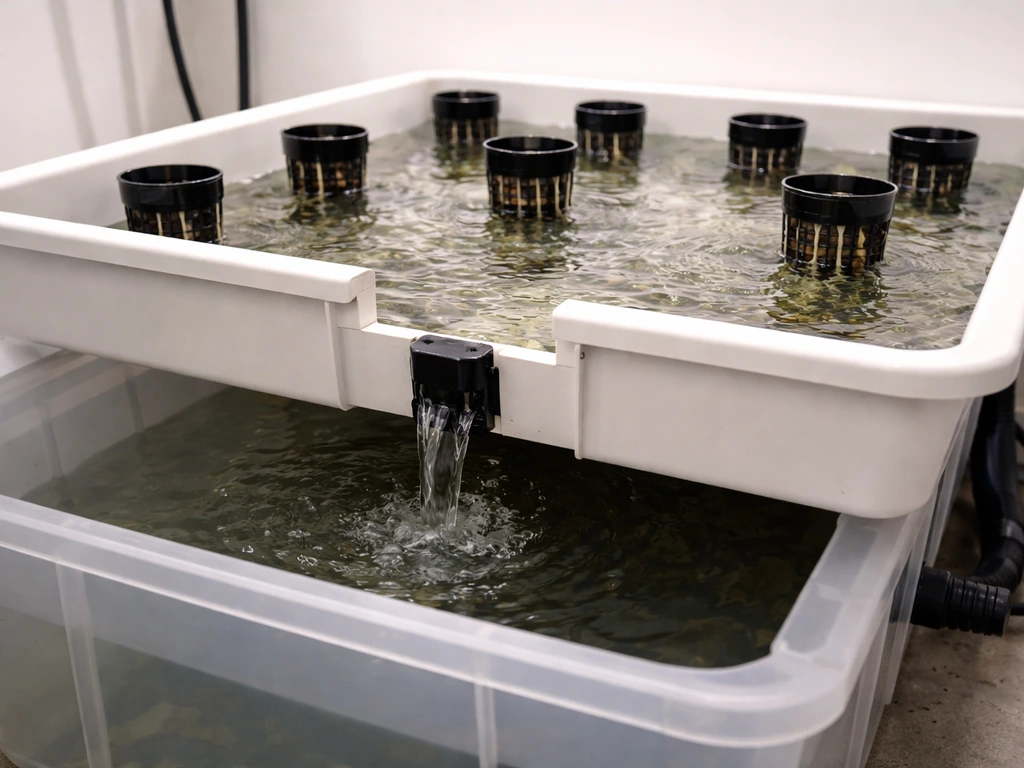
Deep Water Culture (DWC) and Recirculating DWC (RDWC)
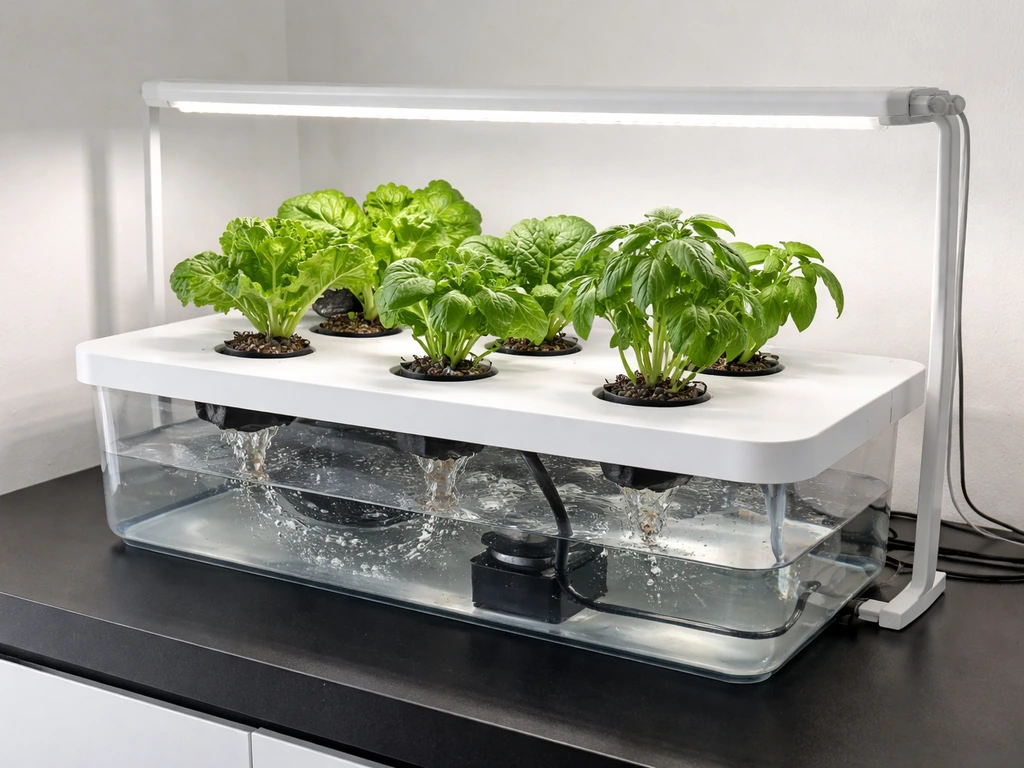
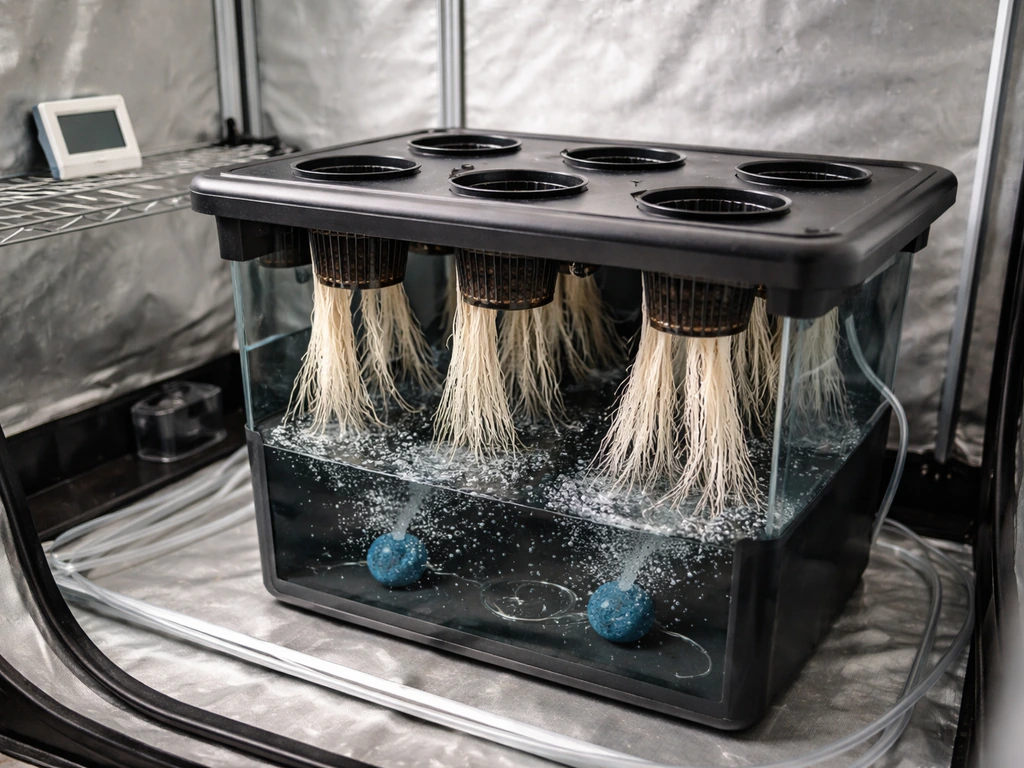
In a DWC setup, each plant sits in a net pot above a reservoir bucket filled with nutrient solution. An air pump and air stones keep the water oxygenated around the clock, and roots hang directly into the solution. Plants grow extremely fast because they have 24/7 access to oxygen-rich nutrients. A single-bucket DWC is one of the cheapest systems to build, and the logic behind it is easy to grasp. RDWC connects multiple buckets to a central reservoir with a pump circulating solution between them, which makes topping off nutrients and monitoring pH much easier at scale. The trade-off is that in RDWC a pH or pathogen problem in the central reservoir affects every plant simultaneously, so your monitoring needs to be consistent.
Nutrient Film Technique (NFT)
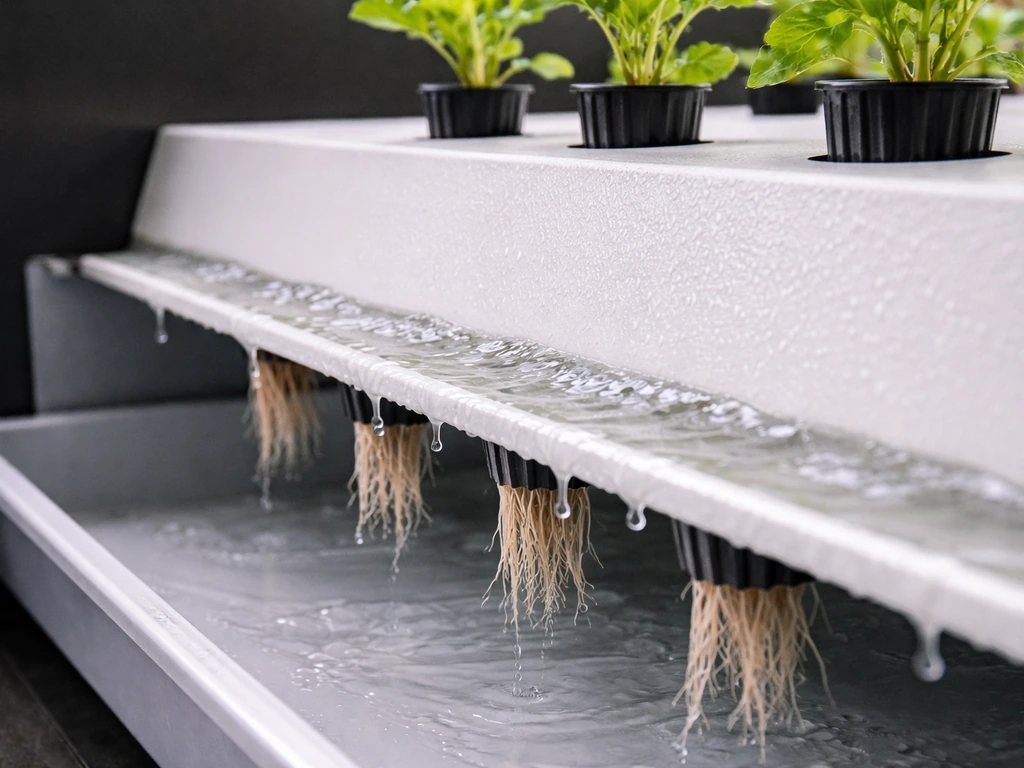
NFT runs a thin, continuous film of nutrient solution through sloped channels, bathing the lower portion of roots while the upper portion stays exposed to air. It is space-efficient and uses less water than most systems, which makes it attractive for smaller operations. The problem with NFT for cannabis is that the shallow root zone and the constant flow mean any pump failure or blockage causes rapid wilting. Cannabis plants also develop large, dense root masses that can eventually clog NFT channels, especially during late flower. It is better suited to leafy greens and herbs than to a plant that spends 8 to 12 weeks in flower.
Drip Systems
Drip systems use a timer-controlled pump to deliver nutrient solution directly to each plant's media through individual drip lines. They are highly scalable and work well in commercial settings. For home cannabis growers, the appeal is that you can grow in a variety of media (coco coir, rockwool, clay pebbles) and dial in feeding schedules with a timer. The downside is that drip emitters clog, especially with organic nutrients, and the lines themselves harbor biofilm over time. Recovery drip systems recirculate runoff back to the reservoir, which is efficient but complicates pH management. Non-recovery (run-to-waste) drip setups are simpler to manage but use more water and nutrients.
Ebb and Flow (Flood and Drain)
Ebb and flow works by flooding a grow tray with nutrient solution on a timer, then blank" rel="noopener noreferrer">letting it drain back to the reservoir through gravity once the pump shuts off. Plants sit in net pots or containers filled with an inert medium. Between floods, roots get excellent oxygen exposure because the medium drains completely. This system is forgiving, flexible (you can move plants around the tray), and good for anyone who wants to grow multiple small plants or try a sea of green approach. blank" rel="noopener noreferrer">Keep your nutrient solution temperature between 65 and 72 degrees Fahrenheit (18 to 22 degrees Celsius) to minimize root disease risk and support nutrient uptake. The main vulnerabilities are timer failure causing either under- or over-flooding, and tray fittings that can leak or clog with root material over time.
Aeroponics
Aeroponics suspends roots in open air and delivers nutrient solution as a fine mist through high-pressure nozzles. When it works, it produces the fastest growth and highest oxygen exposure of any system. When it fails, plants can dehydrate within hours because there is no medium holding any moisture reserve. Nozzles clog easily, and the pumps required are expensive and maintenance-intensive. High-pressure aeroponics in particular demands consistent attention and is not a beginner-friendly choice. Low-pressure aeroponics (sometimes sold as 'aeroponic' systems in budget grow kits) is closer to a basic misting DWC and does not offer the same performance benefits.
| System | Best For | Yield/Quality Ceiling | Failure Risk | Cost to Start | Difficulty |
|---|---|---|---|---|---|
| DWC (single bucket) | Beginners, 1-4 plants | High | Low-Medium | $50-$150/plant | Easy |
| RDWC | Intermediate, 4+ plants | Very High | Medium | $300-$600+ | Intermediate |
| NFT | Small, fast-cycling strains | Medium-High | High | $150-$400 | Intermediate |
| Drip (run-to-waste) | Coco/rockwool growers | High | Medium | $200-$500 | Intermediate |
| Ebb and Flow | SOG, multi-plant flexibility | High | Low-Medium | $150-$400 | Easy-Intermediate |
| Aeroponics (high-pressure) | Advanced, max performance | Highest | High | $500-$1,500+ | Advanced |
Picking the right system for your situation
Rather than pushing one system on everyone, here is how I would match a grower to a system based on three real constraints: skill level, available space, and budget.
Best for beginners: DWC single bucket
If this is your first or second hydro grow, start with a single 5-gallon DWC bucket per plant. The mechanics are transparent, errors are isolated to one plant, and the learning curve is manageable. This is a practical hydroponics grow systems for beginners approach because it keeps setup simple and helps you learn the fundamentals step by step. A 2x2 or 2x4 tent with two to four DWC buckets is an excellent first setup. Budget around $50 to $150 per bucket all-in for a quality kit, or build your own for less.
Best for intermediate growers scaling up: RDWC
Once you have one or two successful DWC cycles under your belt and understand how pH and EC behave over a grow, RDWC is the natural upgrade. A 4-bucket RDWC system in a 4x4 tent lets you manage four plants from a single reservoir top-off point, which saves a significant amount of time during the maintenance-heavy stretch of late veg and early flower. Expect to spend $300 to $600 for a solid complete kit.
Best budget option: DIY DWC or ebb and flow
If budget is the primary constraint, a DIY DWC bucket built from a food-grade 5-gallon bucket, a net pot lid, an air pump, tubing, and air stones costs under $30 per plant to build from scratch. Ebb and flow trays can also be assembled cheaply using a basic flood tray, a small submersible pump, a timer, and clay pebbles. Neither requires proprietary components.
Best for high-control advanced grows: RDWC or drip/coco
Experienced growers chasing maximum control over every variable tend to land on either a well-dialed RDWC system or a recirculating drip setup running coco coir. Both allow precise EC targeting at every stage, respond quickly to adjustments, and produce repeatable results across cycles. Aeroponics is technically the ceiling for oxygen and nutrient delivery, but only invest there if you have the time and budget to manage it properly.
Everything you actually need to run a hydro grow
The system itself is only one part of the equation. Here is the complete equipment picture for a functional indoor hydroponic cannabis setup. For a practical grow guide hydroponic setup, focus on choosing the right system, dialing in pH and EC, and maintaining consistent oxygenation throughout the run.
The core system components
- Hydroponic system (DWC buckets, RDWC kit, flood tray, or drip manifold depending on your choice)
- Reservoir (separate central reservoir for RDWC; bucket is the reservoir in single DWC)
- Air pump rated for your total reservoir volume (aim for at least 1 watt per gallon of nutrient solution)
- Air stones and tubing (replace air stones every 3 to 4 months)
- Submersible water pump (for ebb and flow, drip, or RDWC circulation)
- Net pots and inert growing medium (hydroton/clay pebbles, rockwool cubes, or coco)
- Digital timer (at minimum for flood-and-drain or drip; DWC air pump runs 24/7)
Monitoring and dosing equipment
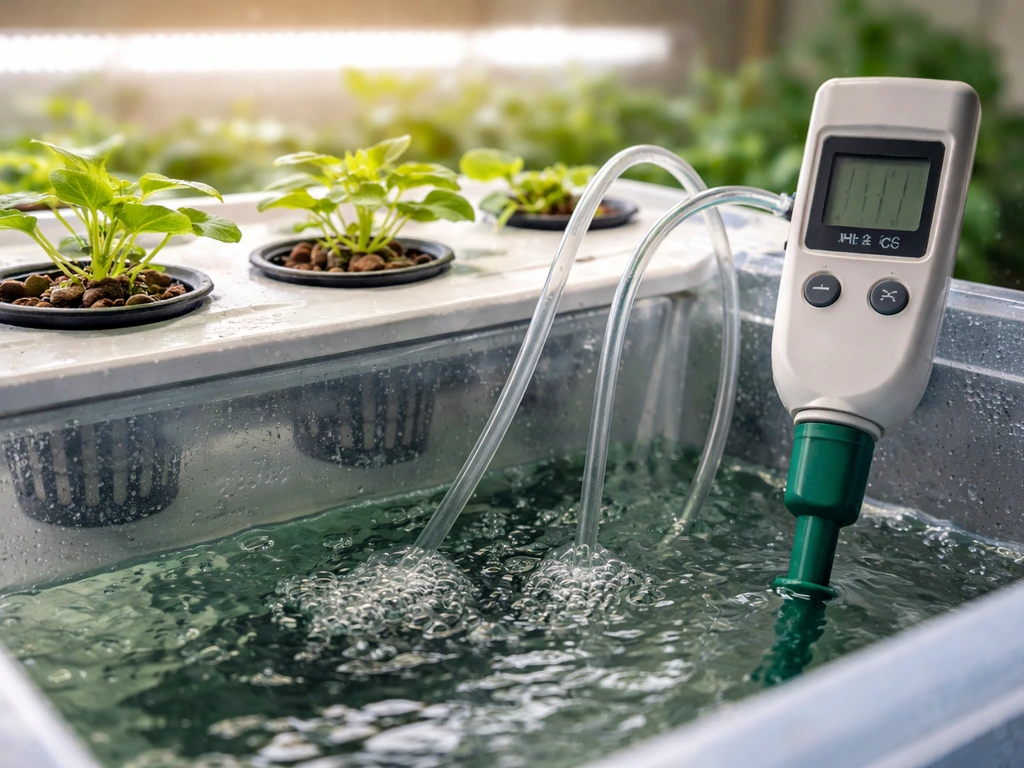
- Combo pH and EC/TDS meter (Bluelab, Apera, or Milwaukee are reliable brands; avoid cheap $10 pens)
- pH up and pH down solutions
- Two-part or three-part hydroponic nutrient line formulated for cannabis (or at minimum separate veg and bloom formulas)
- Calibration solution for pH and EC meters (recalibrate weekly)
- Syringe or measuring cups for accurate nutrient mixing
Environment control
- Grow tent sized to your plant count (a 4x4 handles 4 to 6 plants comfortably in DWC; a 2x2 works for 1 to 2 plants)
- LED grow light sized at roughly 30 to 50 watts of actual draw per square foot (quantum board LEDs are the current standard)
- Inline fan and carbon filter for odor control and fresh air exchange (size the fan to turn over tent air every 1 to 3 minutes)
- Oscillating fan for canopy airflow and stem strengthening
- Thermometer and hygrometer (a combo unit with min/max memory is most useful)
- Aquarium thermometer for nutrient solution temperature
- Water chiller if your reservoir runs above 72°F (22°C), or aquarium heater if it drops below 62°F (17°C)
Safety, support, and extras
- GFCI outlet or surge protector (water and electricity require this)
- Plant trellis net or SCROG net for canopy training (particularly useful in DWC where plants grow fast)
- Silica supplementation (strengthens cell walls and improves heat tolerance)
- Hydrogen peroxide (3% food grade) or beneficial bacteria products for root zone health
- Backup air pump (losing oxygenation for more than a few hours can kill roots)
Setting up and dialing in your system
Setup day is where most mistakes happen, usually from rushing. Take your time on the initial commission and you will save yourself a lot of troubleshooting later.
Step-by-step initial setup
- Set up your tent, hang your light, and run your ventilation before filling any reservoir. Confirm temperatures and humidity hit your targets (70 to 78°F during veg, 65 to 75°F during flower; 50 to 70% relative humidity in veg, 40 to 50% in flower).
- Assemble your system dry and check all fittings, tubing connections, and drainage paths for leaks before adding water.
- Fill your reservoir with pH-neutral water. For a DWC bucket, start with about 2 to 3 gallons per plant site.
- Mix nutrients at seedling/clone strength first: target EC of 0.4 to 0.6 mS/cm for young plants, rising to 1.2 to 1.6 mS/cm through mid-veg, and 1.6 to 2.2 mS/cm in flower. Always add nutrients to water, not water to nutrients.
- Adjust pH to 5.5 to 6.2. In DWC specifically, 5.8 is the most common target. Add pH up or down in small increments, mix thoroughly, and recheck before finalizing.
- Check nutrient solution temperature. Target 65 to 72°F (18 to 22°C). Warmer water holds less dissolved oxygen and invites root rot.
- Confirm your air pump is running and air stones are producing vigorous, even bubbling throughout the reservoir.
- Run the system empty for 24 hours before introducing plants. This lets you verify there are no leaks, pH drifts, or pump issues.
- Transplant seedlings or clones into net pots once their roots are visible. In DWC, position the net pot so the bottom just touches the nutrient solution initially. As roots develop, lower the water level so 1 to 2 inches of air space exists between water surface and net pot.
Ongoing pH, EC, and top-off management
Check pH and EC every day for the first two weeks until you understand how your specific setup drifts. In DWC, pH tends to rise as plants consume nutrients and falls when CO2 levels build up. Top off with plain pH-adjusted water (not full-strength nutrient solution) when the reservoir drops by 10 to 20 percent. Do a complete reservoir change every 7 to 10 days in small systems, or when EC climbs significantly above your target despite adding only water, which signals salt buildup.
Maintenance schedule and troubleshooting common failures
Hydro systems reward consistent, brief attention over occasional deep-clean marathons. A 10-minute daily check prevents 90 percent of the problems that send growers to forums at 2 a.m.
Daily, weekly, and cycle maintenance
| Frequency | Task |
|---|---|
| Daily | Check pH and EC, visually inspect roots and plant health, top off reservoir with pH-adjusted water if needed |
| Daily | Verify air pump is running, check solution temperature, look for any leaks or unusual odors |
| Weekly | Full reservoir change with fresh nutrient solution at updated EC for current growth stage |
| Weekly | Clean any pump filters or screens, rinse residue from reservoir walls, check tubing for biofilm |
| Every 3-4 months | Replace air stones (they lose porosity and flow rate over time) |
| Between cycles | Full system breakdown, scrub with diluted bleach or hydrogen peroxide, rinse thoroughly, let dry before next run |
Root rot
Root rot is the most common and most serious hydro failure. Roots turn from white to brown and slimy, and you will usually smell something foul before you see significant plant stress. The primary cause is warm, poorly oxygenated nutrient solution. Fix it by dropping solution temperature below 70°F, increasing air pump output, and treating with hydrogen peroxide (3 ml of 3% H2O2 per liter of solution) or a beneficial bacteria product like Hydroguard. Keeping a complete reservoir change schedule prevents it from becoming established in the first place.
Algae and biofilm
Algae grows when light reaches nutrient solution. Block every light leak in your reservoir, tubing, and tray. If you see green or brown slime on surfaces that are supposed to be dark, that is your signal to track down the light source. Biofilm in tubing and pump screens is best controlled through regular cleaning and reservoir changes. Running beneficial bacteria in the reservoir makes it harder for pathogenic organisms to get a foothold.
Clogged lines and pump failures
In drip and RDWC systems, lines clog from mineral salt deposits and root intrusion. Flush lines with plain water or a diluted citric acid solution between cycles. Pump failures in any recirculating system are catastrophic, so keep a backup submersible pump on the shelf. For ebb and flow, check the overflow fitting and drain fitting every few weeks to make sure root material has not lodged in them.
pH and EC drift problems
If pH swings more than 0.3 points per day, your plants are likely consuming nutrients faster than expected (common in mid-veg) or you have a bacterial issue affecting the solution chemistry. If EC rises steadily even as you top off with plain water, you have salt accumulation and need a full reservoir flush. If EC drops faster than expected, plants are hungry and you need to bump up your nutrient concentration at the next reservoir change.
Pairing your hydro setup with a solid indoor cannabis grow plan
A great system running a mediocre grow plan still underperforms. Here is how the pieces outside the reservoir fit together.
High-level grow calendar
Hydroponic cannabis grows faster than soil at every stage, but the basic timeline still applies. Germination and seedling stage takes 1 to 2 weeks. Vegetative growth under an 18/6 light schedule runs 3 to 6 weeks depending on desired plant size. Flowering under 12/12 takes 8 to 12 weeks for most strains (autoflowering strains flower on their own schedule regardless of light). Flush the last 1 to 2 weeks before harvest with plain pH-adjusted water to clear residual salts, then harvest, dry for 7 to 14 days, and cure for a minimum of 2 to 4 weeks for best quality. Total seed-to-harvest in hydro for a photoperiod strain runs roughly 12 to 18 weeks depending on how long you veg. Autoflowering strains typically finish in 9 to 11 weeks from seed.
Training approaches that work with hydro systems
Because DWC and RDWC plants grow aggressively, training is essential to keep the canopy manageable and maximize light penetration. Low-stress training (LST) by bending and tying branches outward works well throughout veg and is easy to implement around buckets. A SCROG (screen of green) net placed above the canopy is particularly effective in DWC because it controls the explosive vertical growth during the first two weeks of flower. Topping and FIMing both work well in DWC but be conservative with heavy defoliation since hydro plants are already running fast and do not need extra recovery time. Sea of green (SOG) is a natural fit for ebb and flow setups where you can pack many small plants onto one tray and flip them to flower early.
Strain selection for hydro grows
Not every strain is equally suited to hydro. Sativa-dominant strains that stretch dramatically in flower can become difficult to manage in DWC without significant training infrastructure. For first-time hydro growers, indica-dominant or balanced hybrid strains with moderate stretch (50 to 100 percent height increase from flip) are easier to control. Autoflowering strains are a great match for DWC beginners because the shorter cycle means less time for problems to develop. If you do want to run a tall, stretchy strain, have your SCROG net in place before the flip and be ready to tuck aggressively for the first three weeks of flower.
Pest and disease prevention in an indoor hydro setup
Hydroponic grows eliminate soil-borne pests but introduce their own vulnerabilities. Fungus gnats are rare in true hydro (no soil to lay eggs in), but spider mites, thrips, and aphids can still arrive on clones or clothing. Inspect new clones carefully before they enter your tent, quarantine them for a few days if possible, and keep tent entry clothing consistent. Powdery mildew is the primary disease threat in an indoor cannabis environment and is driven by high humidity and poor airflow: keep relative humidity below 50 percent in flower and run your oscillating fan to prevent stagnant air pockets in the canopy. Pythium (root rot) in the reservoir, as covered above, is your biggest disease risk specific to hydro.
If you want to go deeper on the principles behind hydroponic growing, how soil compares to hydro across a full grow cycle, or how to build a complete week-by-week grow calendar, those topics connect naturally to everything covered here and are worth exploring as you develop your system and technique. If you want a structured starting point, a best hydroponic grow book can help you learn the fundamentals and dial in your system faster. If you are deciding between hydroponic vs soil grow for cannabis, it helps to compare speed, risk, and the day-to-day effort each approach requires.
FAQ
What’s the simplest “best hydroponic grow system for weed” setup if I only want one plant?
A single-plant 5-gallon DWC bucket kit is usually the simplest. Keep one reservoir per plant so a pH, EC, or root-zone issue stays isolated, and choose a net pot lid that seals tightly to prevent nutrient solution splashing into the tent.
How do I choose between DWC and RDWC if I’m upgrading from my first grow?
Pick DWC first if you want troubleshooting to be localized. Upgrade to RDWC when you can reliably log daily pH and EC without missing days, because a problem in the central reservoir affects every bucket at once.
Is NFT actually worth considering for cannabis, or should I skip it?
For cannabis, NFT is usually a higher-risk choice. If you do try it anyway, run it only with very short flowering cycles or consider very aggressive maintenance to prevent channel blockage, because late-flower root mass can clog channels quickly.
What pump and air stone setup prevents root issues in DWC?
Use an air pump sized for continuous, high-output oxygenation, not a “bare minimum” pump. Place the air stone so bubbles rise across the roots, and avoid creating dead zones in the reservoir where dissolved oxygen drops.
How often should I change the reservoir in small DWC setups?
In small systems, a full change every 7 to 10 days is a common baseline, but use your EC and pH behavior as the trigger. If EC climbs despite topping with plain pH-adjusted water, salts are accumulating and you should replace sooner.
Do I need to clean my reservoirs more often than the scheduled changes?
Yes, at least do targeted spot cleaning. If you see biofilm lines forming in tubing or around fittings, cleaning those components before the next full change can prevent more aggressive outbreaks of slime and root-zone stress.
What EC and pH targets should I use for cannabis in hydro?
Instead of one fixed number, treat your targets as a range that you verify at the start of each reservoir. Use the same measurement method every day, and when you see pH swings greater than about 0.3 per day, stop guessing and check whether consumption or a solution biology issue is driving the change.
How can I tell if my pH swing is normal plant behavior or a real problem?
If pH drifts gradually in line with normal plant growth, that’s often consumption-related. If pH changes are abrupt, accompanied by EC instability or root slime, assume a chemistry or pathogen issue and do a reservoir change plus deeper inspection of oxygenation and temperature.
What’s the fastest way to diagnose root rot risk in hydro?
Check the root color and smell and immediately measure solution temperature. Warm nutrient solution combined with weak oxygenation is the usual trigger, so tightening temperature below 70°F and increasing air output should be your first corrective actions.
Why does my EC rise even when I only top off with water?
EC rise usually means evaporation or concentration plus salt buildup. If you top off with plain water but EC climbs steadily, you likely need a full reservoir flush rather than continued top-ups.
What’s the most common cause of drip emitter clogs in home cannabis grows?
Mineral salt deposits and biofilm, especially when using certain nutrient formulations or not flushing lines between cycles. If you use drip, plan to flush lines during downtime and consider the difference between recirculating (more control, more pH complexity) and run-to-waste (simpler, more water use).
How do I reduce pump failure risk in recirculating systems?
Keep a backup submersible pump and be ready to swap quickly. Also ensure tubing is properly routed so it doesn’t pinch, and periodically inspect fittings for partial blockages, since pump strain can lead to more failures.
What’s the most important environmental setting to prevent mildew in indoor hydro?
Humidity and airflow. Aim to keep relative humidity under about 50% during flower and run consistent oscillating airflow so air reaches canopy corners, where stagnant pockets are most likely to trigger powdery mildew.
Can I use beneficial bacteria in hydro without messing up my pH readings?
Beneficial bacteria can help reduce pathogenic footholds, but they do not eliminate the need for daily pH and EC checks. Expect minor biological effects on water chemistry, so evaluate after changes by monitoring trends rather than single readings.
When should I choose training methods like SCROG versus LST in a hydro system?
Use SCROG if you want to manage the fast vertical stretch during the first part of flower, especially in DWC where plants can grow aggressively. Use LST when you want flexible, low-effort control around buckets, and deploy it earlier to avoid stressing branches during rapid growth.
Which strain types are easiest for first-time hydro growers?
Indica-dominant or balanced hybrids with moderate stretch are usually easier because they don’t require extreme canopy management. Autoflowers can also be forgiving because the shorter cycle reduces the time window for system issues to compound.
What’s the safest way to set up lighting for a DWC tent without overheating the reservoir?
Match your LED output to your tent size and keep an eye on reservoir temperature, not just air temperature. If the reservoir drifts warmer than your target (roughly keeping it under 70°F), root rot risk rises even if your lights are otherwise “the right wattage.”
How should I “flush” before harvest in hydro to avoid residual salts?
Flush with plain, pH-adjusted water during the last 1 to 2 weeks to clear residual salts, then proceed to drying and curing as planned. Skipping the water-only period often leads to lingering nutrient compounds even if plants look healthy at harvest.
What should I log daily to catch issues early in hydro?
At minimum, log pH, EC, reservoir level, and a quick visual root check. Daily attention for a short time catches most problems before they escalate into root slime, pump-related oxygen loss, or severe chemistry swings.